Hello, I have been driving my self mad!
I have an environmental lighting picture.
A model that I want lit by that texture.
I want the texture as my background WITH shadows from my model on it.
How do you do it?
One big problem is that I need the environmental lighting to me much brighter but at the same time that same texture is the background and I don’t want that really contrasty and bright.
PS I have a shadow plane under the model but can’t get it all to work out.
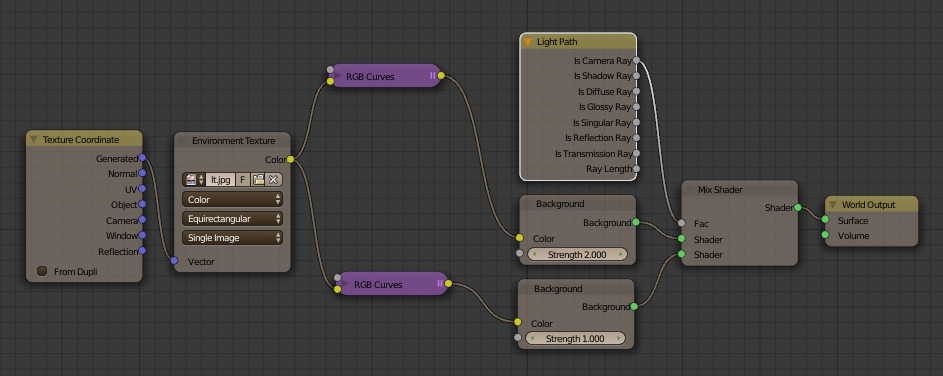
With this node tree, the camera sees the texture differently from what is used to light the scene. In other words, you can tune the lighting to add more contrast and more power without changing the background which will be seen in the render.
If you want to keep the environmental texture the same than what is seen by the camera in other situations, like for the reflections, for example, use a Math node (or several) to add all the outputs from the Light Path node that you need.
And if tuning the environmental texture isn’t enough, just add emitting planes in front of the brightest areas. Set them invisible to the camera and that’s it. (Object tab, Ray Visibility panel.)
Now, projecting shadows… That’s even more simple: No can do! The environment texture isn’t an object. Besides, since it represents some 3D environment beyond the real objects, Blender would have to re-build the geometry of what you see. I think you’ll have to wait a few years before to see the needed AI in Blender…
I saw a very impressive add-on capable of re-building the geometry from a flat image… with some help. But, even with its help, it would be tricky to re-position the generated objects so that they occlude perfectly their counterparts on the environment texture. Not totally impossible but you’ll have to feed a lot of energy bars to your OCD secondary personality.
Thank you very much! That takes care of half of the problem.
It is possible to cast the shadows. It is done with movies in blender and I have done it in the internal renderer.
What we need is a plane under the feet of the model that “catches”, the shadows and is alpha on the rest of it. This is then blender with the background and given that the background is the light, you end up with good shadows over the background texture. Now how to do this in cycles is a bit of a mystery. But I think I can solve that half. We will see!
Thanks again!