Hey RLGUY! The Sheeting feature in the newest build is awesome! Great job on that. I really grateful for the hard work you put into this as it’s solved many of the problems I was previously having.
I have another question. Is it possible to specify a limited range for the simulation? I’ve got a water splash animation test set up using a simple drop falling from the top of the domain into a shallow pool of water that fills the bottom of the domain. To get the exaggerated splash, I’m using a time of 0.1. I’ve got Surface Tension and Sheeting on.
At a resolution of 65, I get a small, barely noticeable ripple. At a resolution of 150, I get a decent but small splash. At a resolution above 200, I get a fairly pronounced splash, however at this resolution, the simulation is very slow and most of that time is just waiting for the water drop to go from the top of the domain to the bottom of the domain.
Since my speed is set to 0.1, I have to calculate 300 frames of the water drop before it gets to the surface. What I’d like to do is start my simulation at frame 280, just before the water drop hits the water surface, thereby skipping the unnecessary frames before that.
I know that I can change the water drop’s Trigger time, but there’s no way to define a negative value here. So I can’t tell the water drop to start at frame -280 so that at frame 0, the water drop is already close to the surface. And if I set the trigger to anything other than 0, it simply offsets when the water emits, which delays the time further.
The fluid simulator will bake the frame range specified in the timeline start/end values. There is a limitation that the range cannot start or end at a negative frame value. These values must be equal to or greater than 0. The trigger values also cannot be negative.
Perhaps I am misunderstanding what you wrote. I’ll describe my workflow for this type of simulation in case it helps:
Set the fluid droplet as a rigid body object to simulate the falling drop
Bake the rigid body cache so that the object falls under gravity
Set the timeline start frame to right before the rigid body hits the domain water. In this example, this was frame 33
Set the fluid object as a FLIP Fluid type object
Enable Add Object Velocity to Fluid. This will cause the fluid object to inherit the velocity from the rigid body object. So when the object is triggered on the start frame, the fluid velocity will match the falling velocity.
Enable Export Animated Mesh. This needs to be checked for the addon to export the animation of the rigid body object.
Here is an animation of what this setup looks like after simulation. The fluid simulation begins at frame 33, so there is no time wasted computing previous frames.
Also attached is a .blend file of this setup: falling_drop.blend (910.9 KB)
Some notes on this workflow:
Since this workflow requires both rigid body and fluid simulation, you will need to make sure that both physics systems match in timing and scale for results to be accurate. This means that you should not use the world scaling feature in FLIP Fluids because this will cause a scale mismatch between the fluid and rigid body. You should set the timing/framerate to be the same for the rigid body simulation and fluid simulation
This can make rendering more difficult since you will need to render the falling rigid body as a fluid before the fluid simulation starts.
Ryan, WATCH THE ADDENDUM!! Posting it in the next minutes. I forgot to make sure the displacement only effected near the surface of the water and not above or below. You’ll see what I mean I’m sure. Yuck. I thought I had this down. It’s so complicated!
You can isolate the surface or whitewater particles for rendering by hiding the objects from rendering int he outliner or by setting what fluid meshes are loaded in the FLIP Fluid Display Panel. You can set ‘Surface Render Display’ to ‘None’ which will prevent the addon from loading the surface mesh. You can also set the percentage of the foam/bubble/spray to 0% to prevent these from loading.
I am not familiar with any techniques to composite these when rendered separately, or how these would be combined using the Blender compositor or an outside compositing software. This is an area of Blender/vfx that I am not at all familiar with.
Hi,
You have a various options depending on how you are going to use use the images.
3 of those options are
Do what RLGUY says and effectively disable rendering of either the surface or the whitewater and render both seperately but…
That will be pretty hard to composite together as some of the whitewater could be below the surface of the water but you won’t that unless you also have depth/world/Z so you will need to generate that. The problem here though is refraction to under surface whitewater won’t be taken into account.
Alternatively if you are only concerned with whitewater above the water surface you can put the whitewater and surface into different layers and render the whitewater layer with the layer with the surface as a mask. That should be fairly easy to composite but of course you lose anything under the surface.
You could also investigate the cryptomatte to see if that will give you the information you need, however I have not used it to comment on how it works (if at all) with refraction etc.
Here’s a bit of a weird high viscosity experiment! The sheeting feature was enabled to help give a stretchier look by filling in particles as the fluid stretches. A side effect of this is that the fluid increases in mass over the course of the simulation.
This was my first try at experimenting with dynamic paint for wetmap generation and was quite easy to set up. The fluid surface was set to a dynamic paint brush and a floor plane was set as the canvas. I followed this tutorial from CGC Weekly: Creating Realistic Wetmaps in Blender.
Aaaaand FLIP Fluids is now on Instagram! You may find our very new very hip account here @flip.fluids. We’ll be posting animations there as well as on our Twitter and Facebook Page.
Could perhaps be used for a ‘whipped’ effect or similar. If you change the material over time to a more opaque and lighter coloured version it might look like you beat some air into the mixture
so i am currently finishing project with flipfluid, sadly i will move to another system once this project is done. the simulation time is killing and just takes ages, the fact that there is no network support for calculation is something which has been a roadblock for us during this project, the product is great for small jobs, but sadly it cant handle large productions. still i give it a 5/5
Sorry to hear that it is not working out for your production, but thank you for trying out the simulator. If you’re looking for distributed simulation, check out SideFX Houdini FLIP or RealFlow if you have not already. As far as I know 3ds Max Fluids, Maya BiFrost and PhoenixFD do not support network computing yet.
Here’s a case where the fluid decreases. Resolution 180, Subdivisions 2, no whitewater, Viscosity 0.2, Surface Tension 0.25, 75%, 0%, Sheeting 0.5, 0.1, Frame Substeps 4, Adaptive Time Stepping for Obstacles on.
I bought it just to support development, for me it is still missing basic things like forces … I saw some nice sheeting fluid sims with colours in render. Is it uv based ? Are there any plans for uv support?
Is it possible to adjust the start frame of a Flip Fluid simulation after baking? For example I was hoping I could find key frames for the FlipMeshes in the dope sheet and adjust the start frame there.
At first I was planning to export multiple individual fluid sims alembic and import into the final scene file to build the project with multiple fluid sims but starting at different frames. I’ve been using Blender 2.8 and export alembic doesn’t seem to work. That’s fine I can do the sims in 2.79 and export. I still run into the issue of changing the start frames for the sims once I get them all in the same scene though.
Thanks for the support! Support for Blender force fields is in progress and will likely be the next large feature added to the addon. The colors in the sheeting animation we’re created through a material using the noise texture and colour ramp nodes. An example .blend file for this scene can be found in the product downloads: flip_text_sheeting_splash.blend.
Support for UV mapping and UV texture simulation/advection will not likely be added due to complexity. We do plan to add features for mixing colours/materials through simulation in a future update.
This can be done by setting the playback frame offset in the FLIP Fluids toolbox menu. Note: if using Blender 2.80, the toolbox was added in the latest version (v9.0.5.3)
Hi, I can’t get version 9.0.5.3 sim result to be exported to alembic format. the smooth modifier method doesn’t work. Is there any solution get the sim result to be in alembic? Please help.
Oh no! I tried out the latest Blender 2.80 and it looks like the alembic export workaround no longer works. I’ll look into this and see if there are any other workarounds in 2.80 and perhaps contact the Blender developers. We’ll eventually add our own Alembic exporter to the addon because the Blender version is a bit limited/slow/unpredictable, but this could be a while as this is a large task to undertake.
A workaround is to create a new file in Blender 2.79, create a domain and set the cache directory to the directory that you use in your 2.80 file, then export to Alembic through 2.79. This seems to work for me, but I have heard that importing a .abc created in 2.79 into 2.80 can be buggy.
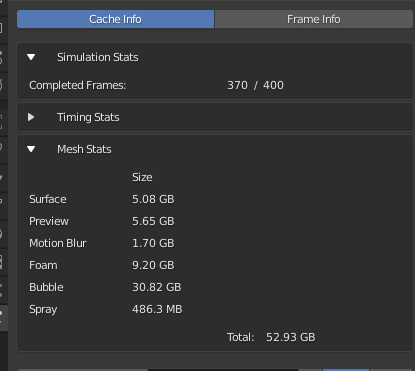
Hello, I’ve been trying to render this fairly large simulation for a couple of days now on blender 2.80, it has all of the new features enabled, sheeting & surface tension, it was rendering fine until i started l reaching frame 80,81,82 etc, it started to take a hour per frame or completely freeze my pc, not to render, but to do the pre render stuff like synchronize objects, I’m using a gtx 1070 graphic card and a i5-4670k 3.4 GHZ cpu with 8GB of RAM, so my question is what can I do to optimize the pre render stuff like synchronize objects loading etc?
i thought moving the cache to my ssd would help because my hdd is quite slow, but i couldn’t find space in my ssd, i ordered a 1tp ssd from Amazon and a 32gb ram kit, i hope that would help with making better sims, also a side question, does the whole sim cache need to fit in the RAM or VRAM
Here are some tips for rendering large or high geometry scenes and what could be causing these problems:
Try rendering from the command line
The best way to render high geometry or intense scenes in Blender is through the command line. I highly recommend this for long renders. Command line rendering is incredibly stable, can render quicker, and does not need to load and manage the Blender UI which can be unstable with high amounts of geometry. Here is our documentation for how to do this: https://github.com/rlguy/Blender-FLIP-Fluids/wiki/Rendering-from-the-Command-Line
Personally I do not recommend rendering fluid simulations in Blender using motion blur due to the incredibly long render times and increased time that is needed for Cycles to synchronize/build the render. Due to the workaround we have to use to get motion blur data into Cycles, rendering can be unstable/buggy. Using too much motion blur in the Cycles render settings can also increase the time for Cycles to set up the render.
My preferred method of motion blur is to add it in post processing. For example using After Effects or Davinci Resolve. But this may not be ideal in all types of renders.
Too much whitewater geometry
By default, the addon will render each particle as an icosphere with 1 subdivision (20 faces). This will create a lot of triangles. One way to reduce geometry is to use a custom object for the particle in the FLIP Fluid Display Settings. For example, you might be able to get away with using a cube, or even just a triangle if the particles are rendered small enough.
Another way to reduce geometry is to render less particles. You can set the percentage of whitewater or foam/bubble/spray particles individually in the display panel. Often there are a lot of bubble particles compared to foam/spray, so reducing the percentage of bubbles rendered can greatly reduce amount of geometry.
Running out of VRAM
I do not think this is a problem in your scene. Usually running out of GPU VRAM will result in a crash or and error message.
In my experience, it takes a lot of VRAM to render particles. My limit on a GTX 1070 8GB is around 6 to 10 million particles depending on whether my scene has other high geometry or large textures loaded.
I don’t think that using an SSD vs a HDD is a problem for rendering. By the time Cycles starts synchronizing or setting up the render all of the data for the frame is already loaded into Blender.
Using an SSD for faster write speeds can benefit simulation times when writing the fluid data to the cache. During the beta we saw that for large simulations, just writing the simulation data to a HDD instead of an SSD could account for an extra hour of simulation time.
The addon only loads the data needed for the current frame and deletes unneeded data when changing frames. The cache files for a frame might be 100MB on disk, but when loaded into Blender this amount can expand to over 10x times the size in RAM. You will only need enough RAM/VRAM to render the current frame. I do not think there is a simple way to find out how much VRAM or RAM a render will require.