That’s awesome, thanks for sharing! I’ve posted the link to our Twitter and Facebook accounts.
1 Like
Our weekly development notes covering March 9th - 13th has been posted: Weekly Development Notes #12 – Surface Force Fields
Weekly Development Notes #12 – Surface Force Fields
Covering the week of March 9th – 13th, 2020.
Hello! This is Ryan here with the 12th weekly development update of the FLIP Fluids addon for Blender! Last week mostly involved fixing and investigating bugs related to our work in progress force fields feature.
Now that FLIP Fluids version 1.0.8 has been released, I have so much more time to get back to work on force field development! The next addon version 1.0.9 will include our force field feature and is set to be released in June or July. In this post, I’ll be covering one of the most requested force field modes: surface forces.
Surface Forces
Our surface force mode generates a force field around an object in the direction of the object’s surface normals. This mode has the effect of drawing fluid towards an object’s surface. Surface forces are not a force field mode available in Blender’s built-in simulation tools, but they have some interesting applications in fluid simulation.
Here is an example animation where surface forces are used on an object that has been twisted 180 degrees. This creates an effect as if the direction of gravity has been warped along the path.
https://gfycat.com/tatteredrevolvinghornedviper
Here is a test where the surface force is aligned to the shape of a pyramid and base:
https://gfycat.com/frighteneddifferentasiantrumpetfish
A useful application of surface forces are in helping liquid stick to an object. Getting fluid to stick effectively on an object in a FLIP simulator can be a struggle, especially if the object is a moving target. You will often find that over time, thin liquid layers peel off of the object unnaturally. Surface force fields can help in this situation by pulling in fluid towards the objects surface to prevent the fluid from falling off. This is a common trick when using a FLIP based simulator.
Here is a comparison of three force strengths pulling fluid against a moving curved surface. In these examples, the strengths are measured in terms of earths gravity of 9.81 m/s^2. In the first example on the left, there is no surface force (0.0g) applied.
https://gfycat.com/fittingtornchicken
Higher resolution comparison can be found on our Facebook Page.
Before I left for the weekend, all three simulations as well as all six renders in this comparison were started and run simultaneously and all completed in under 2 hours! I was worried, but glad I didn’t experience any crashes.
Continuing surface force field development
The surface force field mode is still a work in progress and some issues need to be solved until I would consider it to be stable, usable, and reliable enough for release. Current issues:
- It can be slow to compute. The calculations involved are computationally intense and requires computing a signed distance field (SDF). An SDF is a grid where each point stores the distance to the closest point on an objects surface where positive values denote points outside of the surface and negative values denote points inside of the surface. This data allows us to efficiently compute the vector towards the closes point on the surface at any point in the grid. It can be quick to compute for a narrow band that is within a small distance near the object surface. But if the SDF needs to be computed further away from the object, or computed over the entire grid, this can be very slow.
- Due to the possibility of this computation becoming very slow, I’ve tested out some quick approximations during last week. It works well for many situations, but can become unstable if the object contains complex geometry. This may be caused by a bug in my implementation, or a limitation of the approximation. I’ll need to investigate this during the upcoming week.
- There is a possibility for this type of SDF computation to be highly parallelizable. This means that it could be suitable for GPU acceleration! This is something that I’ll also need to investigate. GPU acceleration can be a bit time consuming and complex for programming, so if this is a possibility, it may need to wait until after the initial force fields features are released.
The surface force field feature has been one of the more complex and time consuming force field modes to develop, but the computations in this mode also apply to another popular force field request: suction forces that fill an objects volume with fluid. This is similar to Control objects in the older Blender Elbeem simulator.
Other popular force field mode requests are curve guided forces, vortex/whirlpool forces, and turbulence forces. These are much simpler to implement and quick to compute.
Precision editing for viscosity and surface tension values
The viscosity and surface tension values are dependent on the physical scale of the simulation. For example a single viscosity value will appear thicker in a smaller scale domain than a larger scale domain. For this reason, the viscosity and surface tension values can become difficult to edit at small scales due to lack of precision. For small adjustments, dragging your mouse on the parameter can increment or decrement the value by too large of an amount.
A recommendation to solve this issue was to add an exponent value to these settings as a way to simplify precision editing for small values. This is the system that the Blender Elbeem and Mantaflow simulators for adjusting viscosity.
The viscosity and surface tension values will be comprised of two components: the base value and the exponent value. With these values, the formula for computing the total viscosity is:
total_viscosity = base * 10^(-exponent)
For example, if the base and exponent are set to 5.0 and 3, the resulting viscosity will be:
5.0 * 10^-3 = 0.005
We will be setting the default exponent to 0 so that this added parameter will not affect compatibility with older .blend files (10^0 = 1). We will also be adding some tweaks to the UI that will make editing and understanding this value easier compared to Blender’s system:
- The UI will display the resulting total viscosity so that you don’t need to compute this in your head.
- When changing the exponent, the base value will be automatically updated so that the total viscosity remains equal. This allows you to seamlessly switch between exponent precision without needing to re-compute the value yourself. Need more precision? Simply increase the exponent and continue editing the base value.

6 Likes
The surface force thing sounds somewhat like the old blender fluid’s control object.
Hello @RLGUY
I want to suggest an improvement. Can you add the ability to indicate the randomness of the parameters? For example, the ability to specify a random direction of fluid flow. At the moment, the fluid is behaving too orderly. The fluid flow has no turbulence. I would like to be able to make the fluid flow more chaotic. It is necessary to make each particle have a unique Initial Velocity value. Here is a picture that explains this:

That is, you indicate the direction of Initial Velocity, and using the randomization parameter, this value is specified from a certain range. That is, each particle receives a unique velocity value. If you specify a value of 360 degrees, the source of the liquid will emit particles in all directions. I would also like to be able to randomize the value of friction for obstacles. To make the flow more vortex in contact with obstacles.
And I also have a suggestion:
can you make it possible to control the number of particles without changing the domain resolution? In Mantaflow, you can increase the amount of fluid particles without changing the resolution. And you can also do so that the resolution of the mesh can be specified in an arbitrary value. For example, the simulation resolution is 200, and the mesh resolution is 250.
I started a command-line baking. I need to pause/stop it and resume later.
How do i do that without corrupting anything. In the GUI there is a button for it but in CMD ?
edit
Seems it worked fine closing the window. Didnt loose any frames so i guess there is no need to stop the process before closing ?
Thanks for the suggestions, I’ll test some things out and should be able to get back to you during next week!
One question: In your experience, what effect does changing the number of fluid particles have ion the simulation in Mantaflow? I have not tested this in Mantaflow or in our FLIP Fluids simulator.
In the latest version (v1.0.8), you should be able to close the command line baking at any time by closing the window or ending the process in a task/process manager. If the last frame ends up corrupted, the simulator should resume from the previous frame.
If using an older version, in the small chance that a frame becomes corrupted, you may lose the last 50 frames. By default, the simulator saves the state every 50 frames.
Great, I was using 1.0.8.
I only lost the frame it was working i think.
Anyway i like the commandline bake/render functionality. Feels more stable and performance optimised.
@RLGUY you need to control the number of particles in order to increase the detail of the fluid, without a strong memory consumption. I saw this opportunity in the fluid-engine-dev simulator (Doyub Kim). At the moment, in the FLIP Fluids simulator, the fluid is quite predictable, since the particle density in all simulations is the same and particle density cannot be controlled. If the grid resolution is 30x30x30, then the number of particles will be low, but if it is possible to change the number of particles, it will be possible to make a smooth fluid flow at a resolution of 30x30x30. I do not know all the technical subtleties of the FLIP simulator, perhaps this does not make sense. I saw this feature in another simulator and thought it would be nice to have the same feature in FLIP Fluids. In the Doyub Kim simulator, you can specify the number of particles individually for each fluid source. That is, the resulting simulator supports a variable particle radius. As far as I know, a voxel grid is used to determine pressure and velocity. But one could indicate a low resolution of the grid, and increase the number of particles. As a result, you sacrifice the amount of data on speeds and pressure, but increase the number of particles. Thus, more smooth fluid flows and more ordered ones are obtained at the output.
Thanks for the input and suggestions! I didn’t get a chance to test any of them and I’ll likely be busy with other development this week. I’ll have to add this testing to a todo list for the future.
I have a thought on the random direction: I haven’t tried this yet, but the result could be quite chaotic/noisy at high resolutions. An inflow may be emitting tens of thousands of particles per frame and if each emitted particle has a random and varied direction, it might not work out very well in the simulator and result in odd behavior. If this does not work out, it might be better to randomly vary the driection based on a smooth 3D noise texture. This could help smooth out the changing directions based on particle location.
1 Like
Our weekly development notes covering March 16th - 20th has been posted: Weekly Development Notes #13 – Visualizing Force Fields.

Weekly Development Notes #13 – Visualizing Force Fields
Covering the week of March 16th – 20th, 2020.
Hello, everyone! This is Ryan and here is our 13th weekly development update for the FLIP Fluids addon for Blender! Last week’s development mostly involved improving stability and performance of our work-in-progress force field feature and catching edge-case bugs related to force fields.
In this post I’ll be covering visual debugging and our new tutorial series for Blender 2.8.
Visual Debugging
I’ve always been a huge fan of using and creating visual tools for debugging during development! I started getting interested in programming with game development and one of the best tips I read was to visualize everything you can. When working out a difficult programming issue or bug, sometimes it helps to be able to see the issue by displaying visual data on the screen. When working with computer graphics, developing visual tools to help debug problems can be incredibly helpful!
Grid and Obstacle Debugging
The FLIP Fluids addon has a few built-in debugging tools that I use all of the time, and they can be helpful to you too. In the FLIP Fluid Debug panel (documentation), you will find a few tools to visualize internal data of the simulation. The two that I use the most are the grid display tool and the obstacle debugging tool:
- Display Grid – Enable this option to display the simulation grid within the 3d viewport. The FLIP Fluids simulator is a grid based simulator where many calculations are run on a 3d grid of voxels. A voxel can be thought of as a 3d pixel, and a size of a voxel is the smallest amount of detail that can be resolved within the simulation. This is similar to how a 2d pixel is the smallest amount of visual detail in an image. Enabling and visualizing the grid can help you understand how the grid works, how voxel size is related to resolution, and how the grid changes as you change the size of your domain.
- Obstacle Debugging – Enable this option before baking to visualize how the simulator ‘understands’ your obstacle objects. The simulator converts your obstacle geometry into voxel data that is useful for many of the physics calculations. Obstacle geometry must be closed/watertight/manifold in order to be accurately converted into voxel data. By enabling this option, the simulator will generate a visualization of your obstacles within the simulator during baking. This can help you check if the geometry is being processed correctly.
To learn more about how to use these tools, check out the first tip in our 10 Tips to Improve Your FLIP Fluids Workflow in Blender article and video.
Force Field Debugging
During force field development, I have been creating a little tool to help visualize force field lines. This has been very useful with helping me make sure what I am programming is correct and has helped identify many bugs. This debugging feature will also be available for you to use!
Here are a few examples for how our force field debugging tool is looking during development:
https://gfycat.com/nervoussphericalbandicoot
New tutorial series: FLIP Fluids addon | The Complete Guide
The FLIP Fluids addon was released in May 2018 when the latest version of Blender was 2.79. Most of the tutorials in our first series are using this version and are now out of date. Blender 2.8 made a huge update to the UI and now a new series is in production!
FLIP Fluids addon: The Complete Guide – This new series starts from the beginning with a focus on all of the simulation settings, features, and how to use them in your workflow. Dennis released the second episode over the weekend. You can find these on our new FLIP Fluids YouTube channel.
Episode #1 guides you on how to install the FLIP Fluids addon or FLIP Fluids Free Trial and the basics on how to use the addon to run your first simulation.

Episode #2 is packed with useful information on the Domain, Fluid, and Obstacle settings. I suggest going slowly and experimenting as you follow along. Even if you’ve been using the FLIP Fluids addon for a long time, I’m sure you’ll learn something!
")
For all of our tutorial videos and community resources, you can find them on this documentation page: Learning Resources.
More Development Notes
- Multithreading force fields – a few of the more computationally intensive force field calculations have been multithreaded to improve performance. I really wanted to get this done so that I can iterate faster during development.
- Optimize force fields to only update when necessary – Added a system that only runs force field calculations when necessary, such as when force field settings are changed. If a force field hasn’t changed at all between frames, there is no need to run its calculations again. This system is similar to how the simulator only updates obstacle objects when they change positions and keeps track of static/dynamic objects.
9 Likes
Our weekly development notes covering March 23rd - 27th has been posted: Weekly Development Notes #14 – Limitations Of The FLIP Fluids Addon

Weekly Development Notes #14 – Limitations Of The FLIP Fluids Addon
Covering the week of March 23rd – 27th, 2020.
Hey, It’s Ryan and this is our 14th weekly development notes for the FLIP Fluids addon for Blender! Last week’s development mostly involved performance optimizations, including a memory optimization/fix that can greatly reduce memory usage in certain situations. During this week, I’ll be finishing some optimization work from last week and work on further development of our force fields feature set.
In this post, I’ll cover an important topic that is the limitations of the FLIP Fluids addon. Simulation systems are full of limitations and workarounds, and I’ve re-arranged some topics on our Documentation/Wiki to create a helpful topic focusing on the limitations of the addon, fluid simulation, and Blender.
Limitations of the FLIP Fluids addon
Is the FLIP Fluids addon right for your project? The FLIP Fluids addon is a liquid simulation tool based on the popular FLIP simulation method which is short for FL uid I mplicit P article. You should always choose the right tool for the job, and like a hammer, this addon might not always be the right tool to use.
There may be limitations in the FLIP Fluids development project, limitations in the FLIP simulation method, or limitations of Blender that may affect success in creating your desired fluid effect. This document will detail common limitations of the FLIP Fluids addon and Blender.
If you want to try out the addon to see if it’s right for you, install our Free FLIP Fluids Demo.
Scale and Time Limitations
Physical scale: The FLIP Fluids simulator is designed for small- to mid-scale fluid effects. It is designed for physical scales ranging from a glass of water to large sections of a beach. The simulator is not designed for micro-scale phenomena such as accurately simulating the interaction between individual droplets of liquid. It is also not designed for larger scale simulations such as river networks, or entire seas and oceans.
Tip: If your effect involves a small area of dynamic liquid within a large ocean, you will likely need to resort to visual effects tricks. Rather than simulating the entire section of ocean, you will want to simulate smaller local fluid simulation effects and composite into larger ocean footage or blend with a larger ocean plane generated with the Blender Ocean Modifier.
Time Scale: The FLIP Fluids simulator is designed for time scale ranging from seconds to a low number of minutes. It is not designed for time scales of days or months.
These scale and time limitations are common to many fluid simulation systems that are used in computer graphics software.
Relevent documentation:
Volume and Mass Preservation
The FLIP Fluids simulator may not be able to perfectly preserve mass and volume liquid over time. This is a limitation of the FLIP simulation method and is one of the downsides of a FLIP-based simulator. The FLIP simulation method has does not really have a concept of volume and tends to have a bias towards volume loss over time. Volume loss is more prevalent in simulations that involve large amounts of motion from obstacles, especially if the fluid is contained inside of a moving object.
Tips:
- In general, volume loss can be reduced by increasing the number of simulation subteps, which can improve accuracy of fluid-obstacle interaction. See this topic for more information: What are substeps?
- If using a FLIP-based simulator in an effect where volume loss can be noticeable, a workaround can be to continuously emit fluid throughout the animation to hide the fact that the volume is decreasing.
- It is also possible that the volume of fluid can increase over time. Our Particle Sheeting Feature is an artificial simulation technique that helps create large thin splashes by adding more fluid to the simulation.
- If you require volume to be preserved over time, a particle-based simulation method such as SPH (Smoothed Particle Hydrodynamics) may be more suitable. The Blender particle system fluids are based on the SPH method and is able to preserve volume.
Usage in Scientific or Engineering simulations
In general, the FLIP Fluids simulator and Blender simulation systems should not be used for scientific/engineering purposes where accuracy and validation is important. The simulator and simulation method is designed for use in computer graphics applications where complete accuracy is not needed and the fluid just needs to look plausible. Many shortcuts are taken during simulation in order to reduce processing time which also reduces simulation accuracy.
Some of the features/parameters in the simulator are not physically based, do not correspond to real-world physical values, and are just graphics tricks to help produce visually pleasing results. The simulator will not contain many of the parameters that you would find in a simulator aimed towards producing scientific/engineering simulations.
For simulation systems targeted for use in scientific and engineering, check out software packages such as OpenFOAM, SOLIDWORKS Flow Simulation, XFlow.
Motion Blur Support
FLIP Fluids motion blur rendering is not currently supported due to limitations in how addons can interact with the Blender renderers. Blender does not provide a method for a user or an addon/script to specify motion blur vectors on meshes that change topology between frames (such as fluids). We are actively looking for solutions and workarounds and hope to be able to support this as a feature in the future. More information can be found on this page: Motion Blur Support.
Since motion blur rendering is not possible, a popular workaround is to add motion blur as a post-processing effect using software such as Adobe After Effects, DaVinci Resolve, and ReelSmart Motion Blur.
Force Field Support
At the moment, the FLIP Fluids simulator does not support interaction with Blender forces or force fields. Force field support is currently the most popular feature request. This is a large feature set that is being actively developed and is planned for release in July 2020. Follow our weekly development notes for progress on development: http://flipfluids.com/blog/
Multiple Fluid Interaction and Mixing Fluid Materials
At the moment, there is no support for multiple fluid simulation and mixing fluid materials in the FLIP Fluids simulator. The simulator is limited to a single fluid (and single viscosity/surface-tension) throughout the domain. Support for multiple fluid interaction is one of the most popular requests. We hope that we can add this in the future, but is not being actively worked on at the moment. This is a complex subject in fluid simulation and may require a significant amount of time for research and development, and some aspects of this feature may be outside of the scope of the FLIP Fluids project.
UV Mapping Support
At the moment, there is no support for generating UV Maps or applying textures to fluids created with the FLIP Fluids simulator. Support for UV mapping and applying textures to fluids and fluid parameters is a popular request and we hope to add this in the future, but is not actively being worked on at the moment. This is a complex subject in fluid simulation and may require a significant amount of time for research and development, and some aspects of this feature may be outside of the scope of the FLIP Fluids project.
Depending on the simulation effect, a workaround may be to use Blender’s existing procedural texture features. In future development, support for mixing fluids and materials may be added which can expand how procedural textures can be used to render fluids.
Fluid and Rigid Body Interaction
Interaction between FLIP Fluids simulator and Blender’s rigid body simulator is limited. Rigid body objects can push around the fluid, but the fluid is not able to push around the rigid body objects. This is because simulation systems in Blender are run separately and do not communicate with each other. This limitation also includes interaction with Blender’s cloth and softbody simulation.
However, there are some convincing tricks that you can use to create the illusion of buoyancy where objects are floating around on your liquid surface. See this episode of our tutorial series for a detailed guide and example animations: Episode Seven: Buoyancy Tricks.
Distributed Computing
Distributing computation over multiple systems and CPUs is not supported in the FLIP Fluids simulator. The simulator is multi-threaded, but the FLIP simulation is not highly parallelizable and is often not able to benefit from distributed computation. There are methods to allow for distributed computing using the FLIP method (See SideFX Houdini distributed fluid simulations), but have limited use and is outside of the scope of the FLIP Fluids project. Simulations large enough to benefit from distributed computing are likely too large to be displayed and rendered in Blender.
Relevant Documentation:
Bug Fix: Inflow Memory Optimization
Since very early development of the FLIP Fluids project there has been a design flaw in the simulation engine where Inflow objects use more memory than they need. I had always meant to get around to re-working this area of the engine and last week I had finally got around to looking into this. And it was WAY worse than I had thought – inflow objects are reserving so much unnecessary. This was caused by a design flaw in combination with a bug that has been in the simulator for years.
In early stages of development, the simulator was only capable of running tiny simulations around 32 resolution. Running a 64 resolution simulation would take hours due to design issues and lack of optimization.
Many of the simulation calculations are stored on 3D grids. A cube domain at 32 resolution contains 32x32x32 = 32768 voxels, and to store a 32-bit number into each voxel requires about 131 kB of memory. In early development, memory usage wasn’t a concern due to the small grid size.
Now that the FLIP Fluids project has grown and become more optimized, it’s now common to run much larger simulations containing millions of voxels. A cube grid at 300 resolution contains 27 million voxels, requiring 108 MB of memory to store a single grid. And there are now many more grids to store in the simulator. Memory became much more of a concern during development and required optimizations to reduce memory usage.
While optimizing the simulator for memory usage, one area was overlooked, and that is what caused high memory usage for inflows. Inflows were still reserving a full resolution grid for its calculations which is excessive, and on top of that, a bug was causing it to reserve more grids that it did not need. If there are many inflows in the simulation setup, this could result in a huge memory requirement.
This design flaw and bug has been fixed last week and will be included in the next version update. Here is a comparison on memory usage before and after the fix on a 300 resolution domain (27 Million voxels):

7 Likes
Hello, @RLGUY
I was interested to read about the optimization of the simulator. And I had a question:
Is it possible to optimize memory consumption by reducing the accuracy of numbers? For example, instead of using float numbers (4 bytes), you need to use half-float numbers (2 bytes). Or, instead of int 4 bytes, use short 2 bytes.
I understand that because of this, accuracy will greatly decrease, but with a large number of particles, accuracy is not important in some cases.
I would like to have a mode in the simulator: standard (as it is now) and trimmed (with short numbers).
And I still have one theoretical question:
How much RAM can FLIP Fluids use? Are there any restrictions? For example, can the addon use 128 GB?
Yes, I think there can be some areas where half-floats and lower precision can result in performance/memory benefits in the simulator. It’s probably something to consider when we re-write/re-design our grid system.
One area that can benefit from half-floats are likely the volumetric data. FLIP objects such as obstacle, inflows, outflows and the fluid surface is converted into volumetric grid data within the simulator. Half-floats have a good amount of precision for values close to zero and the number values in the volumetric data are typically in the range of [-3 * voxel_width, +3 * voxel_width].
Some grids store ints, but can probably work with 2 byte shorts or 1 byte chars depending on the situation.
Much of the mesh data might be able to be saved on HDD/SSD as half-floats to reduce storage space, but this will need to be tested. The simulation data is decoded using Python which doesn’t have a built-in half-float type. Converting 2-byte floats to 4-byte floats in Python could cost performance. A workaround might be to decode the file data in the C++ engine instead of Python.
The addon should have access to all the RAM that Blender and the OS has access to. But there are likely design issues that will cause integer overflows and crashes when the simulation becomes too large. The simulator was not designed for massive simulations since the large amount data produced cannot be handled or rendered by Blender and the simulation times would become too long for normal use. The simulator should be able to run simulations in the range of 32 to 64 GB.
1 Like
Hello, @RLGUY
I would like to ask which processor is best suited for the fastest baking FLIP Fluids simulation?
And do you know how much RAM PolarGrid provides for baking FLIP Fluids?
How long does it take to bake such a simulation on your hardware with the latest version of the simulator?
https://gfycat.com/ru/distortedmemorableibizanhound
Is it possible to bake a particle-free simulation of Whitewater with a resolution of 1024x1024x1024? Or maybe even with a higher resolution. If so, how much memory/time can it take?
A good all around processor for FLIP Fluids simulation baking would be capable of running around 4 - 12 cores (8 - 24 threads) with a a high clock speed as well as a high boosted single threaded clock speed. The simulation calculations alternate between single threaded and multithreaded calculations. Single threaded calculation performance depend on high clock speed and high single threaded clock speed. Multithreaded performance depend on high clock speed and multiple cores.
For highly threaded CPUs (around 32 threads), these perform best for large simulations with a lot of fluid that take around 1min per frame. They also perform very well for running multiple simulations simultaneously when splitting up the threads between simulations.
Threadrippers are very fast for the mulithreaded calculations, but for the single threaded calculations, they don’t perform much quicker than any other CPU with the same clock speed. For example, large simulations run on the Threadripper 1950X (32 threads) bake at over twice the speed of my home system i7-7700 (8 threads).
I am not sure, I have only tested their 32 GB system, which is the minimum amount of ram of their options. You may ask Peter using this contact form for more info: https://polargrid.space/rendering-contact/
How long does it take to bake such a simulation on your hardware with the latest version of the simulator?
This animation was run as a stress test during the FLIP Fluids beta. I have the animation posted on Reddit here with some stats: https://reddit.com/r/Simulated/comments/861j03/fluid_in_an_invisible_box_in_an_invisible_box/dw1lui6/
This simulation was run on an Intel Quad-Core i7-7700 @ 3.60GHz with 4.20 GHz single threaded clock speed.
- During the Beta around April 2018, this simulation ran in 127h15m (1301 frames).
- After many optimizations, the simulation was re-tested during version 1.0.5 around April 2019 and ran in about 58h.
- I no longer have the .blend file for this simulation, but it should be a bit faster in the current version (v1.0.8). There have been some optimizations in whitewater performance that will improve simulation time for this simulation.
This was tested in earlier development, but the mesh output does not seem to be useful. To get enough detail, it required such a high mesh resolution at about 6 subdivisions of the domain grid. So if the domain was 200 resolution cube (8 million voxels), the mesh resolution would be 1200 (1728 million vovels). This took so long to compute (up to an 15m - an hour per frame) and the results were not usable. The meshes at 200 resolution contained 4+ GB of geometry per frame, which is too much for Blender to handle.
Our mesh generator is quite optimized for memory usage. Very large simulations do not require much more memory to mesh compared to medium sized simulations. This is because we limit the mesh generator to compute 4 million voxels chunks one at a time so that we don’t need to keep all of the data in memory at once.
Note: the completed mesh data is always stored in RAM until the end of the frame, which is when the Python addon saves the data to SSD/HDD. The amount of geometry will add to the RAM usage, but meshes are typically under 100 MB of memory for most simulations.
Hope this answers your questions!
1 Like
Our FLIP Fluids weekly development notes #15 is now posted! This post covers a call for content for the 2020 FLIP Fluids Customer Reel, performance improvements, and automatic detection of rigid/deformable meshes. https://flipfluids.com/weekly-development-notes-15-call-for-content-2020-customer-reel/

Weekly Development Notes #15 – Call For Content: 2020 Customer Reel
Covering the week of March 30th – April 3rd, 2020.
Hope you are all staying healthy and safe! Here we are with our 15th weekly development updated for the FLIP Fluids addon for Blender. Last week’s development mostly involved performance improvements in both existing features and our upcoming force field features.
In this post, we’re calling for content submissions for our 2020 FLIP Fluids Customer Reel. Send your submissions to support[at]flipfluids.com by June 30th, 2020 and you may be featured! More information and up-to-date guidelines can be found in this documentation: FLIP Fluids Customer Reel 2020.
Call for Content

Be a part of the 2020 FLIP Fluids addon Customer Reel
- The Best Animations will be selected to be featured in our 2020 customer reel
- Our video editor will add sound effects to some videos, and cut them to the beet of the reel’s soundtrack
- While your animation is featured, an overlay will display your artist information as well as links of your choice so that other can find your artwork
- The final 2020 customer reel will be uploaded and linked to all of our channels where your artwork will reach thousands of viewers
Animation Guidelines
- All simulations and animations must be your own and created using the FLIP Fluids addon
- Video Resolution: 1920 x 1080 pixels (Full HD)
- Video Frame Rate: 30 FPS
- Video Length: Max 10 seconds
- Output Format: JPEG or PNG image sequence, packed into a ZIP archive
- Upload your ZIP file to any online host and then send the link and your information to support[at]flipfluids.com
By participating, you consent to the full publication of your content as part of this project. Submission deadline ends on June 30th, 2020 .
Your Artist Information
We want to display your artist information over your animation so that viewers will be able to find you and your artwork. Your information and links will also be available in the YouTube descriptions and on other social media where applicable. In your submission let us know what information and links you would like to display.
- Artist Name: Your name, alias, or screen name
- Links: These may be links to your portfolio, website, email, social media, etc. Due to limited space, we may not be able to add all of your links to the video overlay. Please list your links that you would like to be displayed in order of priority.
Example:
Artist Name: Ryan Guy

1. Website: rlguy.com
2. Email: [email protected]
3. Facebook: www.facebook.com/FLIPFluids
4. Twitter: twitter.com/FlipFluids
5. Instagram: www.instagram.com/flip.fluids
6. YouTube: https://www.youtube.com/c/rlguyportfolio
Want to bake and render your animation on Polargrid?
The Polargrid baking and render farm wants to support you in creating your animations! Each user who requests resources will get a free package containing:
- 2 units GTX 1060 GB (OctaneBench 1080) for rendering
- 1 unit baking server
Request Polargrid resources here
Tutorial: Baking and Rendering on Polargrid with the FLIP Fluids addon
FAQ
Do I own the rights to my submitted animations?
Yes, you will still own the rights of your submitted animations. We are not requesting exclusive rights to your submitted content. By submitting your content, you consent to the full publication of your content as part of the FLIP Fluids 2020 Customer Reel project.
Can I make multiple submissions?
Yes, you can!
Does my submission need to be new content?
No, you may also submit older animations that you have created.
Will my submission be featured?
We cannot guarantee that your submission will make it into the final customer reel. Due to limited length, we will only be able to choose the best and highest quality submissions.
Do you have any examples of high quality artwork?
See this collection of some of the artwork we have seen shared on Twitter: FLIP Fluids Artwork on Twitter
Can I send a video file for my submission?
No, for highest quality, we are requiring that the animation is submitted as a JPEG or PNG sequence packed into a ZIP archive.
Can I use a third-party renderer?
Yes, you can render your animation using a third-party renderer or software outside of Blender. We only require that your simulation is created using the FLIP Fluids addon.
I have a question!
If you have any questions, comments, or would like to discuss a qualifying submission, please send a message to support[at]flipfluids.com
![]()
Development Notes
-
Improved performance of engine initialization stage – This is the baking stage directly after the settings/mesh export stage and right before the first frame starts processing. During this stage the Bake operator displays the ‘ Baking in progress… initializing ‘ message. This stage mostly involves reserving memory and initializing your FLIP Fluid objects (Fluid, Inflow, Outflow, Obstacle) within the engine. Performance of initializing objects has been significantly improved and if your scene contains many objects, initialization will be much quicker.
-
Multithreaded adding fluid particles to the simulation – Performance has been improved during the stage where fluid is added to the domain. This stage happens once for each Fluid type object or on every frame/substep for each Inflow type object. This stage used to be single threaded and you could see a performance decrease if your Fluid/Inflow objects were large in volume and containing millions of particles.
-
Simulator now automatically detects if mesh is rigid or deformable – The Inflow ‘ Add Object Velocity to Inflow ‘ feature required the user to specify whether the animated mesh was rigid or deformable. This UI element is no longer needed since the simulator will now automatically detect this. Whether an animated mesh is rigid or deformable is computed on a frame-by-frame basis. Depending on how the object is animated, it could be deformable on some frames and rigid on others.

This detection opens up the possibility to add optimizations in future development. At the moment, most objects in the simulator are treated as if they are deformable. Assuming an object is deformable is safe and relatively accurate for both rigid and deformable meshes. We cannot assume that all objects are rigid because this would lead to inaccurate calculations if the mesh is actually deformable. Being able to differentiate whether an object is rigid/deformable can allow us to add optimizations specifically for rigid objects. There are some calculations in the simulator that can be more efficient, quicker, and more accurate if we know that the object is rigid.
-
New Documentation: Limitations of the FLIP Fluids addon – Is the FLIP Fluids addon right for your project? The FLIP Fluids addon, the FLIP simulation method, and Blender may have limitations that can affect the result of your project. This helpful document covers important limitations that you should know about.
This is amazing thank you! I have been wanting to do this in Blender for years but could never figure it out. Already purchased the add on last year for this exact purpose but ended up using Phoenix FD/3DS max. Have had a play around with your file this morning and hoping to use this technique for one of my designs in a couple of months. Thanks again.
1 Like
Wow, I’ve missed out on loads here, but great to read about all of the development. I can’t wait for that Ocean integration.
I noticed something recently that might be of value to you, or just some quirk in my system, but I was trying to render out a big scene and it kept crashing. I was, once again, trying different combos of GPU/CPU rendering with different tiles sizes and what not.
Basically, what got the scene working (on command line rendering) was to turn the Flip meshes off, then add just the fluid mesh back, do a render. Then build up the particle systems one at a time while doing a render in between each increment of turning them back on. My overall scene size dropped dramatically. I’ve no clue as to why, but it’s rendering now and I’m not touching my machine for at least 24 hours! 
1 Like
Our FLIP Fluids weekly development notes #16 is now posted! This post covers the upcoming Blender Market Spring Sale, a simple setup for a vortex effect, and our latest beginners guide video. https://flipfluids.com/weekly-development-notes-16-vortex-simulation-blender-market-spring-sale/

Weekly Development Notes #16 – Vortex Simulation, Blender Market Spring Sale
Covering the week of April 6th – 10th, 2020.
Hope you’re having a good start to your week! This is our 16th weekly development notes for the FLIP Fluids addon for Blender! I’m posting this on a Tuesday since Monday was a holiday here.
Last week’s development involved almost no coding, but that doesn’t mean it wasn’t a productive week! I had a chance to do some much needed reading to learn some new simulation related concepts and brush up on practicing some math that will be helpful for future development. For the upcoming week, I’ll finish up a bit more reading and get back to code development.
In this post, I’ll cover the 2020 Blender Market Spring Sale, a simple setup to create a vortex effect, and our latest beginners guide video.
Vortex Effect
https://gfycat.com/imaginativesnivelingarmyant
This effect was created by testing a simple simulation setup where fluid flows down a ramp into a circular curve for a liquid vortex effect. This setup was inspired by this coffee bean vortex simulation on Reddit as well as this real-life setup by Peter Cote.
Here is an initial work-in-progress test of the setup:
https://gfycat.com/easygoingnastyaphid
Optimizing the setup
Much of the fluid is out of view of the camera. We can use the FLIP Fluids custom meshing volume feature to tell the mesh generator to only mesh fluid that is inside an object (Documentation). This feature can save meshing time and cache size.
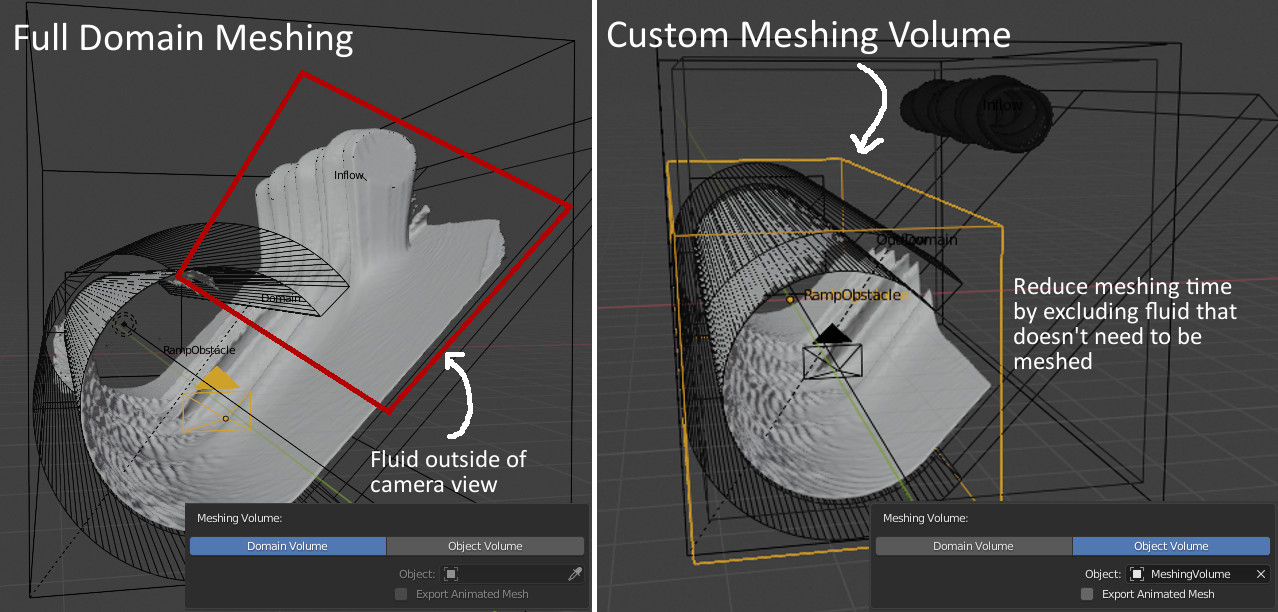
By re-running the simulation with the custom meshing object, this cuts the mesh generation time in half (and reduces total sim time by 25%). This also almost halves the cache size from 46GB down to 26GB!
https://gfycat.com/altruisticscentedaustralianshelduck
Vortex effect .blend file
Want to try this setup out yourself? Here’s the full .blend used for the final simulation and render:
vortex_effect.zip (320 kB) – FLIP Fluids 1.0.8a, Blender 2.82
This setup is also compatible with the free FLIP Fluids demo addon, limited to 250 frames of simulation.
Blender Market Spring Sale
As usual, we like to give advanced notice of upcoming sales. It’s been quite a while since our last sale! We have just heard yesterday that the Blender Market’s huge 2020 Spring Sale will run from April 20th to 24th. The FLIP Fluids addon as well as hundreds of other fantastic products will be on sale for 25% off, so get your shopping list ready!
Want to try out the FLIP Fluids addon before you buy? We have a free demo here: https://github.com/rlguy/Blender-FLIP-Fluids/wiki/FLIP-Fluids-Demo-Addon
FLIP Fluids: The Complete Guide – new episode!
Our new learning series, FLIP Fluids: The Complete Guide starts from the beginning using Blender 2.8 with a focus on all of the simulation settings, features, and how to use them in your workflow. Dennis released Episode 2b last week which covers the settings of the Inflow and Outflow objects:
")
3 Likes