Apologies for the delay; my workload has been much higher this week due to a big event coming up this Saturday. I’ve finally gotten a break to work on the video again.
The dirtmap for the hatch is looking good so far. This is just an initial run to look for any strange errors. I’ll probably do a better unwrap on some areas, like the bolt heads, but I feel this will be a good base for texturing. Dirtmap resolution here is 2048x1024. I’m also going to try using a different node setup for this, to create more detailed materials. If it works well, I may replace the gun’s material nodes with it as well.
Looking at the close-up of the hatch I see very sharp edges on the model. Perhaps a bevel modifier with a tiny bit of bevelling would make it more life like? I’m also curious how the dirtmap would work with this beveling.
It took me a while to recognize that I’m seeing the inside of the hatch on the right part of the image. Nice that you also modelled the inside and the pistons. Are you going to rig this or do you plan to use shape keys for the animation?
I didn’t even know there was a bevel modifier! I’ve been beveling all my edges during modeling (95% of them, anyway).
Yes, I knew that part of the interior would be visible during the animation, and I didn’t want the inside to be bare and break the illusion. I’m going to be using constraints alone to create a rig to control the opening of the doors.
Also, last night I learned how to finally setup my dirtmap properly! Now the black, grey and white areas of the map correspond to separate materials, instead of simply behaving as a blending factor between materials. You can see the harder distinction below:
I believe this will mean much more realistic looking materials. Once I get the new materials applied to the gun and the hatch, I will update my progress here!
nice progress James! Liking that door/hatch. It would be great if you could share how you rig the doors. Mechanical rigging/constraints are fascinating, but I have not found too much available as far as advanced tutorials go.
Thank you, Frobenius! Essentially, I’m just using basic things like “child of”, “track to” and “translate” constraints, and lots of empties to make things move. I find it’s more enjoyable than trying to rig characters with bones and weight painting.
I’ll be uploading the rigged version of the hatch to Blend Swap, so you can study the file directly. Until then, here are a couple of links that have helped me:
Hey James, I know that I stressed this topic before, but I may ask once again how this map is produced? The map follows the edges of your model nicely - most of the times. But it still creates this (in my eyes) unexplainable area on the front. I can’t explain to myself why this part should have another material because usually this would mean a distinct polygon geometry. Or it would mean signs of usage by being worn out or so. But the geometry isn’t explaining that area and it is delimited too sharp to be sign of worn out.
Sorry for coming back to this point again, but everything else is sooo nice and this single area disturbs the overall good impression. Most probably this must be a matter of the gun model itself, because the dirtmap for the hatch was completely comprehensible.
It’s a little hard to see at first, but you can identify that this is the same area as in your crop above. It seems that another part of the gun resides within the other. As we know, the dirtmap script uses something akin to ambient occlusion to generate our dirtmaps. So basically, how close or how far away surfaces are to one another. It must be that surfaces that are interpenetrating will also affect that dirtmap. This can also be seen in the hydraulic pistons seen in post #21; they have internal parts and are practically black compared to everything else.
I suppose the only workaround for this is to ensure you don’t have interpenetration of meshes, or to manually retouch problem areas.
Thanks for digging into the model, James. That was what I guessed. A part of the geometry is causing the problem, obviously. If I got that right this dirt map script was developed during the making of Tears of Steel. Perhaps that has been a constraint for the modellers: don’t model intersecting geometry
You’re correct, minoribus. I find also that the scale of the geometry seems to affect the results a good deal. It seems that playing with the settings in the dirtmap generation buttons can help, but I’m not very skilled at this yet.
I’ve finished setting up the hatch rigging and dirtmap generation. All that’s left for the hatch now is setting up material nodes, which I’ll do later today after I wake up.
The dirt on the hatch is really looking good, as if it has been on the range already for a long time. Some grass around its base could be a nice addition later.
You put yourself on a challenging timeline and I wish you plenty of undisturbed time for this project. But I’m sure that you will manage it on time
Nickersf - I’m glad the links may help you! I’m looking forward to seeing your sketchbook!
I’ve seen some works created with ddo2, and on multiple occasions have looked it up, but the official tutorials have not been easy for me to understand after the first 5 minutes (maybe because I have no experience with the interface). Would you recommend it? Also, do you have to supply all the textures it uses, or does it come with some? In one video, I saw that it created areas of chipping, water lines, and other interesting looking “grungy” sorts of texture. Is that an internal parameter that can be tweaked?
As I mentioned above, the dirtmap script works essentially like AO does, so your results may be a bit smooth. One trick I found is to take the dirtmap you’re using for a specific input (say, your edges material) and multiply it with another image texture of grime or scratches, whatever works. In my case, I’m using the white areas of each dirtmap as a factor for a mix shader. So this multiplied result of two images will be more random and less smooth than simply using the dirtmap by itself. I can upload an example of my current node setup if my description is too confusing! I’m using an older version of Blender (2.66 I believe); I found when I tried rendering the model in 2.69, by bump maps looked completely different (pretty much gone), so I’ll be sticking with my older version for this project.
I have yet to get a chance to get in there and work with the blender dirt map script. It’s on the top of my list of things to do.
Ddo2 is a very powerful tool. My biggest complaint about it is that it is very resource intensive. It bogs my old hulk of computer down hard.
There’s some really intense ddo2 workflows you can go with. There’s so many parameters to tweak you can generate lot’s of textures in it. The new version they just announced over at http://www.quixel.se looks like it has more built in “megascan” 8k textures. That’s nice and all if you have a beastly work station to run it on. I set up some basic dirt maps out of the box in about 15 minutes:
minoribus - Thank you! Grass growing up along the edges is a good idea, if I have time I will try to include that. Thanks for the suggestion!
Nickersf - Thank you for sharing your experiences with Ddo2, it looks very interesting. Using the dirtmap script may be free, but I’m sure Ddo2 offers many more options for customization. It looks very cool!
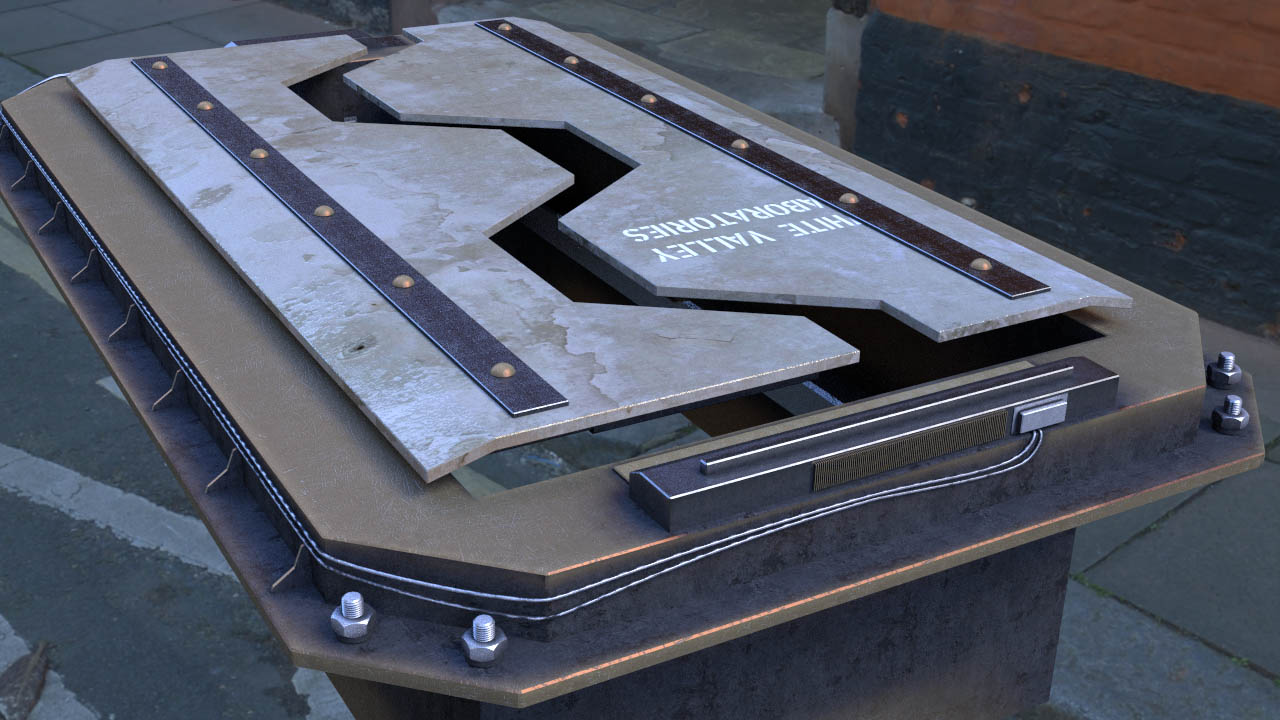
I’ve still been working on materials for the hatch. The gun was easy in comparison, I suppose because it has so much modeled detail. The hatch relies much more on textures and shaders to look good. I’ve not found results that scream “wow!” yet, everything looks crappy and sucks to high heaven. A little bit of manual texturing will probably be required, so I’ve given the two doors their own UV maps. When I looked at the amount of space the auto UV-unwrapping from the dirtmap script gave them, it was unbelievably small! They are about the two biggest things in the model, yet their portion of the 2048 pixel UV map was the size of my BA avatar!
So to summarize: everything looks crappy, and I’m currently working to make it look good. I just need better material definition in a lot of places. Looking at references helps.
Hi James, I absolutely don’t agree with your summary. It doesn’t look crappy at all.
The “metalness” can be elaborated more, perhaps. I see that you assigned different materials to different parts of it. The value of the material of the lower part could perhaps be more in the gray/blue range, like the material for the flaps. The wires would most probably have some insulation to keep them separated from the case.
You’re exactly right, minoribus, the “metalness” needs to come across better. I’ve worked on the materials more since last night, and am a little happier with the results, but am still not satisfied. There are a few resources I’ll check out to see if I can figure out better material definition for these pieces.
Also, the wires you mention along the base are supposed to be coolant pipes. The boxy thing we see on the front of the hatch (that the pipes lead into) is supposed to be a hologram. I had the idea that it produced intense heat, and needs to be cooled, so that is why there is a long run of piping going into and out of the unit. That is why I’ve given the pipes a shiny material. But let me know if real pipes would look differently than mine, I didn’t bother to look up any references for them.
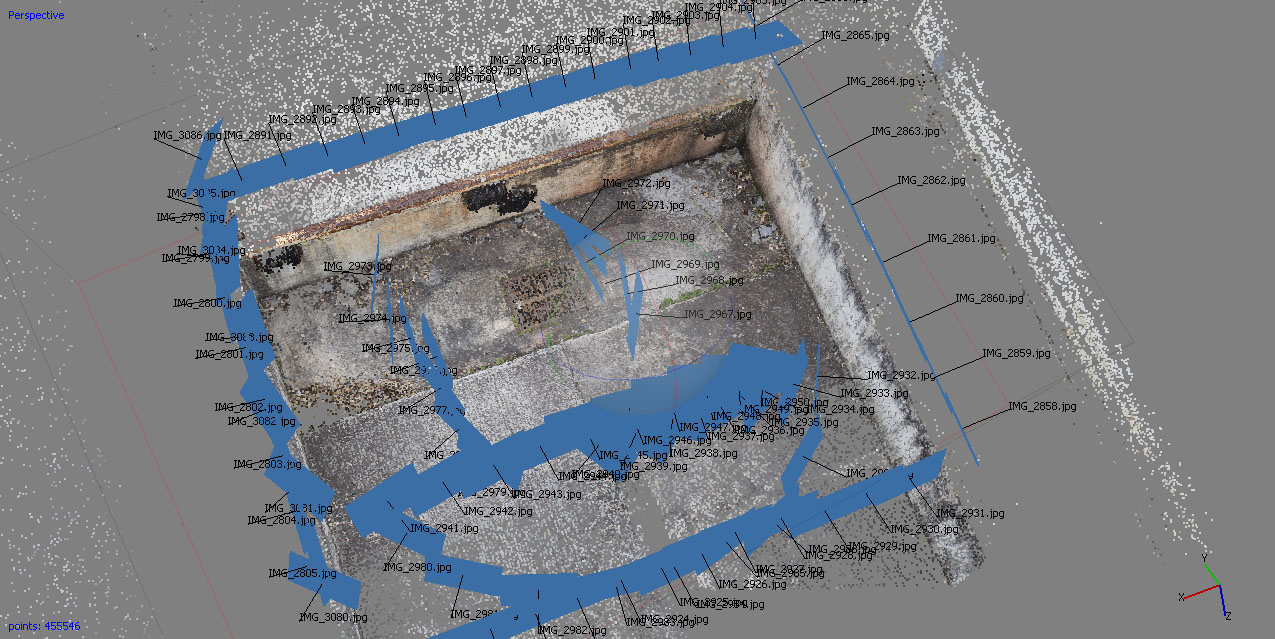
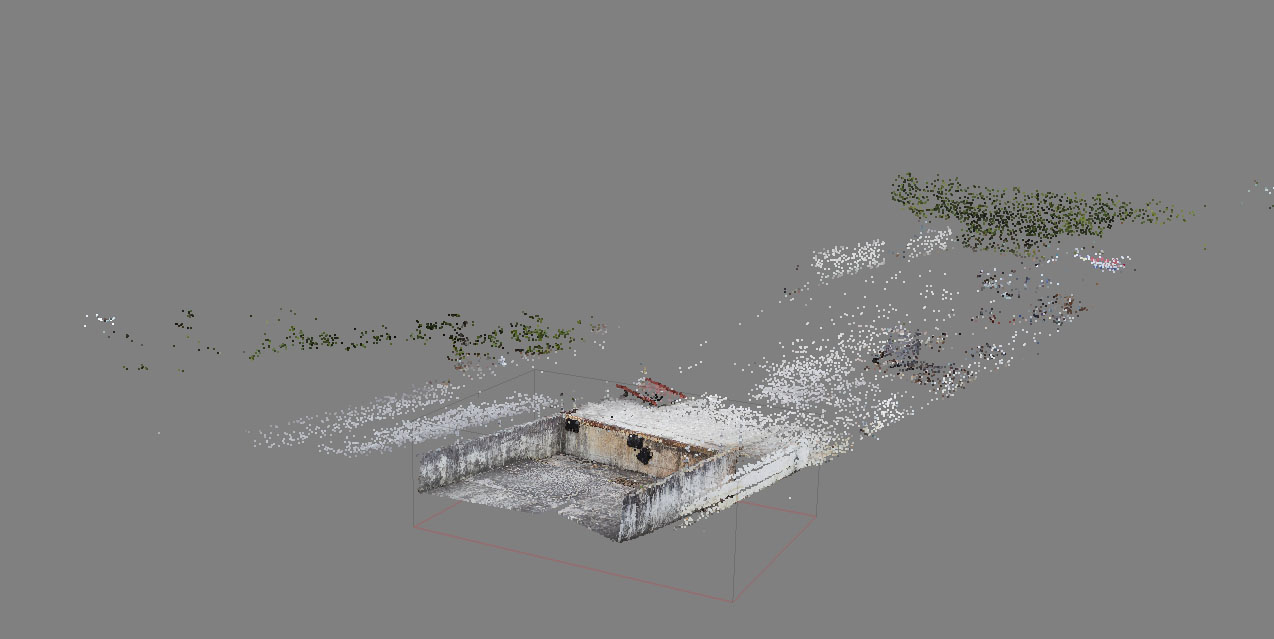
I’ve worked on the scan of the environment today. I’m splitting the environment into two pieces; a very high quality version of the immediate area around the hatch, and high quality version of the surrounding area.
I’ll probably be sending my scene files out to be processed by a workstation. If I had tried to identify and match points along all 350+ photos, it would have taken 38 hours on my computer! And that’s the easy part; after matching points, there is still the much more intensive task of generating the mesh!
I don’t know if I’ve been working too much and staying up too late, or if it’s just bad luck, but I’ve come down with a cold. On top of that, I have no money in my bank account due to some unfortunate circumstances. So work has slowed down while I rest and try to get better. While the movies I create for Classy Dog don’t require much money, they do still require some money. I did recently get my new Rode shotgun mic as well.
Anyway, once I’m able to afford it, I’ll be sending out my PhotoScan files for processing. Additionally, I plan on donating to the Blender Cloud to support the Gooseberry project, and additionally gaining access to the content. Specifically, there are some Mango assets I’m very interested in using in a new way in this video. If you can afford it, I highly recommend supporting the Gooseberry project as well. Not only does it help the film get made, but you’ll also have access to all the great resources in the Blender Cloud.
You can find helpful information about the Cloud and how to help in this great demonstration by Sebastian König:
I had to search for your thread this evening, because you changed the thumbnail, but here you are
Did you do photographs in a real shooting range for this? That matching must have taken the whole day to compute :eek: And out of curiosity I may ask what service offers the computing for the photo matching. Does Agisoft have such a service?
Regarding the pipes I think that they should be bigger. The only heat pipes I saw so far, have been in my laptop. I had to disassemble it to see what damage the cup of coffee had done to this brave old one. And the coffee was very successful Most of the heat pipes seem to be made of copper.
I don’t want to go off topic here. But I donated for Gooseberry also. And I can’t understand the discussions in the general forum about this. I think that this is an important and exciting project. I can understand that some people are not interested in animation. But I don’t understand why there are people who are talking it bad.
Actually, the area I took photos of was a truck loading/unloading bay. It’s actually in the same complex as the area I filmed the GTA video in. I needed a grungy setting with non-reflective surfaces, and this fit the bill.
Agisoft doesn’t offer such a service (though they may in the future), but one of their representatives in Algeria has a powerful workstation that is available for a small fee. I’ve emailed him and am just waiting to hear back, hopefully he’ll be able to help me!
You’re probably right about the thickness of the pipes. I’ll try adjusting their scale to better fit the model. I think copper is also a good idea, and would match well with my new idea for the hatch color scheme.
I’m glad to hear you’ve also supported Gooseberry! It will need support if it is to get made, just like Ton needed support to get Blender to to be free and open source in the first place. In a forum of nearly 200,000 members, there are bound to be a few nutters out there. You can usually spot a troll after a few posts, and so the best response is always to ignore them. If they do not get a reaction, they will move on.
Interestingly, Ton was able to raise the 100,000 Euros needed for Blender to become FOSS in only 7 weeks. Yes, the Gooseberry goal is 5 times that amount, but think about how many more people know and use Blender now, compared to 12 YEARS AGO. I feel a donation in support of the project is the honorable thing to do if, like me, Blender is an extremely important tool in your work. Besides that, we will only benefit from more features and tools that will be improved and implemented as a result.
Looking good James including your hatch. I might have a question when the shell casings start flying unless you cover how that was done. Interesting project here.


 and this single area disturbs the overall good impression.
  Most probably this must be a matter of the gun model itself, because the dirtmap for the hatch was completely comprehensible.
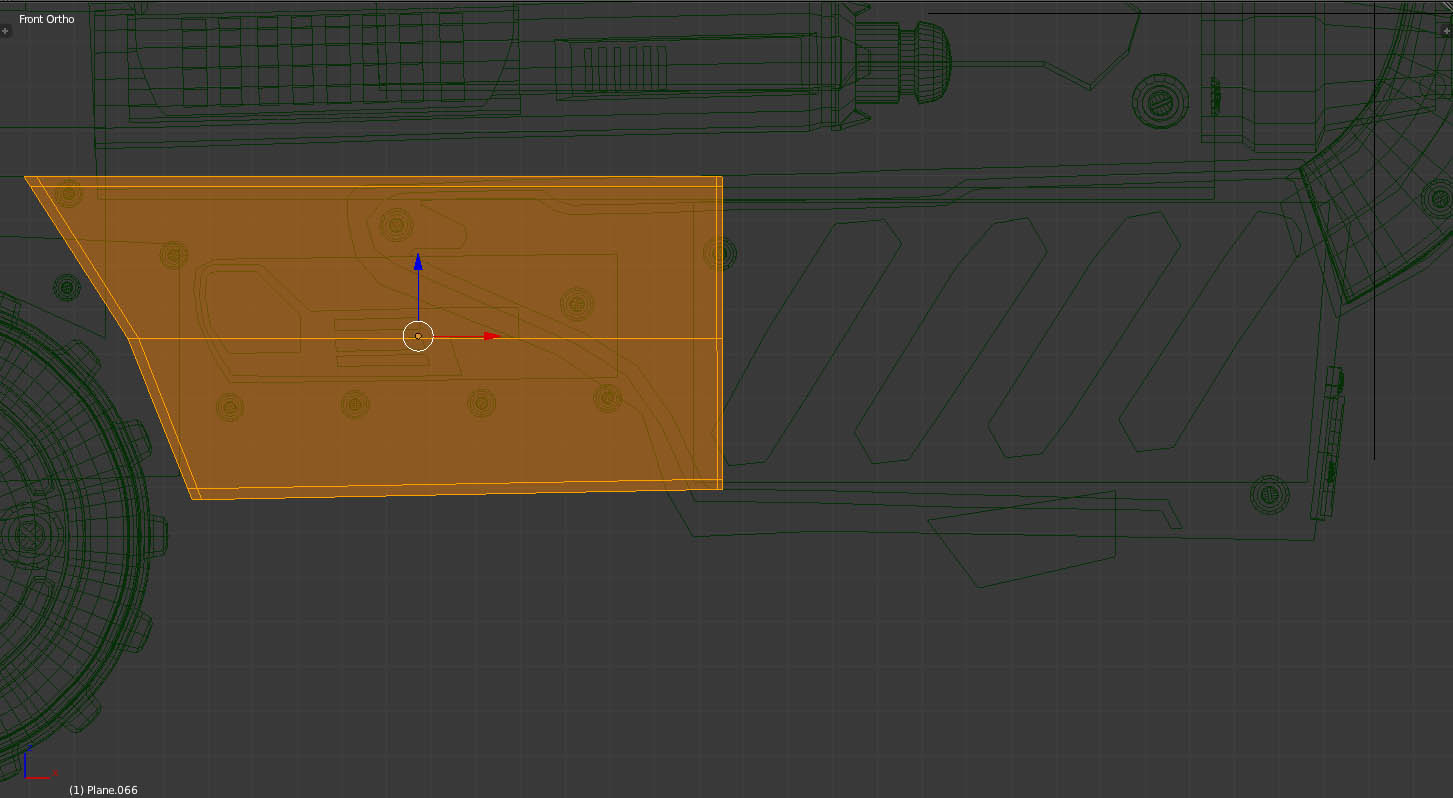


 Most of the heat pipes seem to be made of copper.