Honestly: don’t you think that fluid simulation is a total pain?
Blender is a great and free tool, Okay.
In the fluid simulation departement, many thing don’t work and many parameters creates a total mess or a total nothing. We move a little this and a little that and all change, effector don’t collide anymore, particles goes through, etc, etc… Jeeze, it’s hard.
But, water is water. It’s a well known matter, with clear physics and attributes.
So maybe I demand too much for a free software but for WATER, maybe is there a possibility to make a standard set of settings once and for all. A preset that establish the base for water to flow in, rebound on obstacles then flow out or accumulate at the bottom. Simple.
Then, starting from that, we can modifiy (the hundreds of) attributes to tweak furthermore.
My main complain is to make something just working. You know, when a tool have a button labeled “fluid”, just make what the label is: make some fluid.
Thanks for reading.
This, I believe, is the mistake here. Water in different sizes behaves very differently. An ocean requires different simulation priorities than splashing drops in a cup. And then there is everything in between.
I agree that there are probably fluid sims with better interfaces than Blender but it is not as clear cut as saying water is water.
Hey !
I try to avoid simulation at all cost because I hate waiting for baking time and feeling enslaved by the computer, so I’m clearly not an expert in that domain.
Chances are that the default settings correspond to water, given that you’re scene is at the right scale. I’m sure in some case you can get good results, but probably a good understanding of the algorithm is needed.
But anyway blender isn’t the best tool for that, in houdini for instance you can make a simulation based on a lower res simulation and do a lot of tweaking on the result. You build the effect piece by piece. Here it’s a bit monolithic.
But it’s great to have that included, and maybe at some point with everything node project things can start to be more usable on a regular basis.
It’s our job to know the tools we use, I can rant about compositing in blender that isn’t on par with nuke. Why pretending doing some compositing if it’s to do the worst comp module ever ?
But well, once you know what this module offers and it’s limitation it’s possible to take advantage of it. I use it every time and it saved tremendous time on most projects that I’ve worked on. Still as a compositing app, blender is bad. But still it’s useful once you know what to expect from it.
Sorry, you are probably angry because things don’t work, and I understand that what I say doesn’t help
No. It is not the case.
Water is made of a massive amount of very small molecules that have electromagnetic properties.
That is impossible to have same amount of particles in a simulation as amount of molecules in real world.
Movement of water is still a mystery for mathematicians that are using different approximative formulas according to scale of volume of water.
So, there is no clear math to simulate water.
In theory, the more particles are numerous, the more simulation can be precise.
But in practice, the more particles are numerous, the more computations are complex, the more simulations are error-prone.
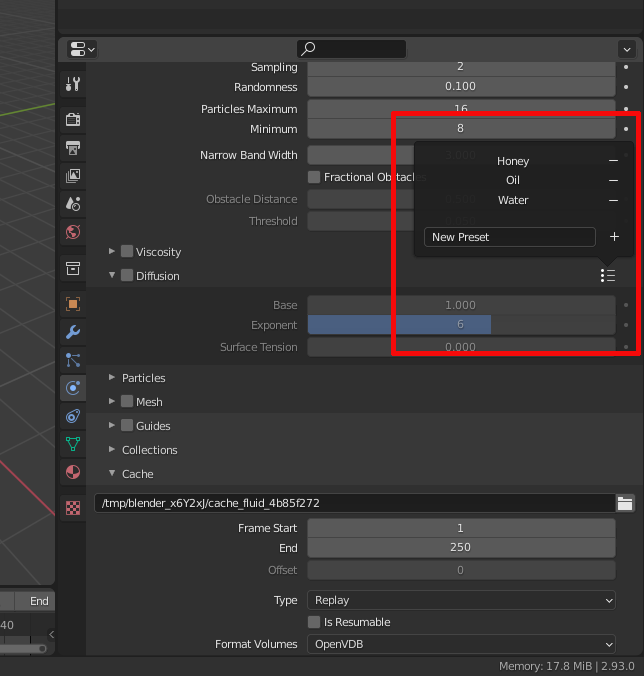
Mantaflow lets user determine the amount of particles to reach desired quality or to desired simulation baking time. But when you change amount or particles, you have to adapt particles size,too, to maintain same behaviour.
There are lot of settings to avoid to have too much computations because of a too important amount of particles.
Narrow Band Width means that only particles in a margin based on surface of water are simulated.
Particles Maximum defines a maximum of particles per cell of volume. Amount of cells and their size are defined by simulation Resolution Divisions.
It is true that if you start to change one of those settings, you have to adapt all the others, too.
So, don’t touch those ones.
Defaults of Quick Liquid preset corresponds to water.
Simulation is correct as long as scene respects unit scale.
If you want a simulation about a glass of water, mesh for the glass should be 10 centimeters tall.
If glass size is 10 meters, mantaflow simulation will look like a swimming pool simulation.
And that is a really bad idea to try to fix that by messing up settings without reading documentation.
The amount of parameters and how they are labeled. It’s absolutely not user-friendly. When you don’t understand what’s it’s doing, you can’t work with it.
After baking the data, the viewport show a nice bunch of particles flowing, and we expect that to be converted into mesh. Then, after baking the mesh, it often becomes ugly blobby drops or a big gelly thing (world’s unit alone don’t seems to change something). It’s really bad when the preview is better than the final render.
While terms like “viscosity” are clear, others are a total darkness of meaning, like “Smoothing positive” or “CFL Number”.
In real life, these parameters functions together and in Blender, the range of modifications is so large that we can destroy all of it in a tiny cursor’s slide.
Maybe they should put 2 major modes of limitations: one that stay inside small changes that DON’T DESTROYs the work, and another unlocking the full range of possibilities.
Sorry folks, but the purpose of a “fluid simulation” is to SIMULATE, real water in my example. Real water don’t turn into a weird blob or particles just by pressing a button. I don’t use Blender to learn fluid physics and atoms and so on. You can assemble a complex house with a hammer, even the hammer is a simple tool.
Well yes, the purpose of a fluid simulatuion is to simulate FLUIDS (not just water). How is Blender supposed to know whether you’re simulating water or honey or clotted cream? While it’s not impossible to paint the walls of your house with a hammer, learning to use the tools in their intended way makes it all the easier. Simulation is not a simple tool at all and will never be, although some presets might help. You’ll still get completely different presets though depending on whether you simulate a drop of water or an entire bucket, let alone ocean waves. BTW, did you ever see footage from water drops floating around a space shuttle? Entirely behavior once again.
Over last 2-3 days, I have been trying to get simple fluid sim working. No success. It is for 36 Days of Type - Z letter filled with water.
I tried different approaches, methods, tutorials. Stuff starts to work, then breaks for no reason. Current iteration - pre-viz particles are appearing, but they are stuck to the emitting object. Nothing is “dripping” or flowing.
I must have missed a simple step or setting and may have to start this all over from scratch. But I thought it will be pretty straight forward to fill an object with water and splashes for still render.
I hope it is ok to upload the file I’m working on here - if anyone with more experience could advice me on what is wrong with my settings?
Resolution is too low. Obstacle is considered as already filled by Flow object.
If you increase resolution above 84, there should be some movement.
If you want to fill the letter, it is probably not the best choice to use same letter as flow.
Use a small primitive (plane, sphere or cube) instead. Place it at top of letter, set it as an Inflow instead of a Geometry flow.
It is better to keep the letter oriented in ZY plane, use a domain that has dimensions that corresponds to letter bounding box, to bake simulation with better resolution possible, and then, to rotate the result as wanted.
@Eddy_Juillerat I partially agree with what you said in the OP. I did complain in the past about different parts of Mantaflow like inconsistent UI, lack of stability and performance. And I fully support your voice that physics solvers should be stable and possibly well designed in terms of the interface.
I however do not think you have any basis to expect physics simulation to BE EASY. Others in this thread made couple good points about the very nature of liquids/gases. Having more options gives the artist more control over the look and feel of the sim. My point is that if physic sim requires lots of parameters - so be it, but label them right in the UI+manual and make them work consistently.
Yes it’s an entire field in CG, some people are specialist and doing mostly only that in their work.
If you start 3D, you should expect some learning curve, you can’t say “I just want to model a character , I don’t want to mess with words like normal, subdivision surface, recursive loopcut, that are technical lingo for scientist or mathematician … I just want to create, make the tool do just that because blender is supposed to be a creative app…”.
That’s how it is, you can’t open a 3D app and intuitively push the buttons to get a good result.
I don’t see how it could be different with simulations.
One doesn’t strike me as way more simple and user friendly than the other…
It’s full of technical terms that you should learn to understand how that work.
Thanks Silex (nice nickname).
I think the nature of some software, if it’s the choice of their makers, is to help to simulate complex nature objects. To help don’t necessary mean “to make it entirely for you”, but to help to have a result without too much work. I agree with that.
But a good tool muste provide (in my perfect world — I know it don’t exist) the basic to have a quick result. Blender have all we need to make something amazing, but it depends on parameters with such range and intricacies that something working can turned to nothing in 2 clicks. So if you say it’s normal to have complex settings for a complex object like fluids, it’s clear. But it by passes the notion of “a tool to help”.
It seems to me that Blender can manage settings to “align them” to avoid this “nothing result” when we go too far in a parameters or another. I think I’m asking that bascially: having an internal basic working setup, like mention a59303 up there, a giant preset that make it work. In the 3D world, Blender have world size and coordinates, it’s seems that managing all the possibile fluids’ parameters to contains them to render for us something visible is not science-fiction. I know it’s free, they do an amazing job. I think they build the simulator without thinking “range limits that prevent no-fluid present”.
I hope my thought is clear. Thanks for all responses.
I’m with you pal =)
Last days, I discover that we have to learn all the main part of this mechanics:
Mainly: start at the top of the settings, work to the bottom ONE AT A TIME
The best we can do to learn is to do it like the science way: observe (render) 1 thing, add another then render, observe… And so on. (that’s my complain: having to analyse the tool before using it)
Resolution of the sim change dramaticaly the overall look of the result Parts to survey closely:
The domain object size (applying the transforms),
The fluid emitter size and velocity (watch the cube on the domain’s object low corner), the surface of emission
The obstacles size and placement inside the domain
It seems that “walls” (obstacles) have an external margin of it’s influence
Some walls don’t work at all, depending of they’re shape, number of vertices or something
Use particles setting (on the Particles tab)
Beside that, I often find the particles rendered as colored dots more beautiful that the gross mesh it tries to generate.
I wonder if the best simulation would not be a mix between 3D water object and not-rendered particles, acting like a 2D effect, using less memory with finer details.
Ok thanks mate. We’re all here to help each other.
Your Z is quite nice. The neon add a very nice touch.
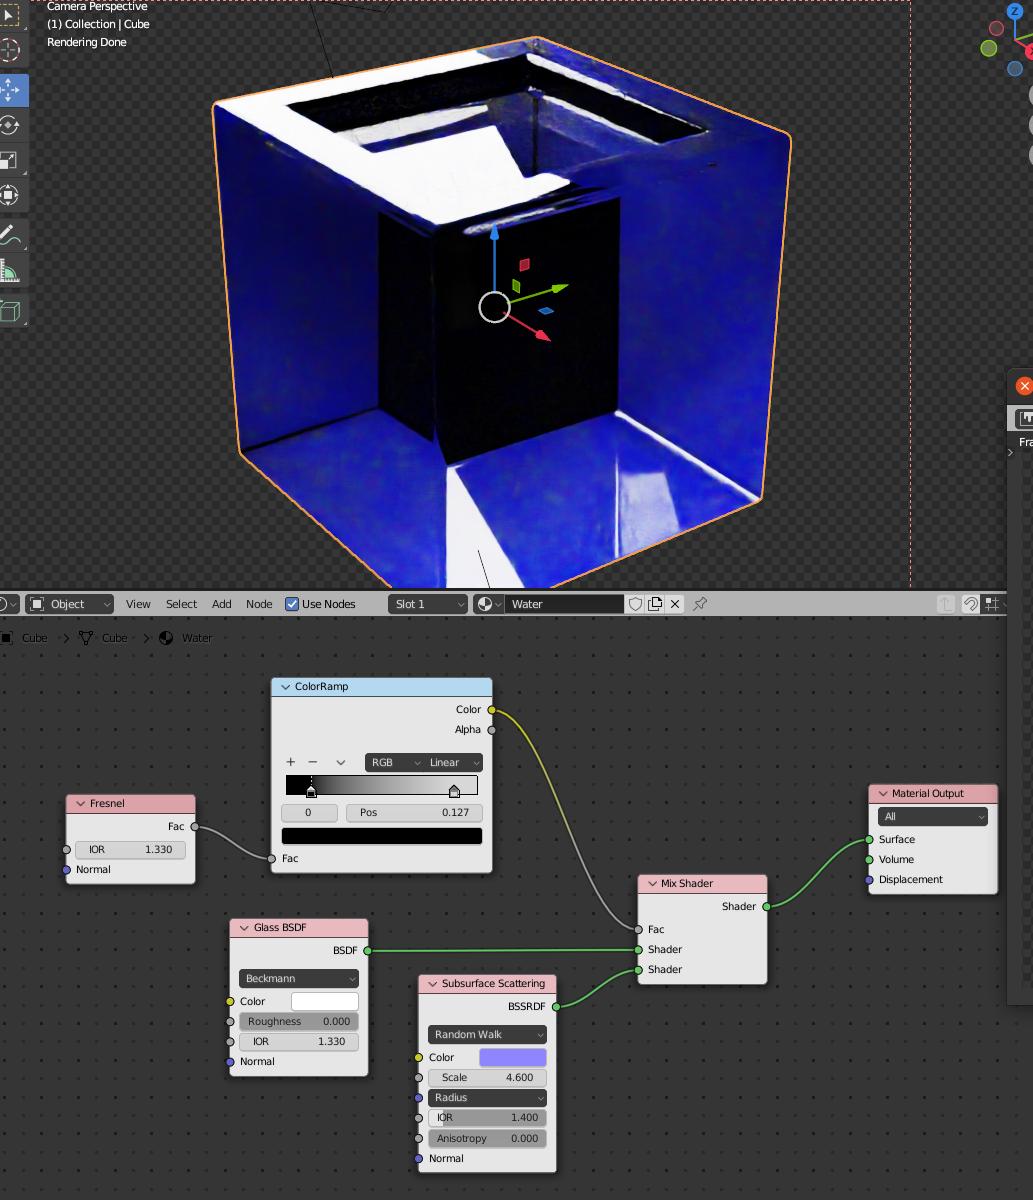
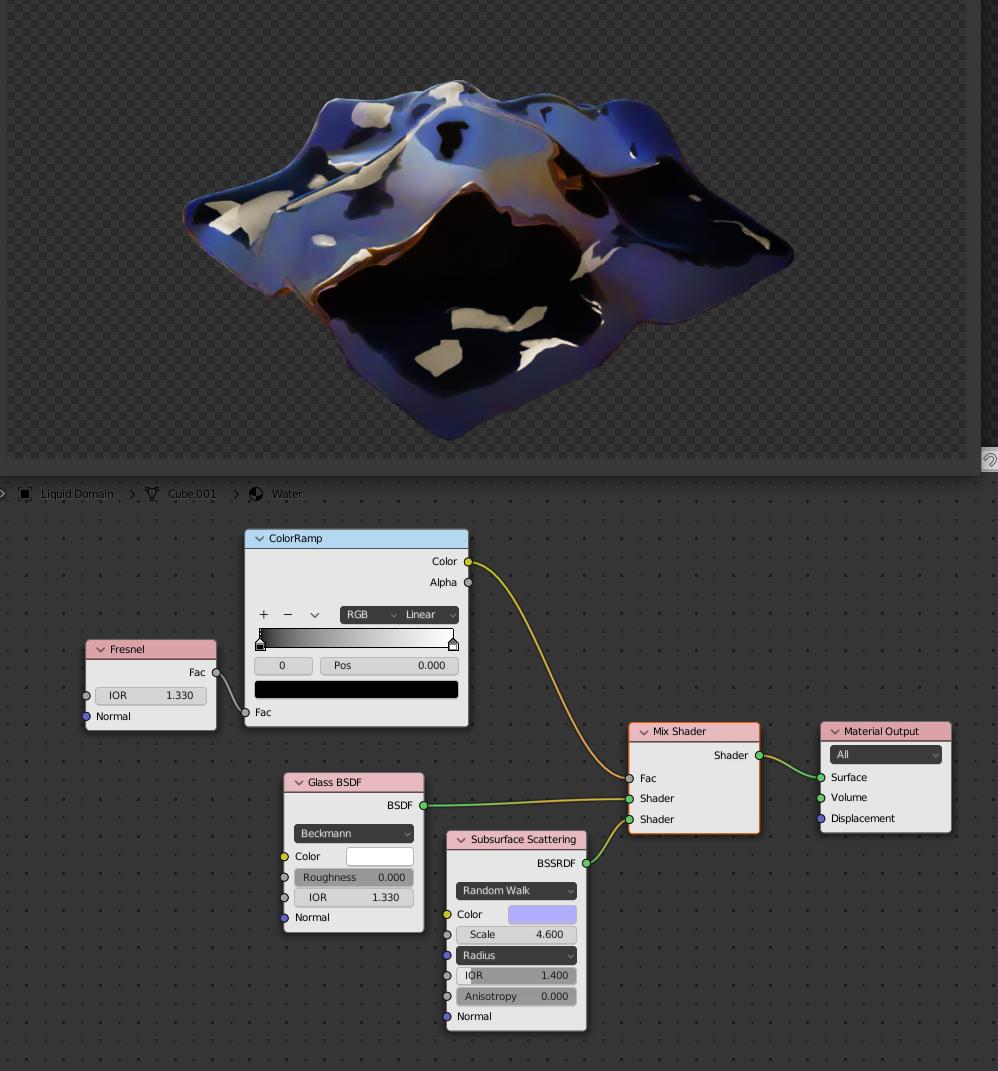
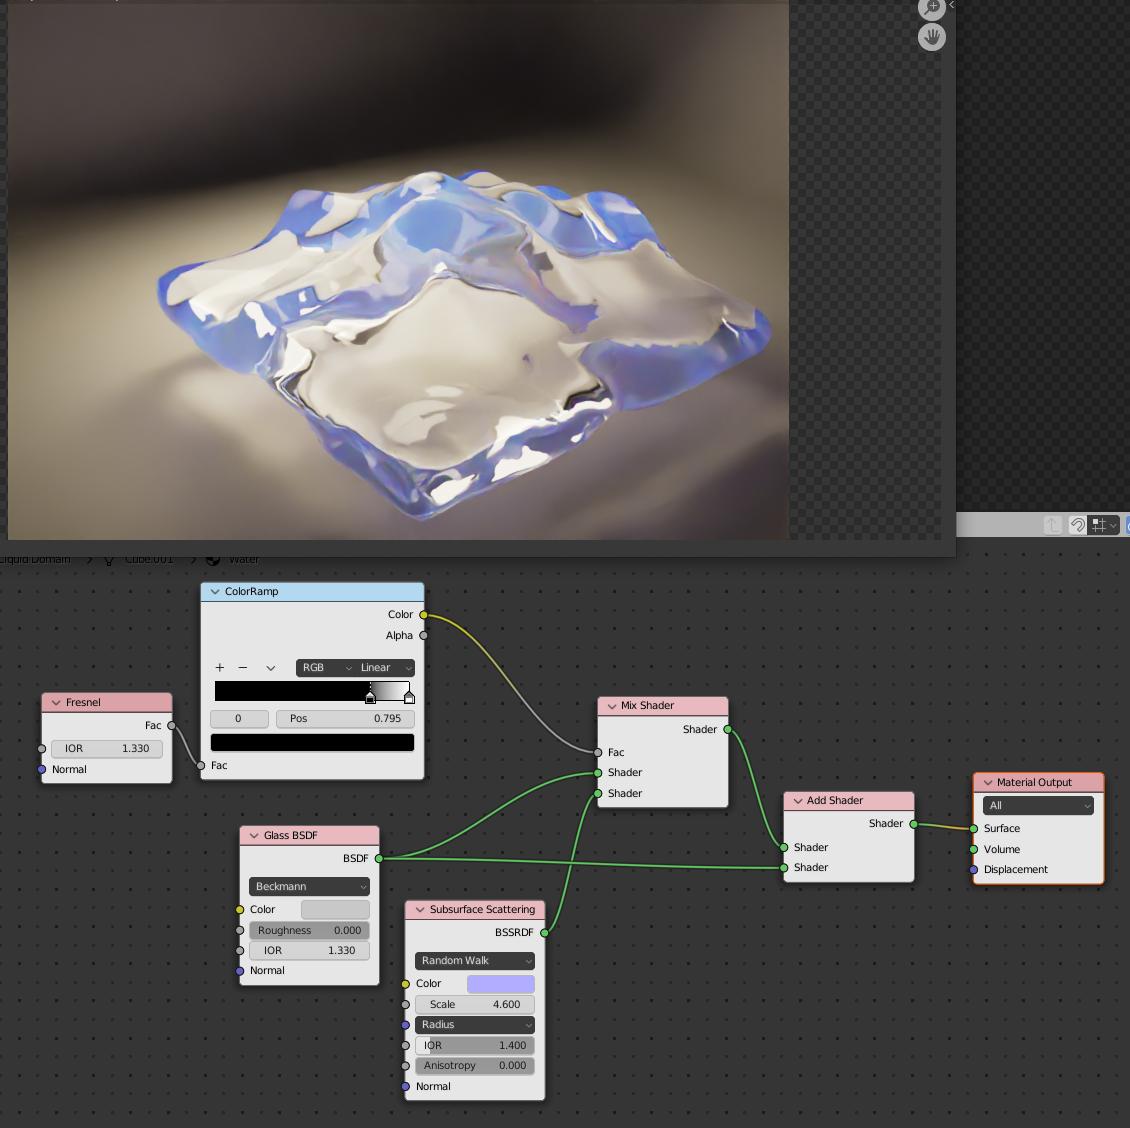
– You point out one important thing I forgot: water need lights and darks surroundings to make it seen. Usually plane lights to make it shine, like any 0-Roughness shiny material.
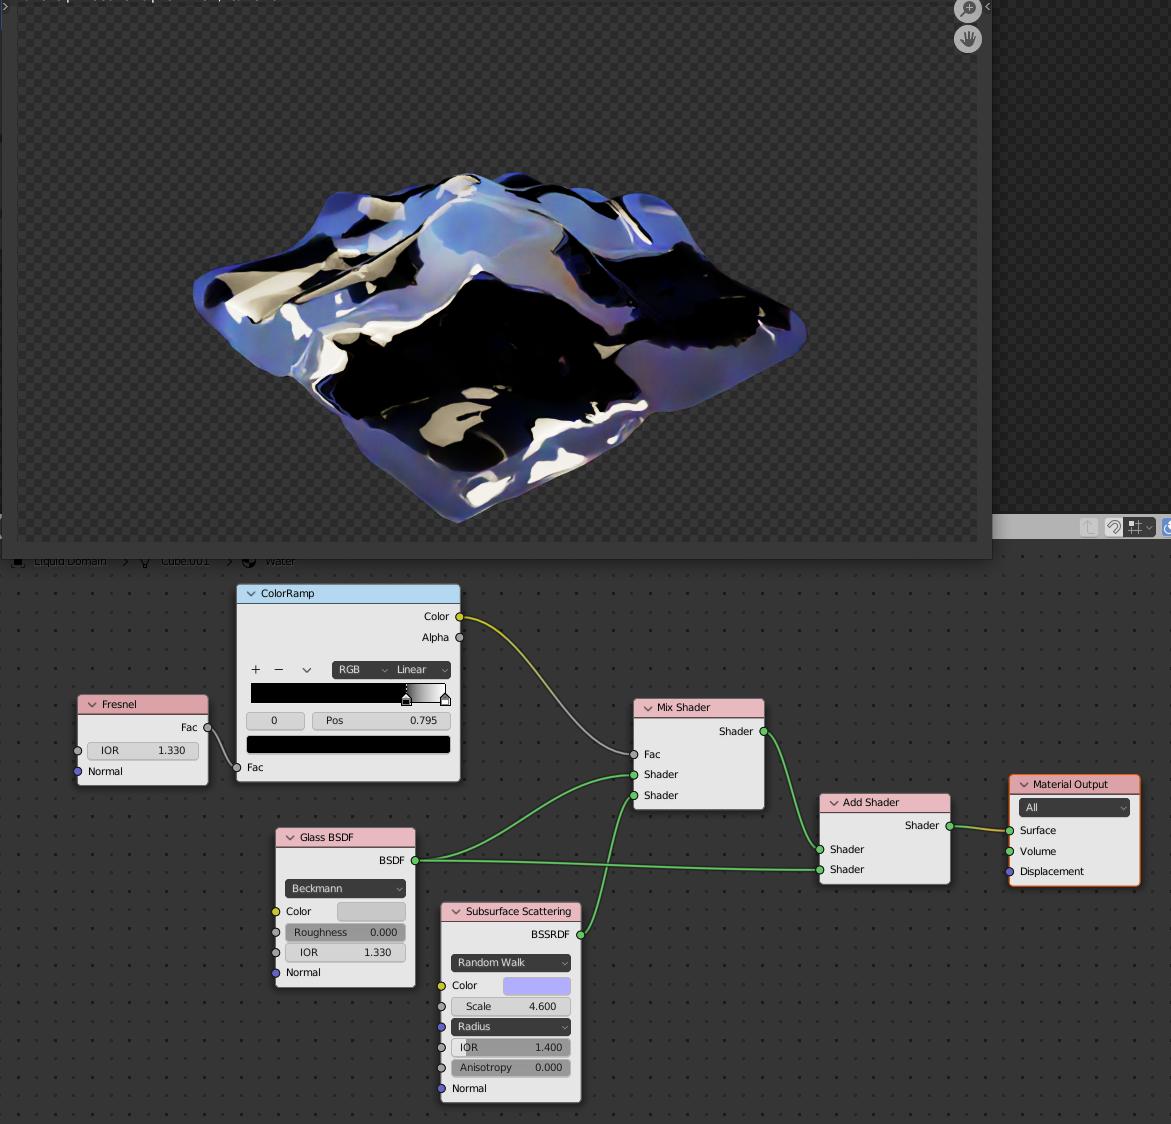
– If you fine-tune your water material, it can catch more of light, like adding tiny bit of catching light matter inside the water. Like this: mixing the Glass Shader with Subsurface Shader. (here with Blue to make it more seen for the demo.) Third image: adding anything around make the water material visible.