I’m playing with Photocatch but the documentation is basically non-existent.
I’m trying to figure out what the Sample Ordering setting does exactly. You also mentioned doing multiple passes, but I can’t figure out how to do refinement passes in it.
I’m playing with Photocatch but the documentation is basically non-existent.
I’m trying to figure out what the Sample Ordering setting does exactly. You also mentioned doing multiple passes, but I can’t figure out how to do refinement passes in it.
Yes it is a bit of a shame that Photocatch does not have more settings.
Oh good news…
Current versions of Metashape (1.6 and 1.7) work on new Apple M1 architecture only in Rosetta compatibility mode.
Agisoft is planning to implement native support of the new architecture in Agisoft Metashape 1.8 update, expected in late December 2021.
What documentation 
When it comes to passes I just shoot image sequences and give it to metashape or photocatch in one folder.
Then I just run it
That’s great news about metashape offering metal too. That will be very interesting to see how metal compares to Cuda.
I might admit that my use of photogrammetry is more geared towards digitizing a model to reverse engineer it.
Because it is not as sharp as laser I never saw it as a replacement but as a super tool to digitize existing 3D objected so we can use the scan as a 3D blueprint to model over.
I just picked up the Topaz Labs Video Enhance AI and I wonder if I might be able to apply it to my footage to upres and sharpen before feeding it to Photocatch?
Yes that will work and help. more pixels more mesh resolution !
I am curious how Topaz compares against Photoshop and Pixelmator Pro with image upscaling.
I have mainly Pixelmator Pro and Photoschrot
Philip Bloom has been doing some tests with Topaz Labs, I seem to remember seeing some comparisons against Resolve AI upscale, Premiere, Photoshop and Topaz Labs with Topaz Labs being considerably better than Resolve and Premiere, but not always the best.
Not sure if you can see this link, but some conversation about it here:
I will get the trial and test to see how the image scale compares to Adobe and Pixelmator pro
Better bigger images = more details in mesh result !
Don’t forget the Sharpen AI which might also increase the perceived resolution.
Ture but be careful - the sharpening has to be the same from frame to frame otherwise it might result into the photogrammetry code reading the pixels differently !
Oh boy video recording
iPhone 12 Pro Max
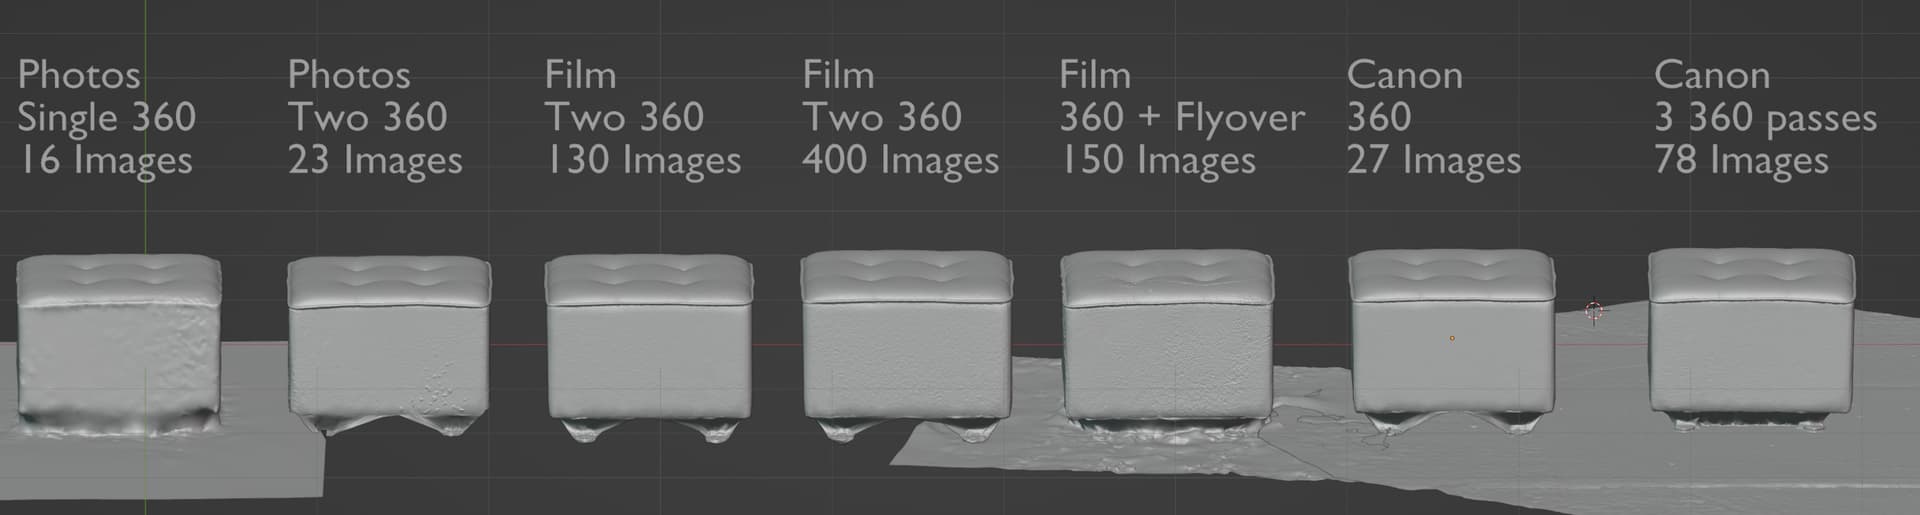
WTH is this artifact on the right side of the ottoman
the whole side is garbage - this explains maybe why photocatch has mesh alignment issues
Update on the ottoman
So the canon can get better results with less photos clearly.
Look at the seam on top.
More passes not always making better images.
Marciv Air 2 48MP Camera
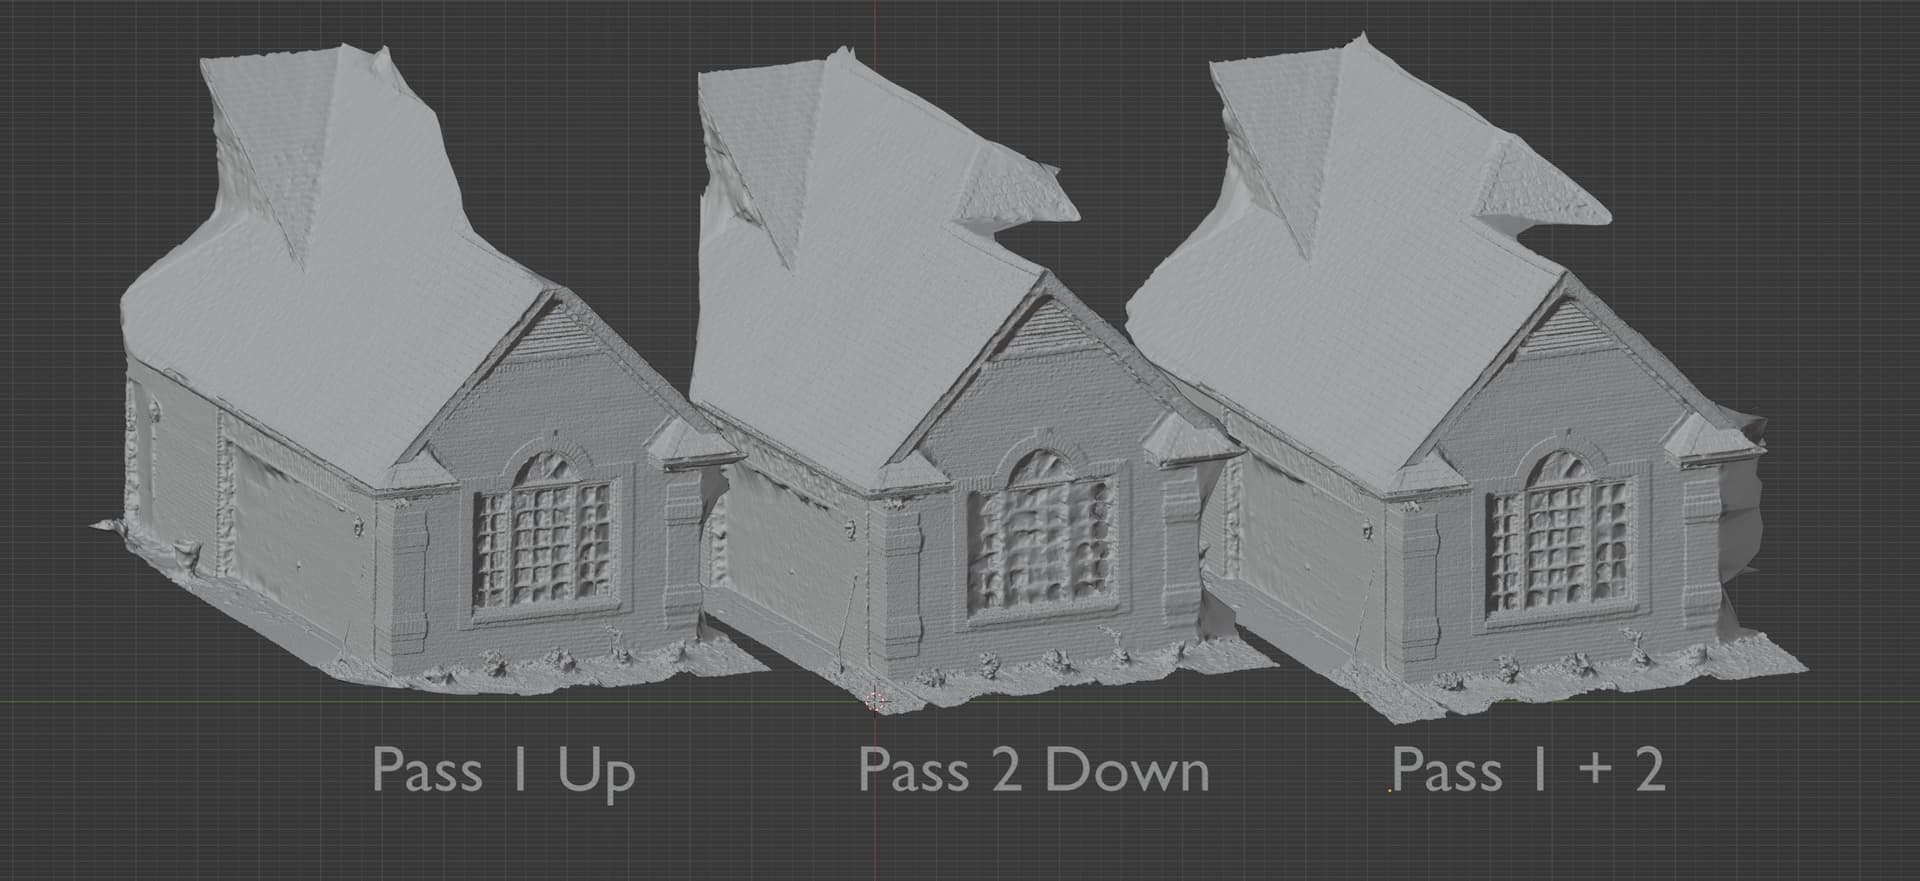
One pass down
One pass up
NOTE: one pass was a little closer thus maybe better details.
But the 3d model with both passes is not showing more details.
I’m a bit confused about this multi-passes thing. How do you do multiple passes in Photocatch?
I would just dive straight in and start seeing what results you can get.
Starting by getting the best image sequence possible is a good start I would imagine as that is very straight forward. If it’s an actors face go for 100 images as a start. Then start feeding the images in and see what the results are.
If a scan result is not the greatest initially then it can lead to a bit of tweaking and an extra pass or two. I have some go to settings now as a good start depending on the situation and subject but it takes getting used to the process. Most photogrammetry apps have filtering systems so if the initial result is not ideal you can try other passes on the mesh with tweaked settings.
There are so many little variables. Each situation is often different and also each app is slightly different. So it really is finding what works best for you and building up a bit of a knack or instinct for what works best by making different attempts and getting a feel for it.
Passes like
1 pass 360 degree around a couch
1 pass photographing up close details but also while walking around the couch
Putting each images sequence into just one folder
Or
Photographing a deck from
South side going up with the drone
North side going up with the drone
Flying with the drone at eye level along the deck
Flying with the drone birds eye over the deck
Ahh … You are talking about actual on-site photography coverage passes ? Walking or droneing around the subject. Medium range images then close up images etc…
I have to admit now I guess I was a little confused too. I thought you were talking about in-software image processing passes on the scan mesh.
Oh no sorry
Maybe instead of passes I should have said
Image sequences or image sets
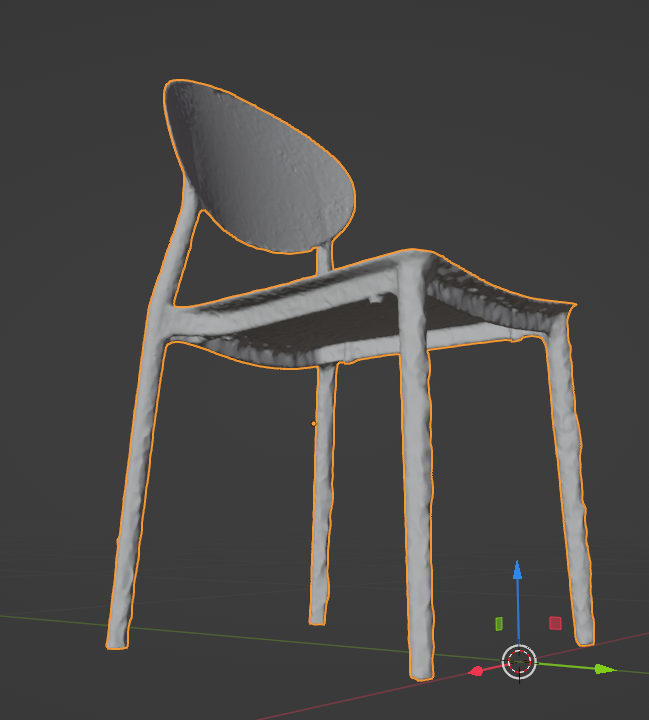
Did another quick chair
Auto masking works in bin white/black surfaces too
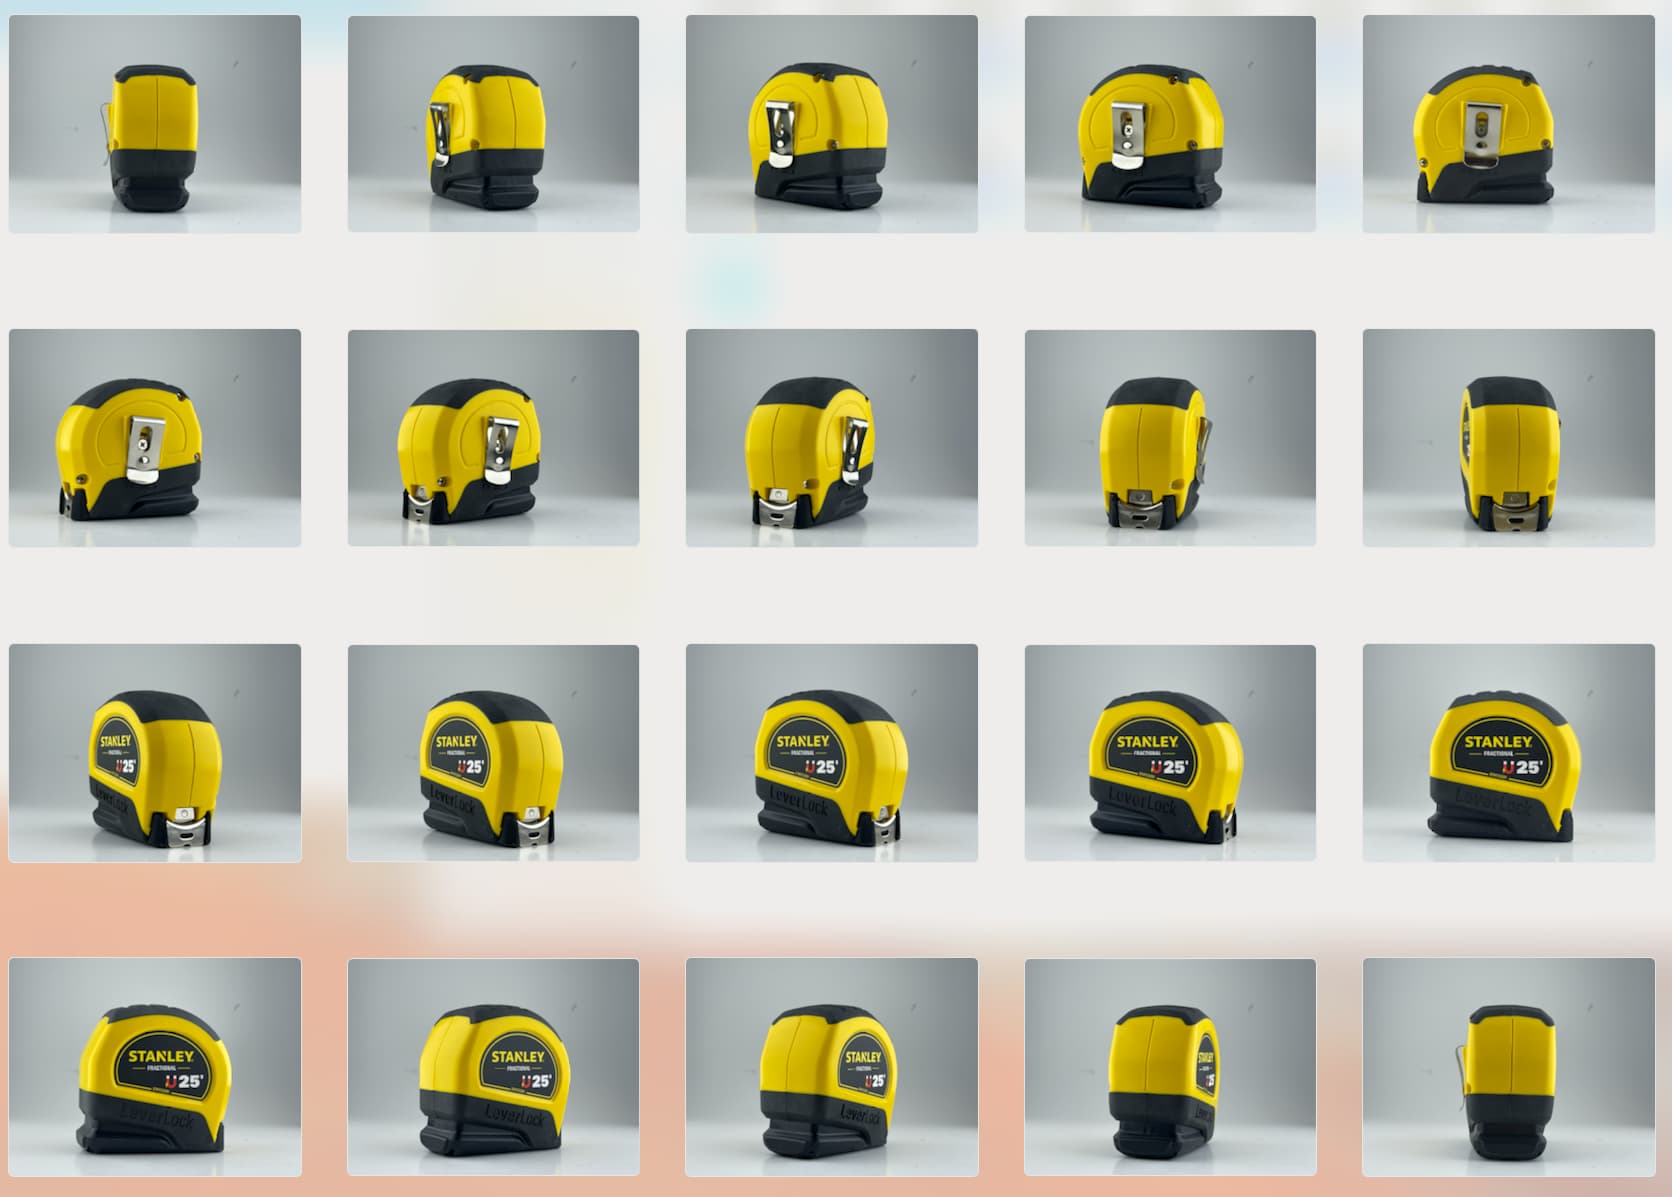
And stitching the two image sequences into one model with bottom and top scan together as one
HOLY COW IMAGE ENHANCE
I have to say thank you for having brought my attention to Topaz.
WTH is Pixelmator Pro doing? Making this a vector art?
And what’s up with Photoshop? Adding noise?
Topaz is just insane!
For the cheap people bigjpg can use useful too
So I tried this out
Stationary camera
Hand made white box (led drafting tablets as lights + white backdrop)
Hand rotated the subject
Clearly the scan has issues because of the flat / feature free areas of the product.
But interestingly this works - the object does not need to be stationary in the environment.
It works great for retopo from photocatch…but I haven’t figured out how to reproject textures doing that …although I’m sure it’s possible