I can see Piotr’s point though, because the way you create and manipulate data in Geometry Nodes is quite different from how it is done with Cycles and the compositor.
For instance, you can’t have textures that output RGB data (which you can convert to vector or greyscale data to input into the transform node). Attributes can be quite powerful, but it would be useful to also have the more straightforward way seen in Blender nodes for ages.
Thanks, but this doesn’t work, it only gives me an object space position instead of worldspace position. I suppose I can just add the object location vector, but that’s kind of a cop-out. Surely there must be a way to just grab the worldspace in the first place?
Edit: Wait. No. I can’t add the Object location, because there is no Object Info node that just simply references the original object. You have to set a specific object, and then all the instances use that one, instead of themselves. What the heck?
Edit2: Also, how do I distribute points within a mesh’s volume instead of on it’s surface?
Edit3: And how do I normalize an attribute? (map whatever unknown range is there into 0-1)
So many interesting sub-topics around here! Geometry nodes will be a great thing for modeling and animation. In my archviz studio we started integrating them in our workflow, for example to spread seats on a stadium. Here’s a small video about the basics.
I am still very new to Blender and Geometry Nodes (although I’ve dabbled with Blender for several years, now), and it’s very frustrating to being able to do something that seems to be very simple. So, apologies in advance.
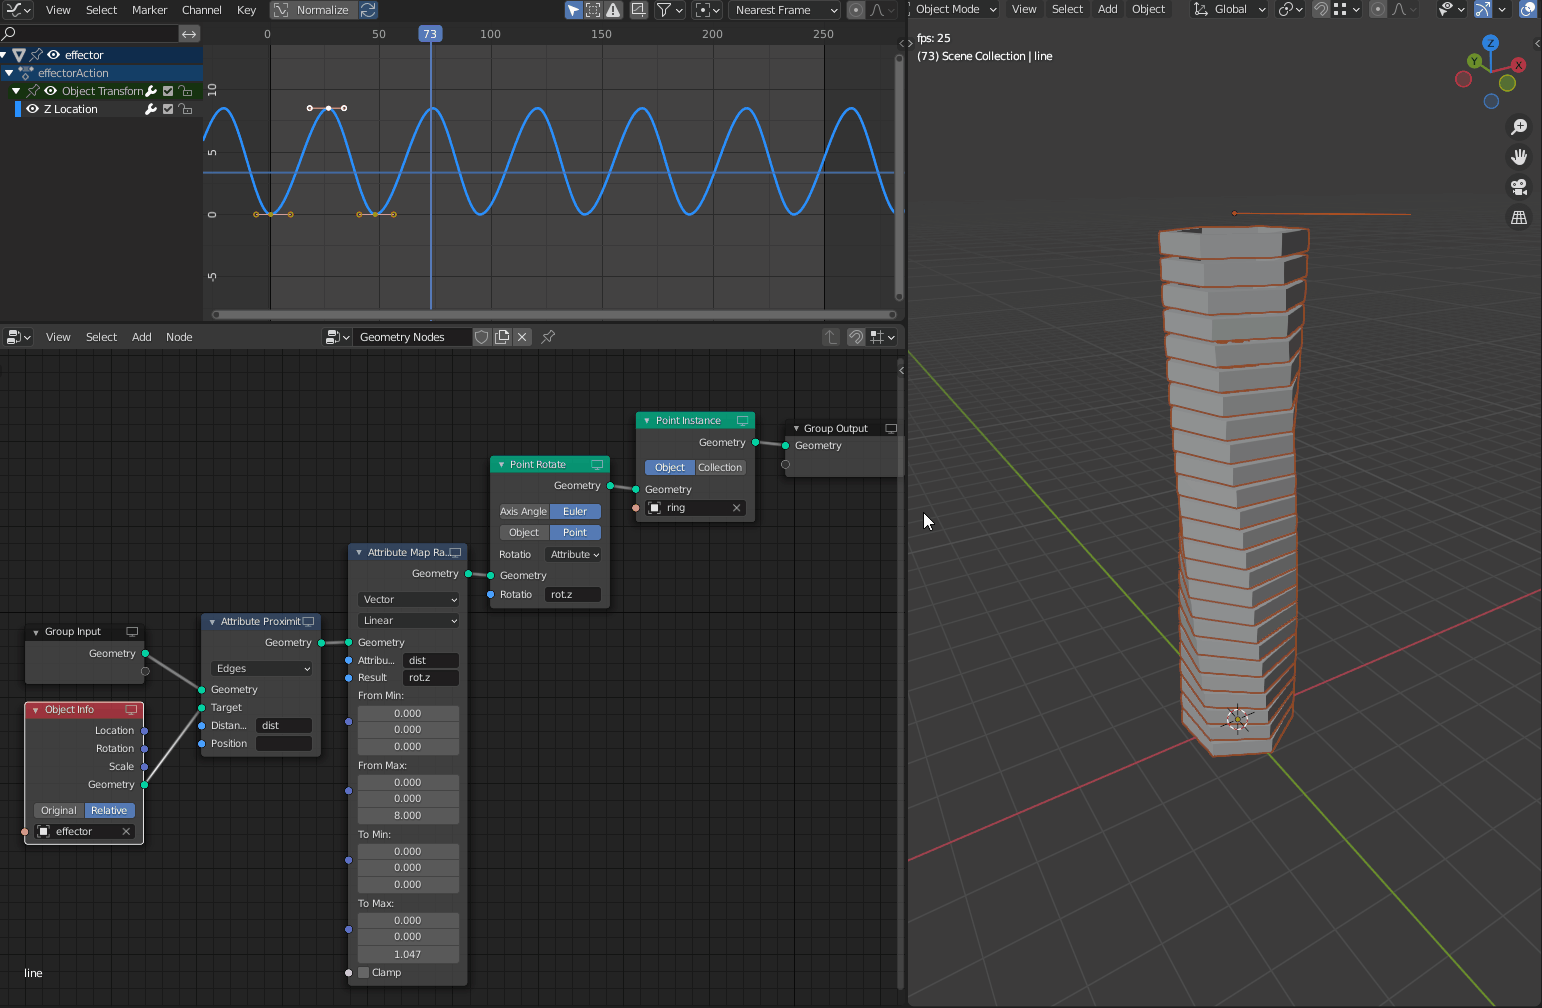
Using Geometry Nodes I made a stack of 25 hexagonal rings, evenly distributed along a line with 25 vertices. I want to use a second line to gradually rotate the rings by 60º, from the bottom to the top. In order to achieve this, I created a second line (called “effector”), which I positioned under the original setup and keyframed its movement on the Z axis to go up, ending in de exact position of my original line.
I am trying to use the “Attribute Proximity” node to get the distance from each point to the effector. I am also trying to use this distance to create a rotation factor for the Z axis. For this I am doing (in the order of the nodes):
Clamping the distance value with the use of an “Attribute Color Ramp”;
Subtracting the distance from 1 (the original distance from the effector to the closest point in my line of hexagonal objects) and storing it in a rotation factor attribute called “rot_factor”
Multiplying rot_factor by (pi/3) to get it in the range 0 to 60º and storing it in an attribute called “rot_z”
Using an “Attribute Vector Math” node to multiply the vector <0,0,1> by rot_z and storing the result in an attribute called “vect_rotation”
Trying (and failing miserably) to use “Attribute Vector Math” to add the attribute vect_rotation to the attribute “rotation”, which I presumed existed inside the system.
I am currently getting only a message “No attribute with name rotation” as a result.
When I run the timeline, nothing happens, and the hexagonal rings just sit there (which I would expect, given I am currently getting that error message regarding rotation).
Here’s a shot of my scene, with all the geometry nodes I created:
That’s where you went astray, if you click on the little monitor icon in the upper right side of a node, the spreadsheet will show you what attributes are available at that point in the graph.
I see some problems with this node setup:
first of all you are using the “Original” option in the object info node, while using the “Relative” option is the one that provide the actual distance from the two geometries, so I would switch that.
Then, I would simplify the setup using less the map range node to remap the distance into a PI/3 range (you can treat the distance value as a vector even if is a float)
Finally, rotate the points with the point rotate node using the output attribute from the previous remapping.
By the way, the frame contains just a setup to non-destructively change the line offset based on the size of the instances. This could be useful, but you can ignore this for now if you’d like. By “much cleaner setup”, I was referring to the attribute vector math using distance instead of the attribute proximity.
I guess this just shows how many ways of doing the same thing there are. That’s a good thing, because it means geometry nodes is a usable ‘artist’s tool’.
That’s where you went astray, if you click on the little monitor icon in the upper right side of a node, the spreadsheet will show you what attributes are available at that point in the graph.
Thank you @LazyDodo . That’s a very useful feature, which I didn’t know before.
first of all you are using the “Original” option in the object info node, while using the “Relative” option is the one that provide the actual distance from the two geometries, so I would switch that.
@Monorender, this did the trick and achieved the effect I was going for. Thank you. I will try your simplified setup next, as I believe it gives me more control.
@Charles_Weaver I will try your “much cleaner setup”, although it seems much above my skill level for the moment. Thank you.
Hey, I was thinking of starting a member contest for geometry nodes, and wanted to know how many people would be interested. You know, casual, just for fun.
My idea is “nodegolf”. There is a theme, and you try to get the best looking scene, while using the fewest nodes. The best looking scene is voted on, but the fewest nodes is concrete, and both scores are added together to make the final score.
You can use attribute map range, but you have to know the range (obviously)
There is an attribute statistics node underway that should do half the work for you (it outputs min and max among other things)
Id also like to see some more debug tools though, took me ages to figure out how to debug a value, (basically shove it into a transform and see where yr object ends up)
There is no real way to get the world space position, but I know of an easy workaround.
Put an empty at the world origin. Use an object info node to get that location, but set it to relative mode. Subtract “position” from the empty’s location, and output it into an attribute. This new attribute will be your global position.
I’m not sure to fully understand your question, but I think you can get the world coordinates of evrery mesh by combining it’s geometry (local space) with the transformations of the object (Loc, Rot, Scale) with the transform node:
You can actually, and it doesn’t cause any spacetime paradoxes either, but the problem was that you can only set it to one particular object per graph, whereas I needed a reference to ‘self’, so that it’s a different object per instance of the graph. Zorro_Weaver’s idea sidesteps this.
I am trying to animate a texture as it changes the scale of elements inside a sphere, using the Attribute Sample Texture node, in version 2.93. This is where I am, at the moment:
My question is: is there a way to move the texture, as would be possible—in a totally different situation, I’m aware—if I used a texture inside a displacement, controlled by an object (say, an empty), to animate the displacement on a sphere?
As the cloud texture interferes with the scale of my cubes (making them gradually smaller until they disappear altogether in several positions), I would like to animate this effect, making the texture “move” and thus affect different points at different moments in the animation.
Once again, apologies if the above is confusing: English is not my primary language.