The main issue with this kind of setup with Cycles is that Cycles has to raytrace all those transparent layers, and you need more transmission light paths as you increase the number of trees and the leaves in the scene to properly render them. However, it should not be too hard to replace the seeding image leaves with real polygon shapes.
1 Like
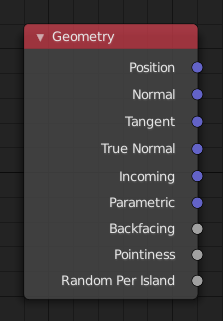
It will output the normal of any mesh you input. The fields version of Transfer attribute takes a bit of time to wrap your head around.
1 Like
From what I can see, you’ve added 5 new nodes into the tree.
A Capture Attribute node placed after the distribute, which I’m assuming is capturing the location of all the instances, and carrying that data throughout the rest of the tree.
The Transfer Attribute node with a Normals and, which I’m assuming is there to capture the normals from the base distribute mesh via the Group Input and Normal node attached to it, which can then be assigned to a variable.
And the realize node.
It seems pretty straightforward, but it’s just not working for me. Maybe it has something to do with your NewNormal variable. That’s driven from the the Normal attached to the Transfer Attribute node, right?
Edit: Here’s my file. I need to know what I’m doing wrong, cuz it’ll annoy the piss out of me until I find out.
BillboardTree_Wuh.zip (1010.7 KB)
Sorry, my bad. The attribute capture is not doing anything.
The problems I see with your file-
- You have connected the normal to the “Source Position” instead of the “Attribute” socket.
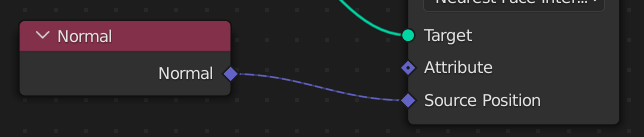
- Seems like you have not set up the material? Also make sure its on the “Leaf mesh” object.
1 Like
Got it! Didn’t even think to look in the leaf material. Thanks! 
…it’s…it’s done. After all this time…
2 Likes
Hey, I’m working on something at the moment, and experimenting with a few techniques.
That’s what leads me here. There was a tutorial I watched here awhile back that showed a way to use the geometry node in the shader editor to tweak the colors for the backfaces of your objects. I wanted to try it out, but now I can’t seem to find the damn thing.
Anyone know what I’m talking about here?
From the blender manual:
Geometry Node
Geometry Node
The Geometry node gives geometric information about the current shading point.Backfacing
1.0 if the face is being viewed from the back side, 0.0 for the front side.
Yeah, I know about that. Thing is, tere was some specific mix you could do in the shader editor to further stylize your shading using that node. I wanted to try it out on something, but now I can’t find the tutorial.
…but it’s out there, and I will find it eventually. This, I swear!
After a while, I believe I may have found what you are looking for:
Duplicate your mesh. (I would do this within geometry nodes)
Scale the duplicate a little bit. (Preferably along normals to keep it even)
Give the duplicate a black material, and mix between a transparent material. Use the backface input to make the front faces transparent and the back faces black.
If all goes well, you should have an anime-like outline.
1 Like
I had made this tree generator in September but forgot to post it due to Nodevember

tree.blend (1.2 MB)
8 Likes
That’s not a bad idea. I’ll probably use it, but it’s not quite what I had in mind.
What I was initially going for was a way to unify lighting on both faces, so that you don’t get that ugly mix of light and dark splotches that’s so prevalent in Blender trees. I could never find the video though.
In the end, I don’t think it’d work for me.
I did discover something really interesting though. During my random goofing around sessions, I plugged in a geometry node into the normal socket on the principled to see what it’d do. It shocked me to see that it made the lighting cast further into the tree itself, giving it a more shaded look, like what you’d get from transferring normals from a smudgy object. It had some problems though, so I started experimenting with it, and kinda came up some cool results.
I’ll post more once I’m done with it.

I just tried it out, and it worked really well. It won’t work on your 2d leaf planes, but it sure is a good technique to remember.
It could be very useful on the tree branches themselves.
4 Likes
Nice! Looks like an easier version of the inverted solidify technique. I’ll definitely use this.
2 Likes
Much better, because you don’t have to deal with multiple objects getting in the way.
If you wanted, you could even use collection info to apply it to an entire collection at once…
2 Likes
What I discovered, entirely by accident, is that by plugging the position on a Geometry node into the Normal socket on the principled, you get slightly more realistic shading without any of the performance hits from transferring the normals. Attaching it to a mapping node gives you a good bit of control over how the the tree catches the light.
It has some issues I’ve been trying to figure out how to resolve, mainly how to clamp it so it doesn’t overblow the lighting. But I still like the results thus far.
…I’m kinda amazed none of us have thought of this so far. Or if you have, I somehow missed it.
Without Geonode:

With Geonode:

What it’s doing:
Overblown lighting:

9 Likes
Hey, @Xeofrios, I found a better way to get multiple colors out of your leaves. Instead of taking a noise or musgrave texture to apply random splotches across the entire canopy, drop in an Object Info node, attach the random socket to the a color ramp fac, and it’ll (appropriately) randomly assign colors to each individual instance.
If you want one color per leaf bunch, set it to constant. More gentle blending from one color to? Use B-spline.

Edit: Oh, and if you want to control the strength of the Position on the Geometry node, just slap a Normal Map node in there, set it to World Space, and put the strength down somewhere low, like 0.04. You’ll get a nice mix of the default shading, with some boosting from the Position.
2 Likes
In my file, the instances are realised (to transfer normal data) which is why it was not possible to use the object info. Though you can have per object colors now that we instance attributes.
1 Like
I found this the other day…
…and decided to make it for myself. The end results? Promising. It might be a little TOO stylized for my taste, but it’s interesting nonetheless.
Check it out for yourself.
TreeBlob.zip (276.0 KB)
Experimenting with a mix of the two. It runs surprisingly well, and I can turn on Alpha Clip in the Shadow Mode and get some nice, smooth lighting through the object, and it looks pretty okay. But it does have some downsides.
-
For some reason, it will not light if you aim the sun lamp at it from a certain angle. This applies to both the leaf blob above, and the tree. I have no idea why it does this. It is a mystery.
-
That the leaves are all crossplanes means that when you turn on contact shadows, it just looks GODAWFUL TERRIBLE BAD!
-
When I try to render it in cycles, it won’t apply the alpha to it.
-
The bark texture on the tree disappeared. I dunno why.

I think I like my original better, but if you want to go full procedural, this is a nice option.
Better late than never…
PROCEDURAL TREE CANOPY AND LEAF DISTRIBUTION, NOW WITH HANDY SLIDERS!

…special. ![]()
ProceduralTreeLeaves.zip (3.3 MB)
15 Likes