Damned, you found your way in face realisation ! Great man!
Syziph: Thanks dude! You’re 100% correct on the back of the head, I’ll fix it as you suggested etc. Thanks man. The texture was just a test for now, but as soon as I finish the modelling I’ll add the eyes in etc 
ahuri: Thanks hey
Here’s another test I did for anyone that might be interested, it’s purely a test for me to work out beforehand the best way of texturing. Especially for when I do the tutorial. It only took me about 20 minutes or so to make.
Comment welcome but pls don’t crit on the texture yet guys. It’s purely a test.
Attachments

Man you are a great modeler Len, wish I had your talent 
very realistic! cant wait to see the end.
Thanks Mmph! I appreciate it hey, I’m still learning the whole modelling thing LOL, I’m still very dependant on tutorals so I can follow where all the loops etc go Hopefully one day I’ll be able to just do it from memory and develop my own method. Thanks again hey!
Come on, man! Give her some eyes  Or just close them for … a while. She looks so real that those spheres scared me
On the last render I can’t see the anti helix of the ears.
I mean:

Although the reference images are not so high res I think I can see them bumpping out a bit in Front view.
LOL patience dude I’m still busy modeling But will do them eyes as soon as possible promise! Thanks for your feedback though dude, much appreciated.
Edit PS: you’re right about the “Anti Helix” area hey, I need to fix it, it got distorted when I did some shaping to the head Thanks dude.
hahaha, holy crap, I almost missed this one!!! Dude, I bow before you. This is even better than your self portrait. Though can I like push you to use the multilayer SSS shader? Please. haha.
Careful, Len, you’re modeling yourself. That is to say, I see a lot of you in your model of her. She’s going to wind up looking like your twin sister. Study your proportions and her proportions, find the differences, and make sure you are using her proprotions on the model.
Framedworld: Hey dude you’ve been quiet lately, so have I though Thanks for your comments man. Hehe, it’s woth a try hey, any chance I can tempt you into sharing your Ogre .blend with me so I can have a close look at on how you did the multilayer SSS.
Orinoco: Haha gosh I must’ve been doing it subcontiously. Thanks for pointing it out to me hey, I’ll definately keep it in mind while I finish up the moddeling.
Vrey Nice work, Len!
Looking Real. Eyes are nice and bright.
Excellent looks flawless!
You should do the who body it would be not the first but very few and the first
ive seen with blender sites
kkrawal: Thanks dude
darkcgi: Thanks hey I won’t do the whole body this time but might at a later stage. But I will model her shoulders, upper arms, and breasts and a bit of the torso.
Hey there guys.
I’ve had quite a few guys ask me for tips about UV unrapping, so I decided to just show you what I’m working on. I still need to finish modelling and unrap this properly again, but I thought I’d just let you in on some UV unrapping tests I’ve been doing.
I haven’t seen anyone else use “project from view” unrapping function like this yet, so guys this is purely experimental. But maybe it will help. What you see here took me about 5-10 minutes to do!
I’m in a bit of a hury so I’m gonna keep this really short, hope everyone can follow it ok.

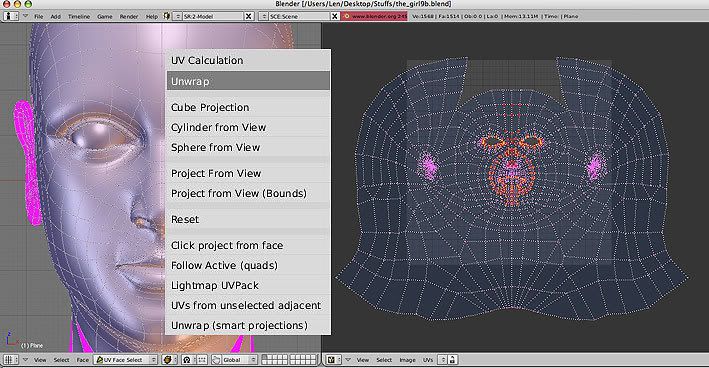
Added seams. One horizontally across the forehead, and running vertically from the front all the way to the back of the head. (As also done by others in other tutorials)
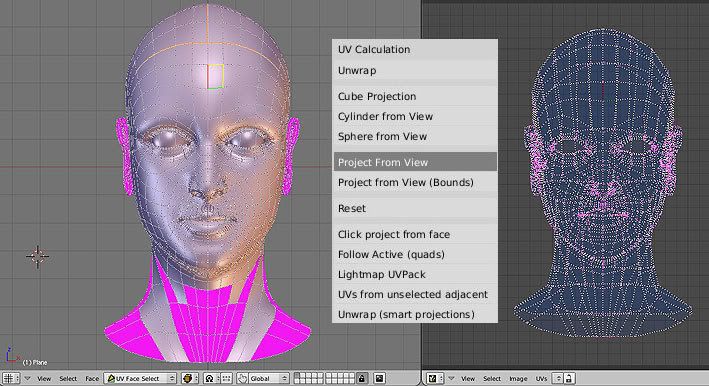
UV Face select mode left. UV image/Editor right: Select all, press “u” for unrap and select “project from view” to get the direct "unrapping on the right.
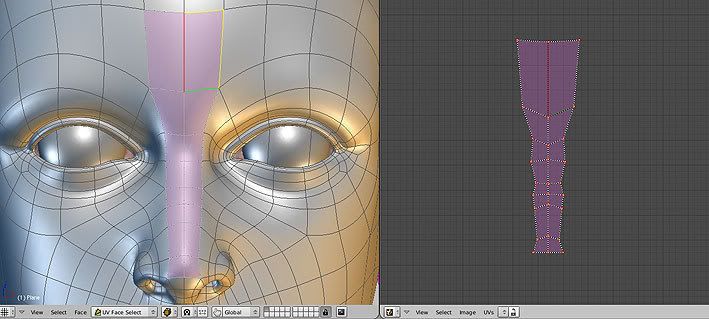
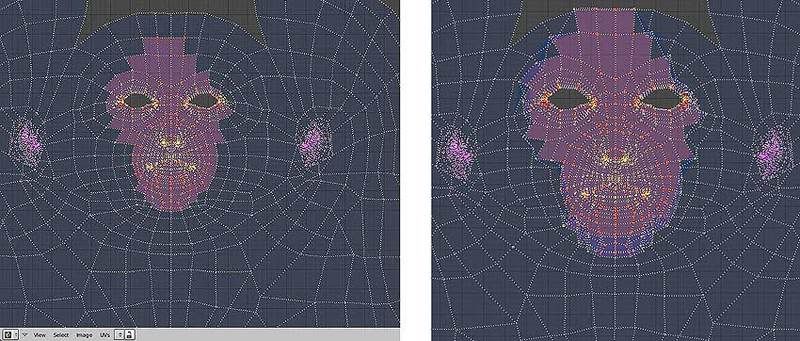
Select faces on bridge of nose running up to the forehead only. Then only those “unrapped” faces will show up on the right. Then select and pin all those buggers down!

Select looped faces around mouth, then select the inside loop vertices only and pin them.
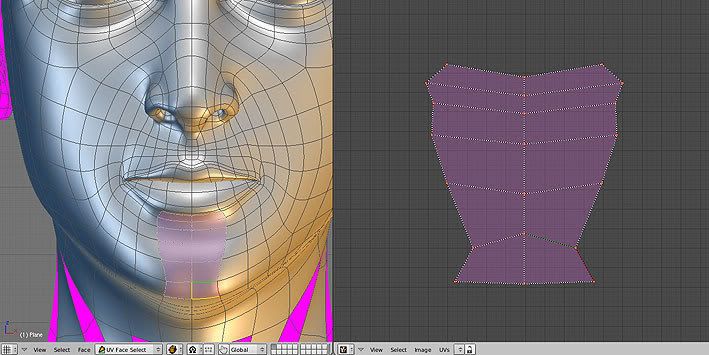
Select vertices on chin, pin them all down.
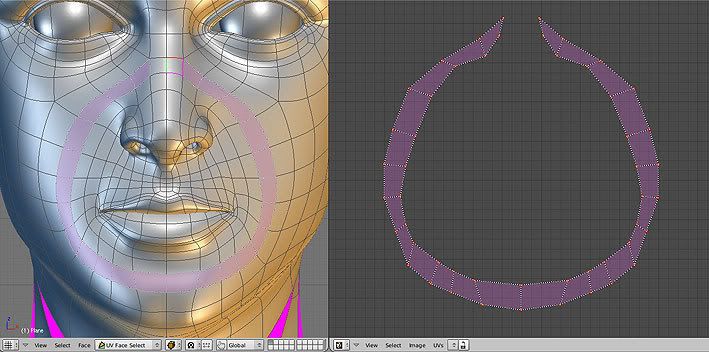
Select loop faces from nose to around mouth as indicated and guess what … pin all of them down too!

OK, now I selected all in the left viewer and now one can see all the pinned vertices on the right along side the rest.
Then, here comes the real magic!! Press “U” and give it a normal unrap as indicated. Voila! One will have to select all in the unrap and scale it down to fit the prescribed area.
Then I selected the entire centre area, making sure to get all those pinned vertices selected (doesn’t matter if you select some unpinned ones alongside it) and scaled it bigger in all directions. Press “U” to unrap again.
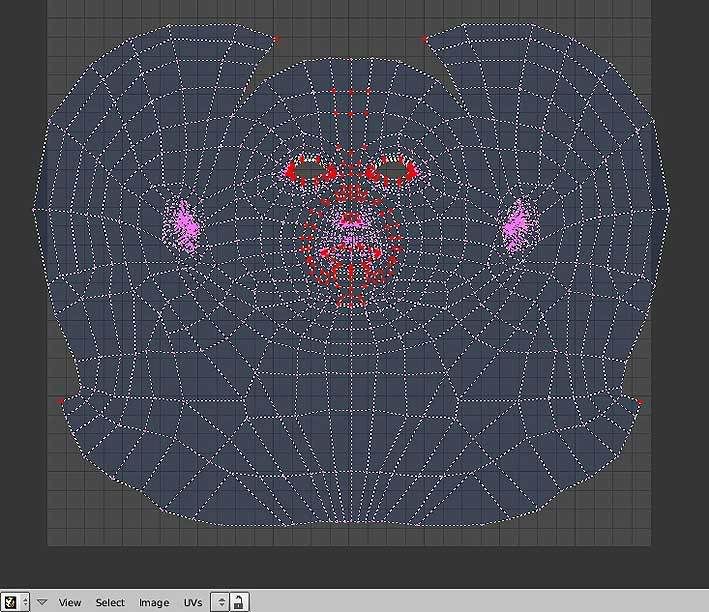
Here you can see I also pinned two vertices at the top, and two at the bottom, but this is by no means done. Entire unrap needs to be scaled down to fit. One might want to move the eyes wider from each other, and there will be lots of overlapping vertices that needs fixing. Also possibly other areas where one needs to move loops and vertices wider or closer together to prevent distortion. Then normally I would also weld the seems at the top.
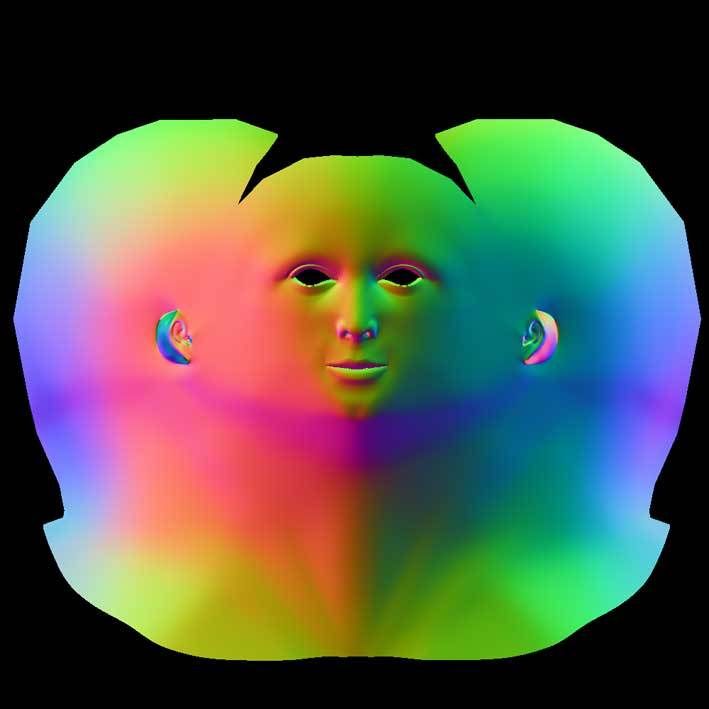
Exported/saved the UV unrap to an image, opened it up, and baked the normals.
Like I said guys, this is merely a preview, I’ll do everything properly when I do it again, and also spend more time explaining when I do the proper making-of/tutorial.
Hope this helped a bit
All the best.
Len
Hey Len!
You got some amazing work going on here, keep it up! Can’t wait to see the tutorial!
Greets,
Tobi
She’s awesome bra. Scary how much she looks like my ex-girlfriend though! Seriously - except the eyes of course!! And hair!! And the closed mouth! You are a genius and you have done us all a huge favour in posting the knowledge. Now to work through it, hmmm. … Blessings
Cool tut, Len. Looks like you’ve reinvented Painless Organic Unwrapping, with project from view instead of tweaking the mesh. Nice addition to the workflow. I love synergy! :yes:
Yes, such a tutorial would be faNTASTIC!!! If you blend it, they will come.
Wow, that tutorial made it seem easy… What about the ears though?
Great stuff dude. Yeah, for sho do the tutorial. I love your method of unwrapping. In and out in under half and hour on a complex mesh such as this is fantastic. Keep it up, holmes.
Veeeery nice again Len!!
I thank you a bunch for that tutorial, it really made it easy as pie.
Keep up the good work!