Hi bud you might be onto something…in fact, and if my memory serves me correctly I loaded a texture and used it as a grease pencil brush, can’t remember how I did it though 
1 Like
Sorry to disturb you Regnas (wrong Reply button pressed  )
)
FX, modifiers & a texture
Valuable threads
Ctrl Tab to change mode. And then, left click to use a sculpt brush.
That is what you have currently.
2.8 have same brush settings and curves as in 2.79 + the ability to assign a specific material with textures to a specific brush.
You have to use pin button in Topbar. I don’t know why but this button is missing in Tool Properties tab.
Right, true. I meant something more robust that also includes natively being able to change the softness/hardness of the brush.
That would mean using a vector line GP creates as a guide for a masked trace… right?
Sure…? Merely an artist here, don’t know technical specifics, haha.
Sorry to necro this thread, but I didn’t want to start a new one -
Can someone confirm that the Pinch/Inflate brush is broken? It’s supposed to pull strokes towards the center of the brush, right? Meanwhile it’s doing some odd, useless warping thing.
Also Simplify Adaptive doesn’t seem to be doing what it’s supposed to.
Pinch/Inflate brush effect is not supposed to be relative to center of brush. It is relative to GP points under the brush. Pinch brush makes GP points closer by reducing shortest distance between them.
Pinch brush on UVs or meshes, made of quads, may give feeling to make UV vertices closer to center of brush. But it works the same.
Here, GP strokes are often longer than brush radius that is passing above only one or two.
But if brush radius is big enough to include GP strokes from all sides, GP points will migrate at center of brush.
Brush have a Falloff. Strength of brush is higher in center of brush. But the goal is not to migrate GP points to center of brush.
IMO, Pinch brush works as it should. User have to use a big radius or to create a smooth transition by making several sculpt strokes.
Same thing for an Inflate, 2 GP points will be spread according same line without taking center of brush into account. Without falloff, 3 GP points under cursor will describe a growing triangle until one of GP point is out of brush radius.
What counts is scattering of points under brush.
To sum-up, if you want an effect on a suzanne, use a brush radius to include the suzanne.
If you want to make peak or a bulb on a GP line at a certain position, use another brush Grab or Push.
Yes. It looks like a bug of modifier.
A certain amount of GP points, at starting of strokes, relative to factor of modifier, are not taking into account by modifier.
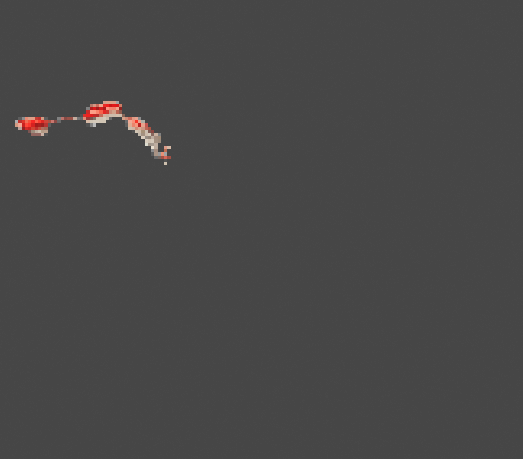
Just so we’re on the same page here, this is what I mean:
That doesn’t look like any behaviour you’d want.
Notice how the lines are to the left of the stroke, but pinch warps them to be on the right of the stroke.
Also note that this doesn’t happen on a fresh file, but only happens after drawing for a while.
Here’s a file that exhibits this:
pinch.blend (671.9 KB)
That’s the problem to test only default scene, with default object.
I confirm the bug that should be obvious. Pinch brush goes crazy when GP object location is not at scene origin.
You just have to set GP object at a location different from X=0,Y=0, Z=0 to see this offset.
Bug is not limited to Pinch brush. Rotate and Clone brushes are affected by offset, too.
1 Like
Good find!
I already reported here: https://developer.blender.org/T66265, so feel free to add this information.
1 Like
This would be great if you could also change the layer’s opacity as a whole, not just of its member strokes.
You can already do that. There is an Opacity slider under Layer’s Blend mode.
You can adjust opacity through an Opacity modifier restricted to a layer.
But modifier or slider are influencing Opacity of material and video is about strokes strength.
What is really lacking is a way to set strength as a whole.
User can adjust thickness or material color or material opacity. But user can only reset Strength of strokes by using Strength brush in Sculpt mode.
1 Like
There is a slider under the layers but here’s the problem with it:

This is much better than what was before, but it’d sure be nice if it distinguished between layer opacity and stroke opacity.
Using a brush at 50% opacity should result in the left image, but lowering the whole layer’s opacity to 50% should result in the right image. Or, well, that’s what years of Photoshop have taught us.
Yes, yes, Blender is not Photoshop, but in this case this would be useful behavior.
It is probably more complicated. There is only one material per stroke.
On a layer, there can be as many materials as strokes to deal with.
Currently, you can obtain something close with 3 layers.
One regular where strokes are joined into a unique one with opacity at 50%.
One mask layer with opacity at 100% for the fill.
One duplicate of fill with opacity at 50% driven by first layer opacity.
That is a complicated workflow, (not really practical because substract layer will influence all the others before it) but that is possible to obtain such result.
I don’t think this is an insurmountable roadblock. It just means each layer would have to be rendered as a separate pass before blending. Or maybe there’s another, shader-based solution. I’ve no idea how GP strokes are currently rendered, so take this with a grain of salt.
We’ll probably get there eventually ![]()
This cool development seemingly came out of nowhere:
I wonder if it also takes into account gradients. Also, now, we just need the Grease Pencil export to SVG.
@bartv I think the topic title should be changed to something like “Grease Pencil 2.8 development” since this thread isn’t really about the news of Grease Pencil being merged into 2.8 anymore. I almost started a new dedicated thread for Grease Pencil development discussions.