Hello, i’ve been recently struggling with something when trying to rig a mesh, i’ve made a human model with Make Human and imported it into blender with an armature, but i can’t figure how to add new meshes to the model, example: i want to add a hat to my model so i select the two of them and press CTRL + J to join them but when i do that the mesh moves out of place, i also tried to join the 2 meshes first then join them to the armature, i did join the two meshes but when i joined them with the armature some meshes went out of place, Sorry for my bad explanation i hope you can help me out.
You need to parent the new mesh(es) to the armature: Select Mesh, SHIFT+Select Armature, CTRL+P => “Automatic Weights” then it should work, otherwise post the blend file for us to look at.
It will never work joining the meshes, because the new mesh vertices have no armature weights assigned.
Cheers, Clock.
EDIT:
For a hat you can just “Bone” parent the hat to the Head bone of the MH Armature: Select hat mesh, SHIFT+Select Head bone (Armature in Pose Mode), key CTRL+P => “Bone”.
1 Like
Thanks!!! that solved the problem with the hat, now i need to put boots on it, but they’re too large for one bone
, i tried selecting 2 bones and one boot, then CTRL + P > Bone but when i rotate one bone the mesh of the boot doesn’t deform on the other part that should be assigned to the other bone, (I also tried selecting the mesh and the whole armature in obj mode then CTRL + P > Automatic weights but it didn’t even move) the boot to the armature, but that time the boot didn’t even move) i think that is the last problem that i have.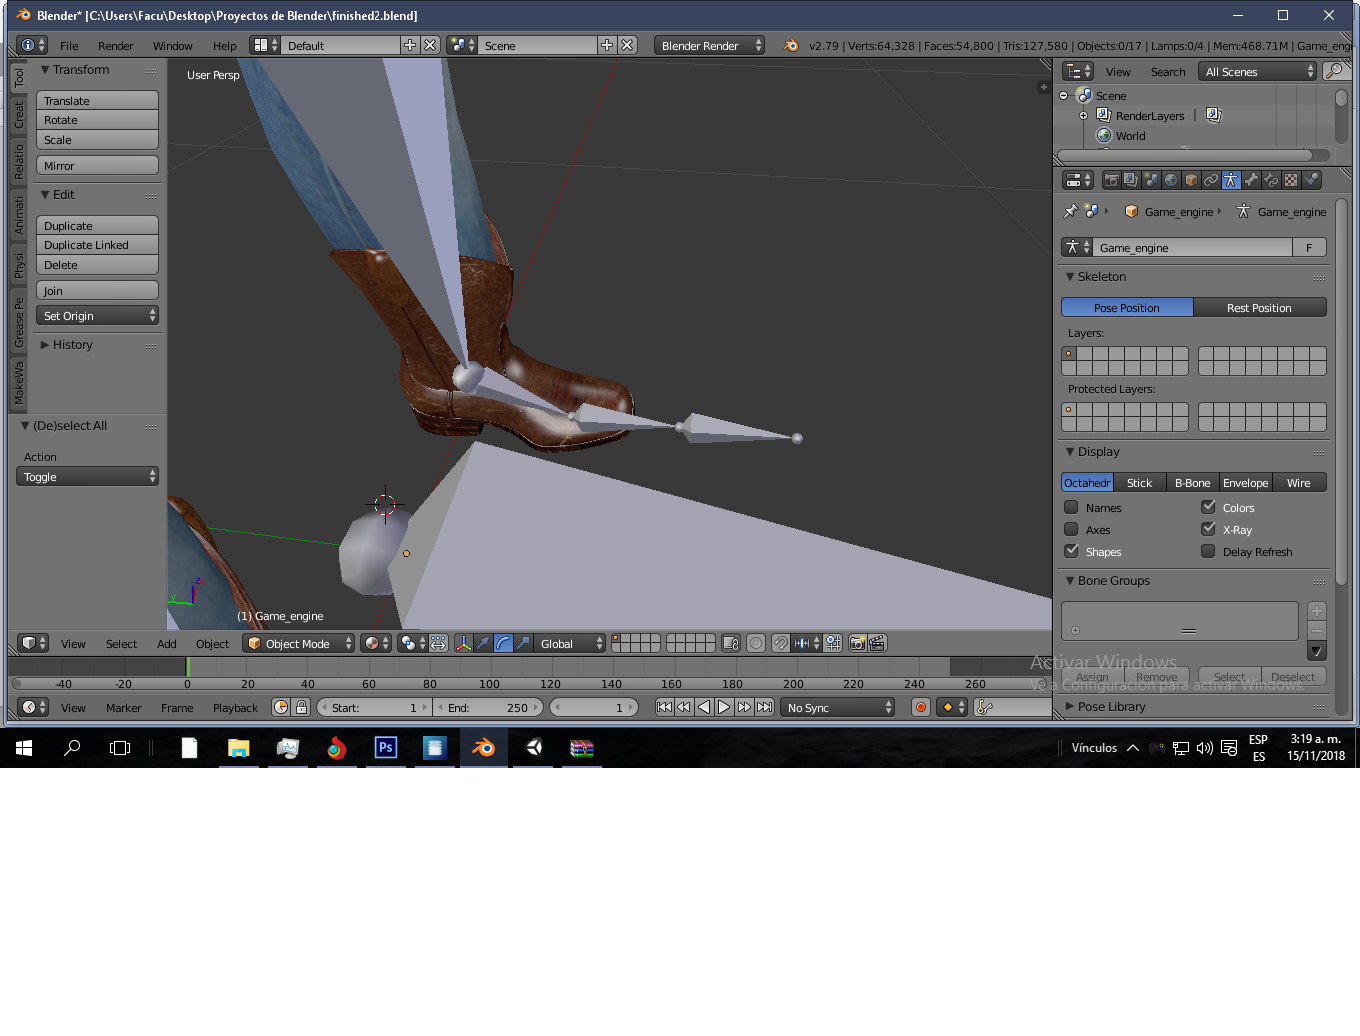
OK, I just built this for you: boot.blend (466.6 KB)
Just rotate the bones, some axes are locked. The process was:
- Build boot mesh.
- Build Armature and put it in Pose Mode.
- Select Boot mesh, SHIFT+Select Armature.
- Key CTRL+P => Automatic Weights.
- Rotate bones in Pose Mode.
This procedure should work for you, can you post the blend file to pasteall.org/blend then post the link to your file here and I will look at it. The foot bones look too big to me, but I need to see your file please.
This won’t work, “Bone” parenting parents the whole mesh to one bone, so if you had two selected Blender would chose the last one you selected. This method is only to be used when you don’t want the mesh to deform at all, just to follow the bone it is assigned to.
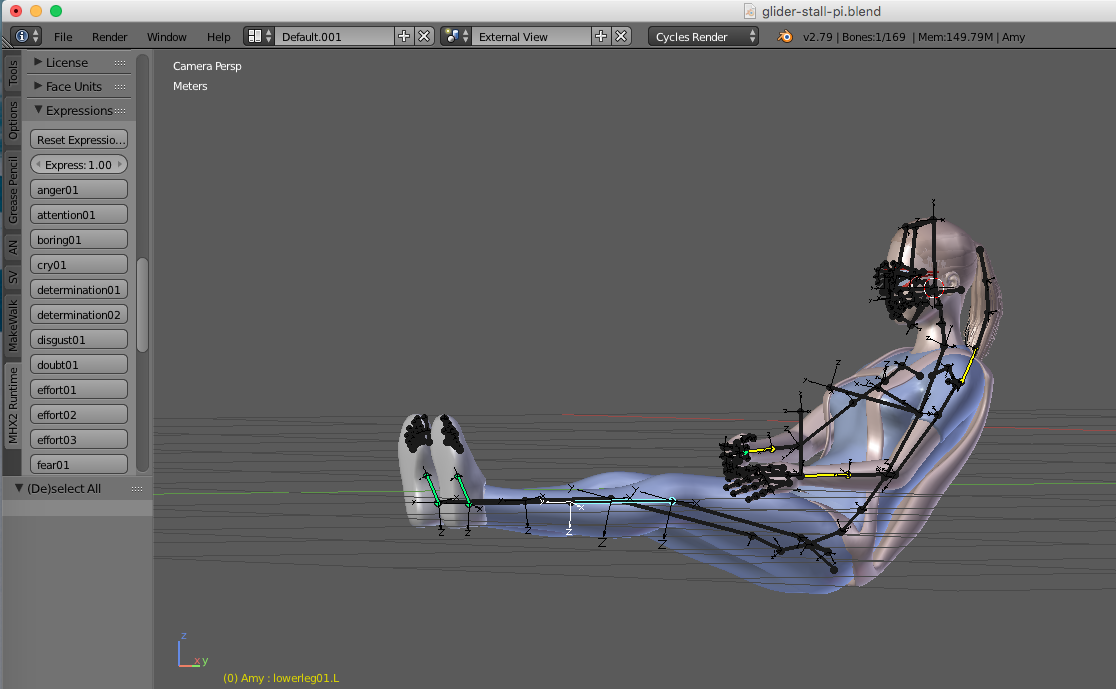
BTW the best way to do this is to clothe the character in MakeHuman, then use the MHX2 importer add-on in Blender, the whole lot then comes in parented with weights assigned. Details of MHX2 importer here. This lets you import all the poses and expressions from MakeHuman also, and if you select the “Add Simple Materials” button, you get good base materials from MH. This is how I do things and it always works well. Example:
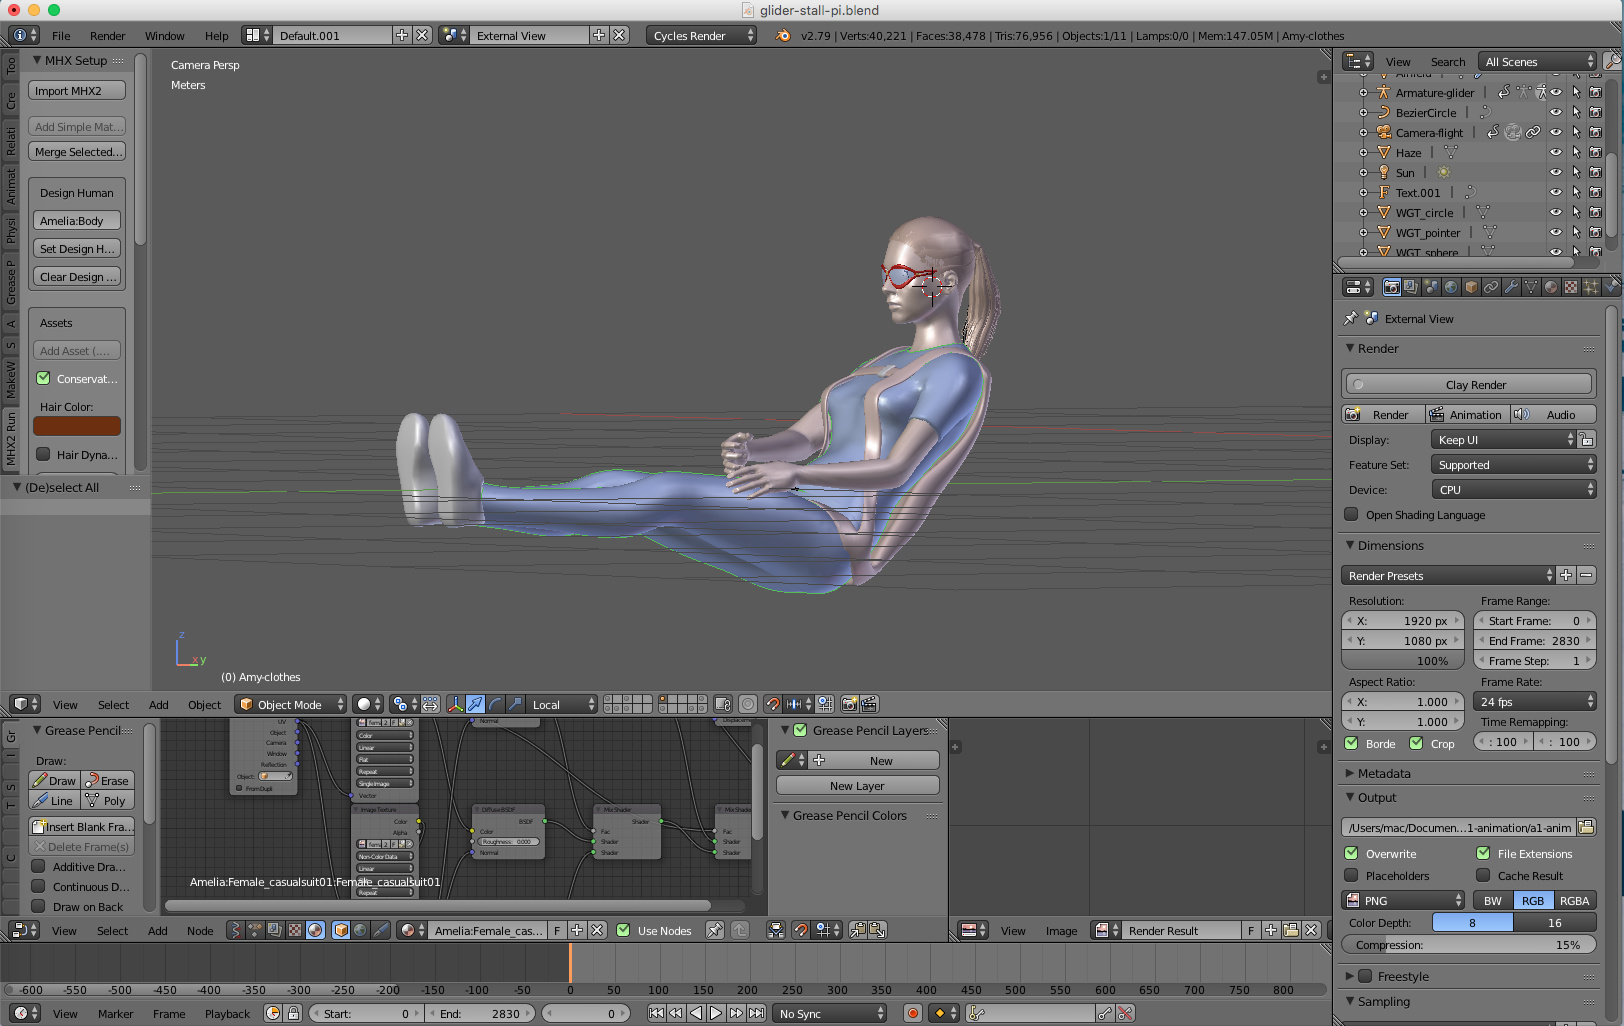
This is the girl in the images above in MakeHuman, ready for Export.
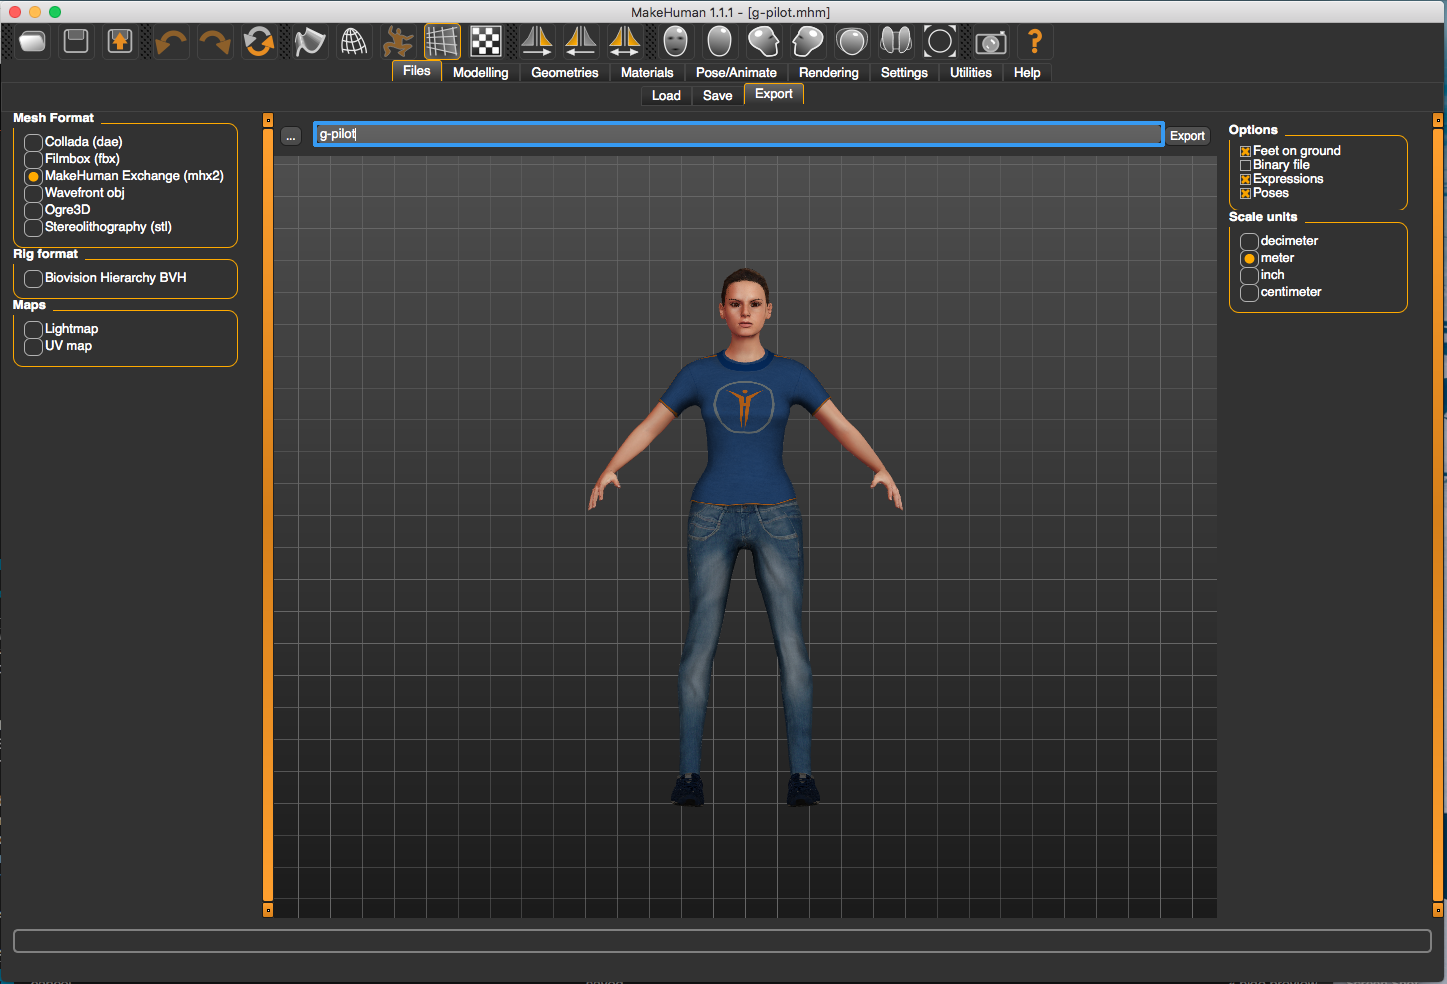
Note which options I have selected before I click Export.
Cheers, Clock. ![]()
EDIT:
The bones in her ponytail are added by me so I can animate it in flight (she flies a glider) and the parachute is also added in Blender and then parented to her armature with automatic weights. Video of one flight is in the Animations section here on BA.
I tried
But it didn’t work, when i rotate the bones the mesh doesn’t move
Link to blend file: http://pasteall.org/blend/index.php?id=50722
I exported the file from MH as a FBX file, so it already had the armature attached to the mesh.
(It uses the “Game Engine” skeleton).
I did that but MH doesn’t have a lot of clothes, and i don’t know how to make a mesh for importing it into MH ( Like what files do i need to export or if it needs to have something else other than the mesh)
See this page, everything you need to increase the clothes in MH from the community is there.
If you want to make your own clothes, see this page.
MHX2 is a much better alternative in my humble opinion. ![]()
I will look at your file later today.
Cheers, Clock. ![]()
1 Like
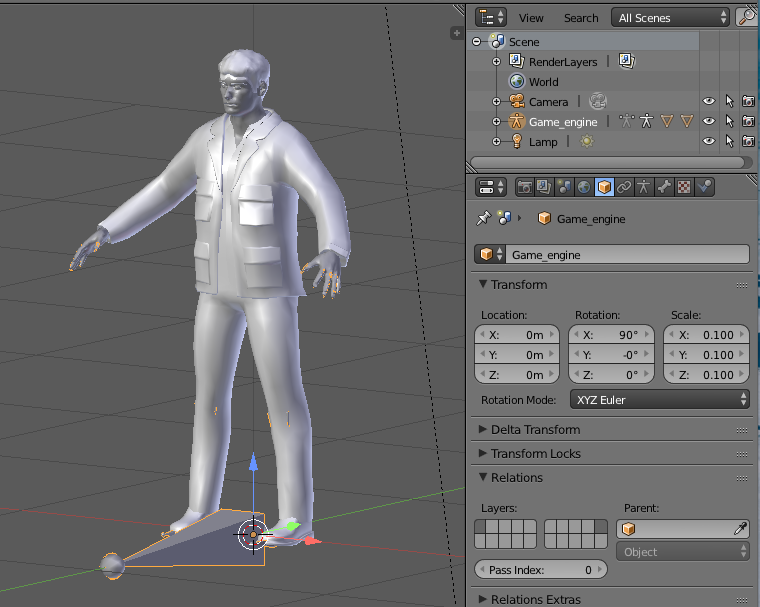
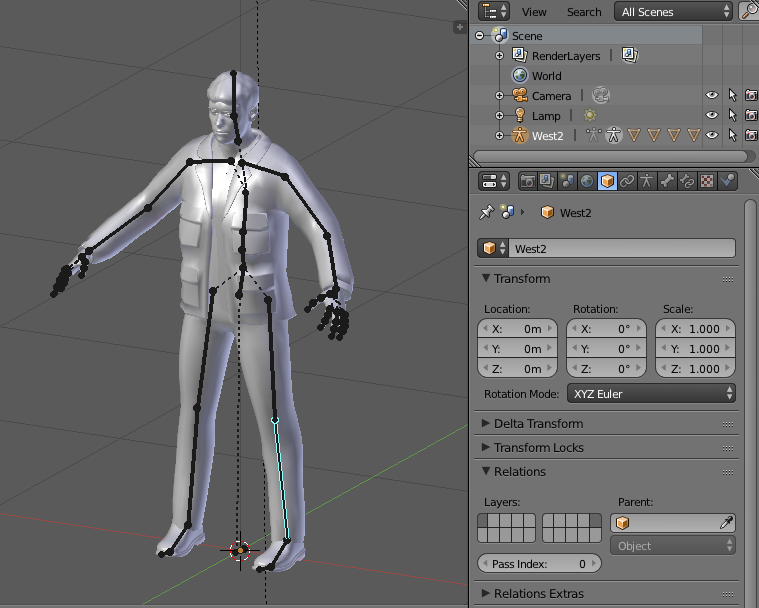
Sometimes I reply to myself… I took a quick look at your file. So, ALL your meshes and armature have unapplied rotations and scales:

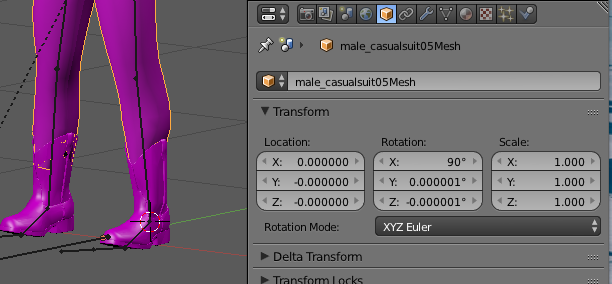
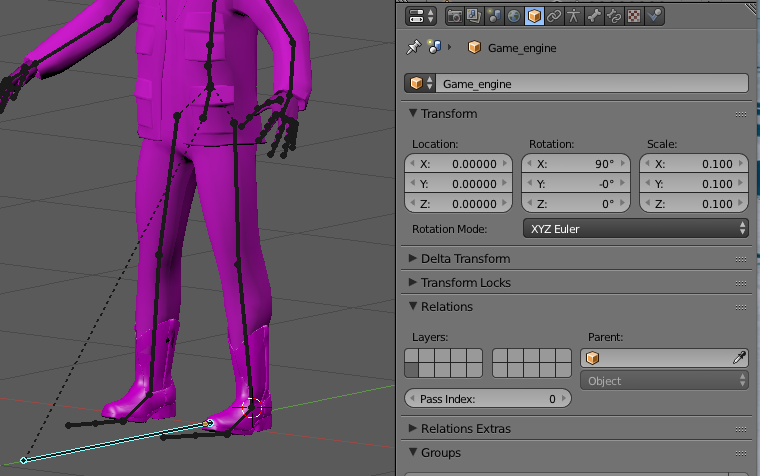
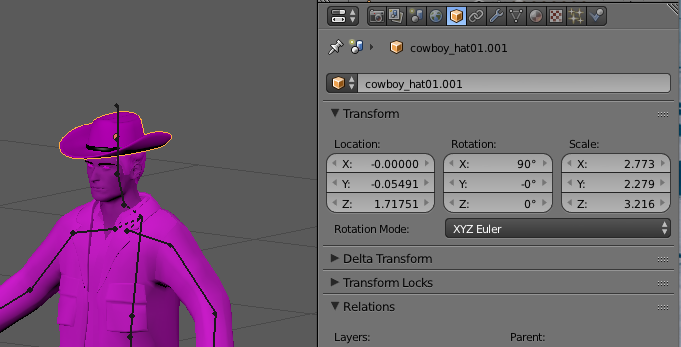
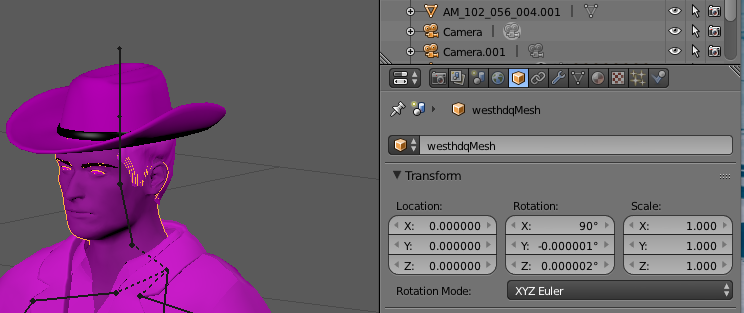

It’s a wonder ANYTHING works at all! Do all edits in EDIT mode, not object mode, or apply rotation and scale BEFORE you parent mesh to armature. I cannot understand how the armature and meshes became like this if you imported direct from MH, that has never been the case for me. I will try to sort this out later, but it will take some time without the export file from MH.
Cheers, Clock. ![]()
1 Like
Next instalment:
This is the message I get when I try to parent the boot to the armature:

“Failed to find solution” means that the mesh is FUBAR, or maybe the armatures, but in this case, here is your boot mesh:
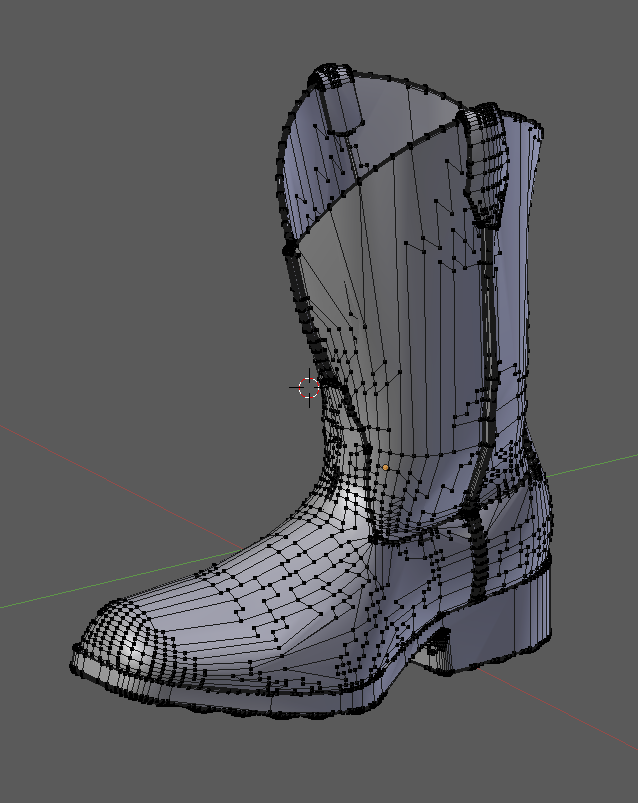
The topology is sh*t to put it mildly ![]() , where did you get this from? It’s full of ugly ngons (faces of more than 4 vertices), it has overlapping faces, internal faces poking through external faces, etc. etc. and is therefore totally unusable and totally un-resolvable I am afraid to say. If you are going to animate an object, it needs to be made of quads (four sided polygons) with good proportions, good face flow, etc. Also for the game engine, if this is where he is to end up, the mesh is far too complex to process in real-time. Sorry, but these boots are not made for walking…
, where did you get this from? It’s full of ugly ngons (faces of more than 4 vertices), it has overlapping faces, internal faces poking through external faces, etc. etc. and is therefore totally unusable and totally un-resolvable I am afraid to say. If you are going to animate an object, it needs to be made of quads (four sided polygons) with good proportions, good face flow, etc. Also for the game engine, if this is where he is to end up, the mesh is far too complex to process in real-time. Sorry, but these boots are not made for walking…
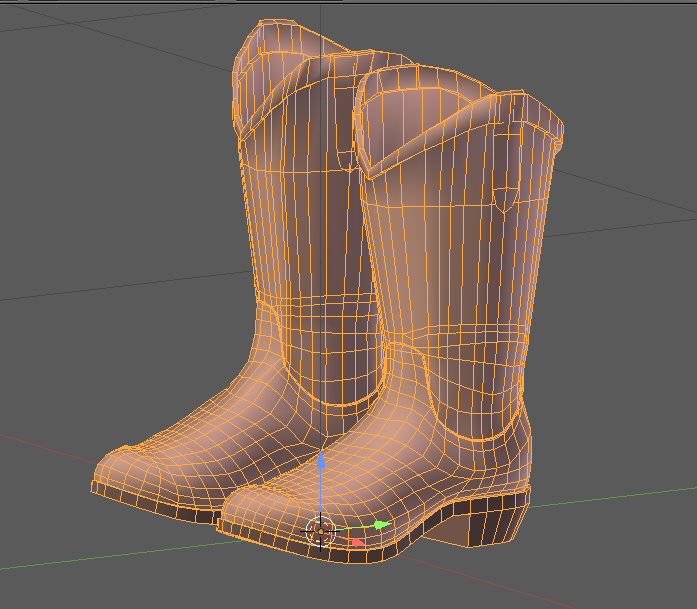
This is an example of good topology for a boot: ![]()
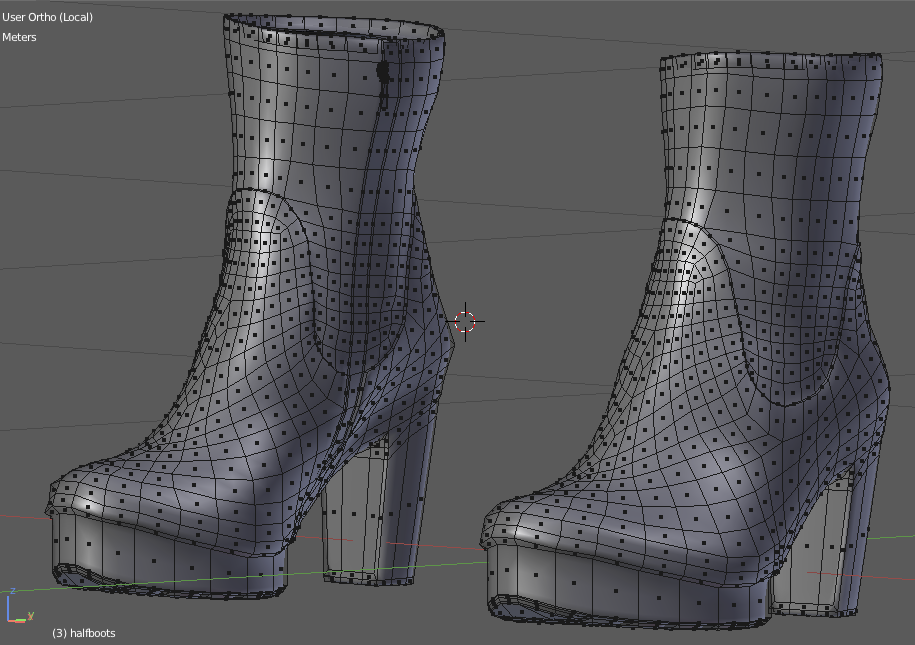
All quads, good face flow, good proportions, all round excellent and came from the MakeHuman clothes resource I mentioned previously. Not suitable for a cowboy though…
The rest I could spend many hours putting right, but if you get the original MakeHuman file to me, I can put it into a new blend file, in very little time, for you and get you started. If they won’t let you post it here, PM me for my email address and I will process it.
Cheers, Clock. ![]()
1 Like
Weird… i don’t remember doing any rotation or scaling on the default meshes exported from MH, apart from the boots and the hat
Here is the FBX exported from MH
http://www.mediafire.com/file/2v8xklte2ela7sb/westHDq.fbx/file
i know, but i had to use limited dissolve because the file was too big for uploading it, i have the higher quality one in my project (Also the mesh having that many polygons is really a problem, is there any way to decrease the numbers of vertices without screwing up the whole thing?)

I don’t know if you need it but here are the files that i used:
Boots:
http://www.mediafire.com/file/otmgaz1kk2b0rt2/Boots_1.obj/file
also i just downloaded another mesh of boots that has less vertices:
http://www.mediafire.com/file/c327247ra7d645l/boots_2.rar/file
Hat:
http://www.mediafire.com/file/g32l1i7d6pdu25b/cowboy_hat01.obj/file
PD: Sorry for all that mess, i guess you could say i’m not really good at this ![]()
Don’t worry mate, we all had to learn at some point in our lives…
I’ll look at your files and get back to you tomorrow, off out with Mrs. Clockmender now. ![]()
Cheers, Clock. ![]()
EDIT:
While she is still tinkering with her makeup… The FBX file is the problem, the objects are coming in with rotations and scales, I have only imported this, done nothing else:
And it is rotated and scaled, not good, can I have the MakeHuman saved project file please, not the export file, so I can try an MHX2 export, oh shit Mrs. C is calling…
Sorry for the delay, i was a little busy, you mean the .mhm file?
Here:
http://www.mediafire.com/file/wgsud5p1hx9z9mh/West2.mhm/file
Exactly! ![]()
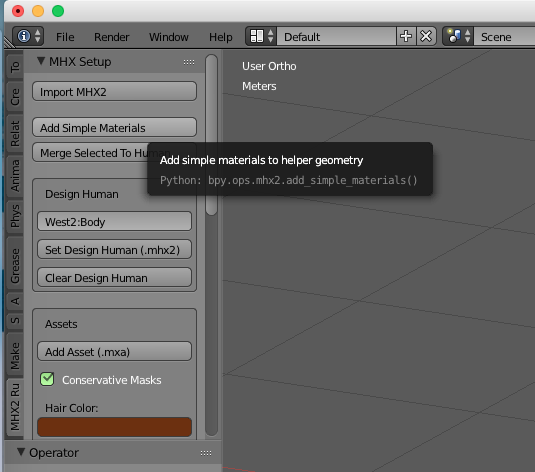
So, I exported him using MHX2, note use of “Meter” in options:
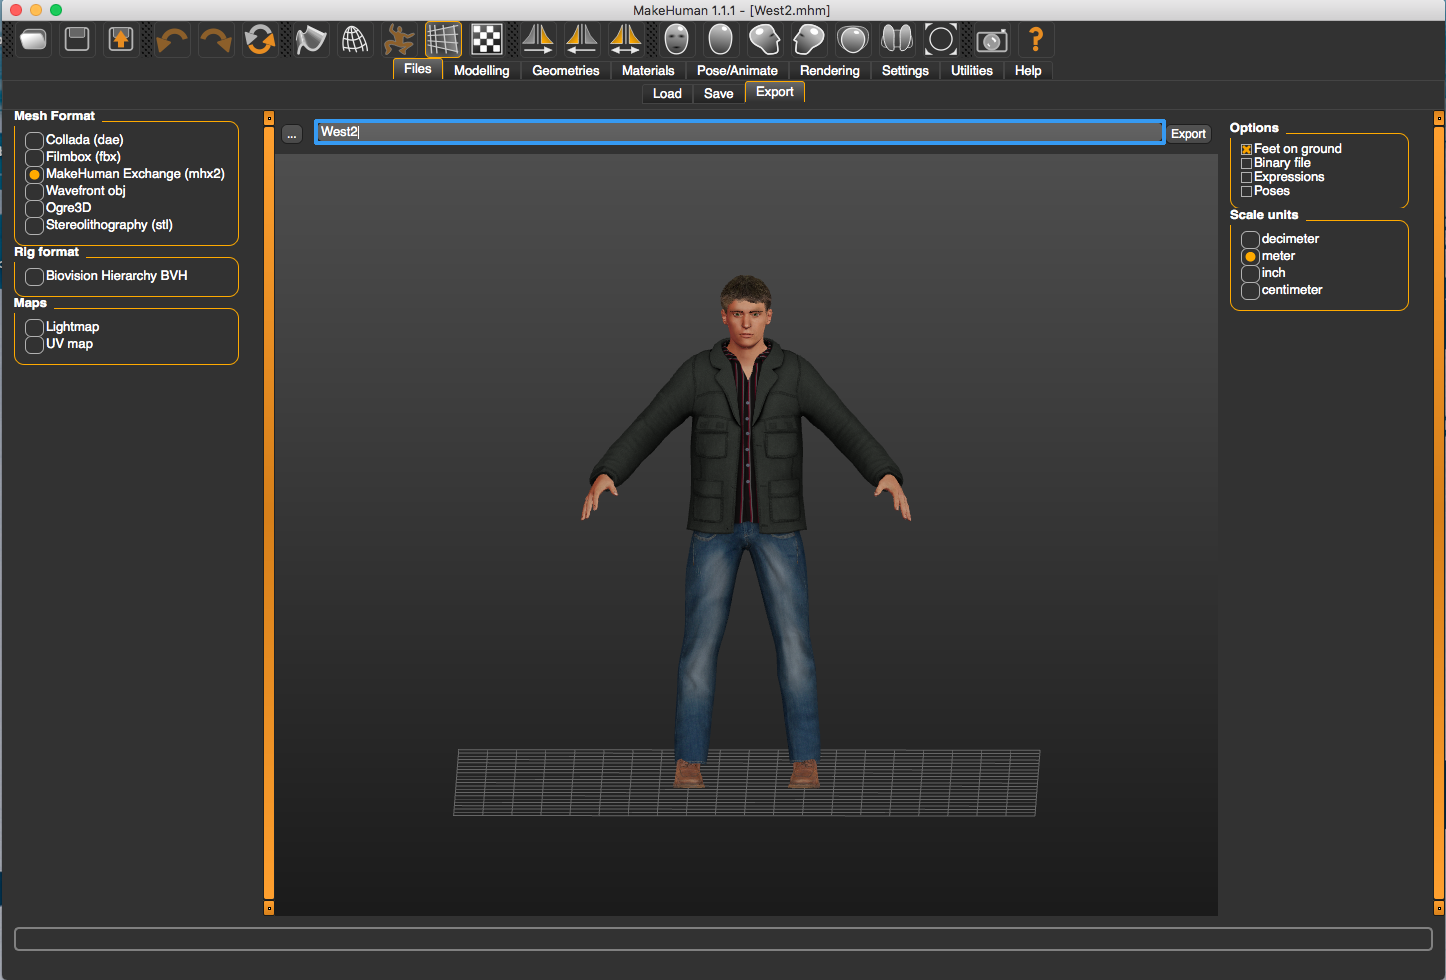
Sadly the makers of MakeHuman can’t spell “Metre” correctly… ![]()
I imported him into Blender using MHX2. All is good in Blender, no scales, no rotations:
I selected his skin and added simple materials:
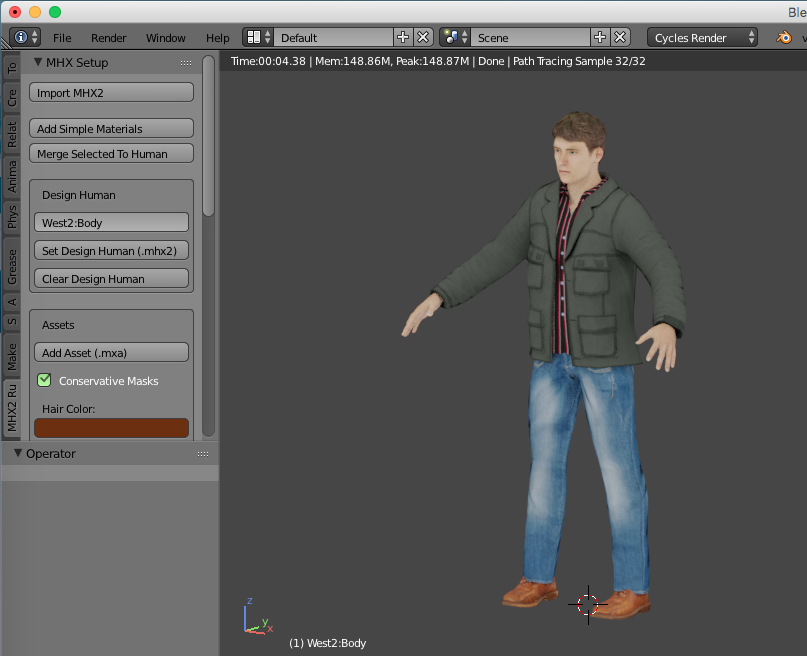
Then rendered him:
Then imported his hat (using Import .obj), applied the rotation… and scaled that in EDIT mode, then parented it to his head bone and rendered that:

I didn’t get the texture images for his hat, so I just used a simple diffuse shader - you can modify this to use the texture images you have.
Blend file: west-2.blend (4.1 MB)
Whole process took 20 minutes, so much easier with MHX2 Export/Import. ![]()
Cheers, Clock. ![]()
PS. I will try to sort the boots later today, but the ones you have are all horrible Tris (three sided polygons) and there are far too many of them, so don’t hold your breath! There may be some you can adapt on the MH resources web-page.
So, I spent some time sorting them:
I just need to see if they parent properly, I suspect they will, but that will take some time as we now have visitors and Mrs. C doesn’t like me “playing with Blender” when others are here, damned unreasonable if you ask me…
Cheers, Clock. ![]()
I forgot to upload it ![]() , also if i wanna replace the hat for a new one i just delete the previous hat, add the new one and transform it in edit mode?
, also if i wanna replace the hat for a new one i just delete the previous hat, add the new one and transform it in edit mode?
Wow Looks good, take you time dude, thanks for the all effort!!! ![]()
You can pay me in “virtual beer” ![]()
Here is the revised look with the boots:

I have sorted the UV map to cater for the new geometry:
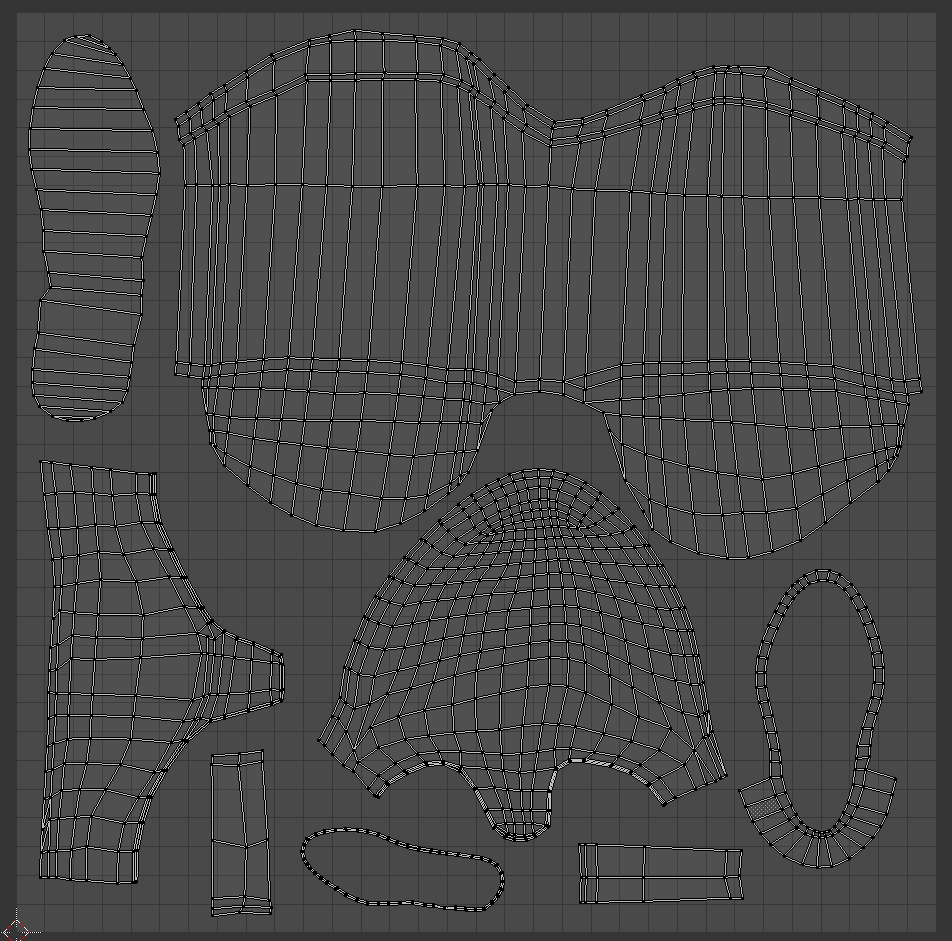
I got rid of nearly all the Tris, the odd one or two are not a problem and sorted one or two other errors in the boots mesh, and I have parented the boots to the armature so they pose properly. I moved the other shoes to layer 20 and chopped off the bottom of his legs, that bit which disappears inside his boots. The main problem with the boots as you got them, apart from being horrible tris, is the internal bits where the original modeller made inside surfaces and collapsed them down, but did not remove duplicates. You do this by selecting all vertices in Edit mode and key W => Remove Duplicates - there were hundreds of duplicates BTW, not surprising it wouldn’t parent to the armature.
You need to sort the material:
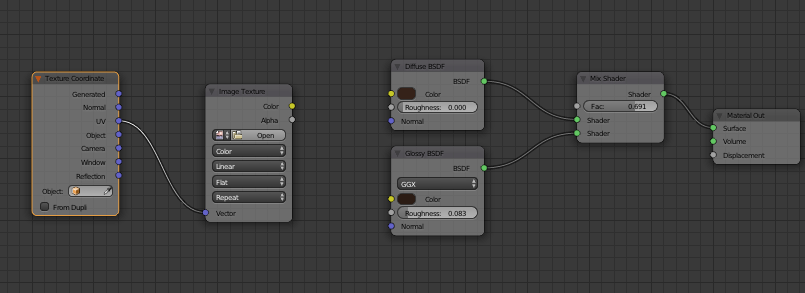
Just open the Image you have for the boots texture (click the Open button and navigate to the image on your disc) and connect the Image Texture node’s colour socket to the colour sockets on the Diffuse and Glossy nodes in the material and you are good to go.
Yes, this is exactly what you do - every edit to the new hat should be done in Edit mode… Then “Bone” parent it to the head bone as the hat in the blend file is done.
Blend File: west-2-boots.blend (4.4 MB)
Cheers, Clock. ![]()
1 Like
Got it!
Well that seems to be everything, Thank you very much for helping me!!!
There ya go!! ![]() Enjoy it!
Enjoy it! ![]()
1 Like
You’re welcome!
Cheers, Clock. ![]()
1 Like