Hi All,
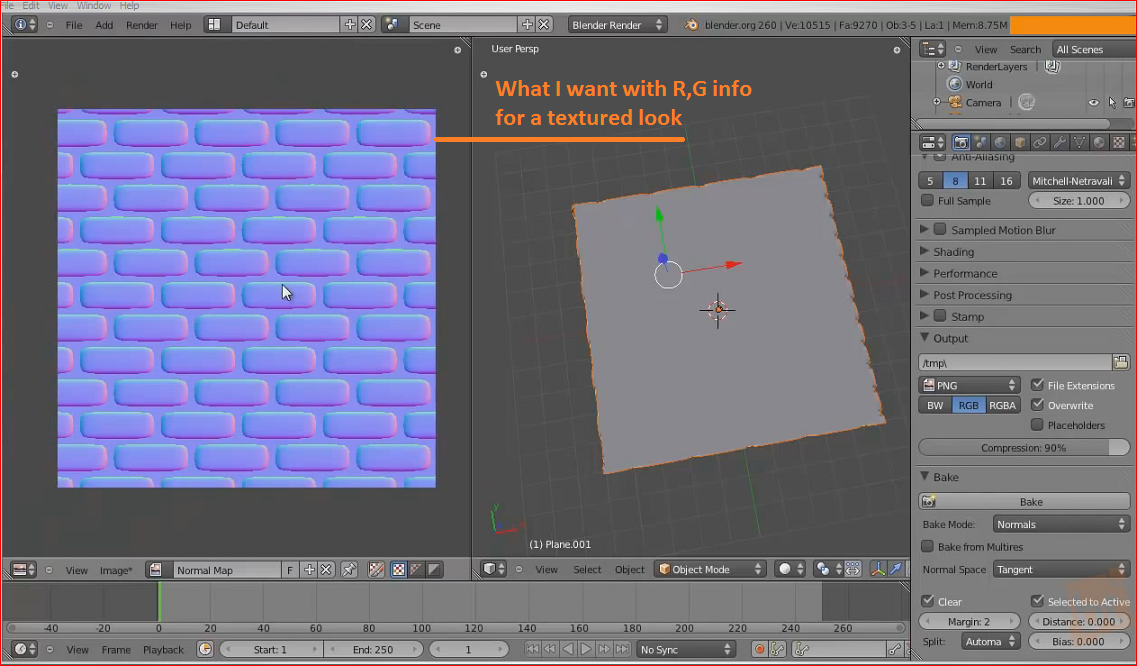
I am following a tut, where oliver villar shows a bake. Describes how Blender stores normals face via R,G and B is for “Z” depth from what I understand. My bake should be that of a purple hue and the shaded areas will be an off purple that is the Red and Green stored info of the Normals direction.
In another video I’ve watched it shared that a brown bake are upside down normals. I went thru this bake and have my normals flipped in the right direction, actually tried it both ways and tried having my ‘bake to’ layer above and below with the same result.
I am trying to use this solidfied, arrayed cylinder as a texture that will react to light as the camera goes over it; once applied to my model. As would the 2nd example pic would do…
What am I NOT doing or is this one of those things that cannot be done via the direction I am trying?
Thanks for the help. Yes I know he is using bricks and I am using cylinders, it is the texture I wanted
You won’t see any normal map in your blend because the normals of the cylinder ends are pointing in the same direction as your plane.
You would need to bevel the edges of the cylinders so you get some difference in face normals direction (the baking is showing a difference in normal direction. If there is no difference there is nothing to bake)
The other option is to shade smooth the cylinders, this may or may not give the effect you are after
OK I think I got the idea. I switched out my pattern a bit used cylinders into cones. Bypassing bevel. For some reason Bevel and array don’t jib to well over here…?
I got this 1st one, the second one is me trying to use the CNTRL “N” in Edit mode to Recalc faces with no result…?
So why am I losing my map texture when switching it to a Coordinates > UV drp dn. But when using Generated I get a result?
I am assigning the Bake as a texture. I have deleted and redid 3 times with the same result… UV is not working only generated? http://www.pasteall.org/blend/31028
Actually, he does unwrap the low-poly mesh. It’s done at 5:50 ;). But back to your other questions.
PNG is a common file format to use for textures, including normal maps. Its larger than JPG, but it supports lossless compression, meaning your texture will not lose quality after its compressed into PNG format. I dont recomment TGA because although it may load faster in game, it takes up more memory so its not ideal.
Sorry, I’m not sure i understand your second question. Maybe you could give me an example?
Thank you. He does @5:50; now that it is pointed out. Although he refers to it as UV and not Unwrap for UV. Must be the novice in me. Plus I went ahead and had created a second plane on a different layer to try out my map so that could have been part of it too. Secrop got me pointed in the right direction. *Note-IF all all else fails with a texture, it could be “U”
Coloring- IGE: Sending over to a 3rd party like P.Shop.
From what I understand of a normal map it’s that Blender assigns pixels shades to then use as a way to react to a light source. Giving it a GEOmetry feel at most angles.
The question being; will I lose that ‘fake normals’ Geometry by sending it over to P.S and coloring and then saving as a PNG, to then import back for using it on a model?
I watched a tut on making spaceship walls where he colors everything in P.S saves it as a PNG. He then sends it over to another Software program for making games (I do not have nor recall) So I never saw his result as if he had brought it back into Blender, to show in fact you do not lose that pixel info by coloring it or adding effects (Drop shadows,etc) in P.S to your Normal map.
But when I did those steps to mine, it was kinda lack luster for the Normals that create fake GEO.
SO I wanted to know if that was the standard and it may have been the effects added in P.S that watered down my normals fake geo. The whole idea behind baking…
You don’t need to touch the normal map. Remember that the normal map is in fact a vector map, and the color of each pixel represent how much the true normal of your object will be rotated (R=X axis, G=Y axis, B=Z axis). Painting on this information is not advisable…
But you can have two objects and two diffuse materials with different colors, still use the same normal texture in both of them. Of course, the uv map of each object should be adapted to use the normal texture, just like you’d do with any other texture.
Secrop,
Thank you. I appreciate the explanation of x,y,z and r,g,b Painting is not advisable. (that was my train of thought to my question)
Now you elaborated about adding diffuse nodes / materials. I am not quite getting that…? I am under the impression that once a texture is placed on a material the material color is also covered…
I finished the TUT and after making an AO map I understand how painting would not be advisable. But how does one tune the color or change it for that matter without losing the RGB XYZ info of the map?
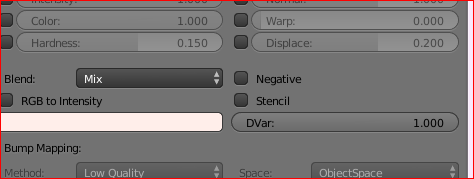
See pic for example please. If I wanted to change the color of the dimples to white say, is that a node or must this be done before baking?
you need one texture for the normals (the one mostly bluish) and another texture for the color… This last one can be painted, or a mix of two different colors or even different textures.
if you want the dimples to have different color from the rest, maybe a BW mask could be used in a MixRGB.
I think you lost me at this point…
SO you mean to say that I need to set colors before Baking as I did to get that blugreen color the ‘dimples’
Painting? I do not know how that is applied…Is that another word for Nodes>Color ??
To change colors after the bake a 3rd mask and enable RGB ? When i used that it changes both colors to one?
However I only used thus far with may Normals map and AO Map applied UV coordinated. Are there different coordinates or check offs I should be aware of?
Thanks again
Hey not quite sure i understand all your questions but after you have baked out your normal map you do not paint over it (unless you want to also add extra detail from within photoshop and you would use tools like ndo2 or (free) Nvidia normal map plugin etc).
Within blender make sure once you have added the normal map texture into the material/texture slot, you check on "normal map in “Image sampling tab” and ovcourse check on “normal” in the “influence/Geometry tab”.
This wont effect the objects colour (unless you forgot to check-off colour in the influence tab,
from there add a new slot and open your diffuse with the colors you want your object to be.
Normal maps are used to define how and which way light is cast upon the geometry to add deapth not to colour the geometry itself.
Anyways here are some links that have helped me in the past to get a better understanding of normal maps and material workflows hope it helps and i do apologise if i have totaly missunderstood:
If I understand you it is OK to paint or touch up in PS? That contradicts Secrops XYZ to RGB as I understood it?
Your Nvida plugin which is the GPU I have, I do not know of this? or the other? Link?
Yes I would like to color my maps to fine tune them after the fact of baking them. As described above with picture too.
“add a new slot and open your diffuse with the colors you want your object to be.” I tried this, but it colors the whole plane as it is one plane. Not a plane with faces and Geo, the whole idea of baking.
I tried using Nodes enable too but that got me nodes with red and white and checkers and it seems as though it removed the map.
Maybe the links above will explain how to get the colors desired from a map while retaining it’s RGB of XYZ axis…?
I am further confused from your post as it DOES contradict what Secrop had stated. “Not advisable to use PS to touch up maps.”
Please, the parts of my questions that you do not understand; just ask me to explain and I will try to make it Clearer.
Thanks again,
Well what Secrops says is understandable he “advise’s you not to paint over the normal map” and it’s probably best not to until you learn more about them, It is ok to paint over (and by paint over i dont mean with any old matte colour) adding details into a normal map within photoshop is quick and easy (with the help of plugins like Nvidia & Ndo) unless you wanted to bake out a highly detailed sculpt.
All depends on what you are tryn to achieve, what kind of material is this going to be, is it going to be a metal (where you would want to add slight wear into the normal) or is the object going to be made of stone\concrete (then you could add slight grooves and indents into the normal map within photoshop) all add a little more realism, just depends on what you are aiming for.
“Maybe the links above will explain how to get the colors desired from a map while retaining it’s RGB of XYZ axis…?”
Im not sure what you mean by this,
Are you looking to get certain parts of the same object have different colours? if so simply add a new material in the materials tab go into face select mode and select the face’s of the object you want tobe different and then click assign (in the materials tab) to assign them to the new material you just added. after that if you want to bake that out just goto the bake options and change the bake to “Textures”.
Doing this can also be a good way to create a colour map for taking into photoshop and easily selectingg certain areas of the texture.
Sorry missread your post (very tired and late^^)
if you want to change the color of those circles just change the material colour then do a texture bake (like i mentioned above) save it out and add it to the diffuse slot and make sure you do have the UV’s mapped out, for just baking onto a square plane - press 7 (to go into top view) the U (to unwrap) and select “project from view bounds” this will map the UV square onto the UV space.
KennyW,
Thanks for the detailed get back, it is appreciated. So to change my colors it is done via a Material add (as one would do with ANY model to make it a color be it diffuse,shiny, etc?) Then it is Baked out. as a texture bake.
I was doing this but not as a texture Bake…I wonder if that was what Secrop referred to as a BW map? I did not see that as an option for dropdown…BW- Black and white I assume but did not see that…
Thank you again. Some of the artists here have such extensive experience and knowledge be it code or script writers, they sometimes over explain something, or under explain expecting someone to understand. I am grateful for the help on the forum.
I will follow and learn about those links. I had started to curse over the previous links but one was like a Wiki page, the second was about hard edge textures, when I only wanted to ‘simply’ change the color of the cones / circles, maybe the background too.
Which means doing another rebake using the Texture drp dn.
Is there any other switch I need to apply, or a value changed to do this bake; or will my Normals bake settings suffice? I will try it soon enough, but if there is an adjustment please advise. IGE: Influences> used to get a nice look out of it? Like Normals map; one does not use Color, For an AO map another switch is used…etc.
To use a 3rd party to tune up (worn metal, rust) the pixel information used in RGB for the XYZ (not really -Z) would require special attention and certain procedures to keep the RGB info baked into my map? If you know of a good video showing this unless that is one of the new links? I responded before watching them. I would appreciate the link (if you got one) That is a half day in itself with the trash videos on youtube…
Regards
NC
EDIT-I did do that SCI FI walls tut but he does not bring them back into blender instead another software engine. My maps I made lost a lot of info from P.S as a PNG into Blender as a texture. Hence how this whole thread started or was referred to. Then Secrop advised to stay away, then you stated special handling. It would be nice to follow a tut and have all the assets to compare…If you get me?
Yeh sorry my brain is on overdrive atm and i may be rambling on.
i do suggest you check out that last link in my last post, that will give you a good idea of what things and workflow when it comes to creating a texture and maps using blender other than that i will check back in tomorrow and if you are still having any problems i will try to help in anyway i can.
Thanks kennyW
Yeah sometimes it is the long way around for an answer. LOL! Hence pics worth a 1000.
How to change the color of an object that is baked out?
Does this require a new Bake ? Yes as a Texture Bake. OR if you are good with P.S you could paint it in P.S however you will still be using a Texture bake to use a reference when working in P.S. anyways.
I realize there are many ways to ‘skin a cat’ in Blender, hence all the different directions and what people are comfortable with.
Me? Path of least resistance.
I will do a re-bake of a Texture Map Bake for my color(s) using my material nodes to get the color and texture desired BEFORE baking it out and adding then adding my AO map.
It would be nice to be able to take all three maps, Normals, Textures and AO, To combine them as 1 texture to then only have to assign that 1 compounded / combined of the 3 texture to the parts of my model as 1 texture material…Unless there is?
Appreciate the help guys, I am grateful. I know none of you are making money doing this, just putting back in. At least that is why I do it for my Jr class-man.