I’m not experienced with posting, so hopefully the formatting of my post remains
as intended.
The file “init.py” has to have 2 underscores on each side of the name “init”, but
the forum software changes it to “init.py”, so be aware of it.
I don’t know whether you already found a solution to your problem.
In short:
- Most probably in your case the solution to your problem is a correct formatting of the zip file.
It has to be:
add-on-wiggle2-v2.2.4.zip
- The zip file MUST contain at least the files
“init.py” and
“blender_manifest.py” (for the required content see below)
Since I myself had to muddle through this, I’d like to share what I found, if you are interested.
I’ll try to elaborate a bit in order to cover as much questions as possible.
The answers I found may not all be completely true down to an atomic level, but it works.
If there would be to clarify some explanations of mine, just ask.
In essence, if I delve into fundamental information, it might be
beneficial for novice lurker visitors who are not yet part of our
community here on the forum.
The Basics (which most probably are not new to you)
After a fresh installation of a newer version of Blender-4.2+
you’ll find the “core” addons at
"c:\Program Files\Blender-4.2\4.2\scripts\addons_core"
Another species of extensions/addons can be found at
"c:\Program Files\Blender-4.2\4.2\extensions\system"
When starting Blender-4.2 for the first time, it creates, as you
know, the folder “4.2” in the following (configuration/addon)
directory:
"c:\Users\username\AppData\Roaming\Blender Foundation\Blender\4.2"
which at this time contains only the “config” folder.
By installing your first legacy addon (e. g. wiggle_2.py) via
Preferences -->Add-ons -->Install from Disk…,
Blender will create a new folder named “scripts” inside this
configuration directory with the subfolder “addons”.
When you install your first extension from disk, Blender
creates the folder “extensions” containing the subfolder
“user_default”.
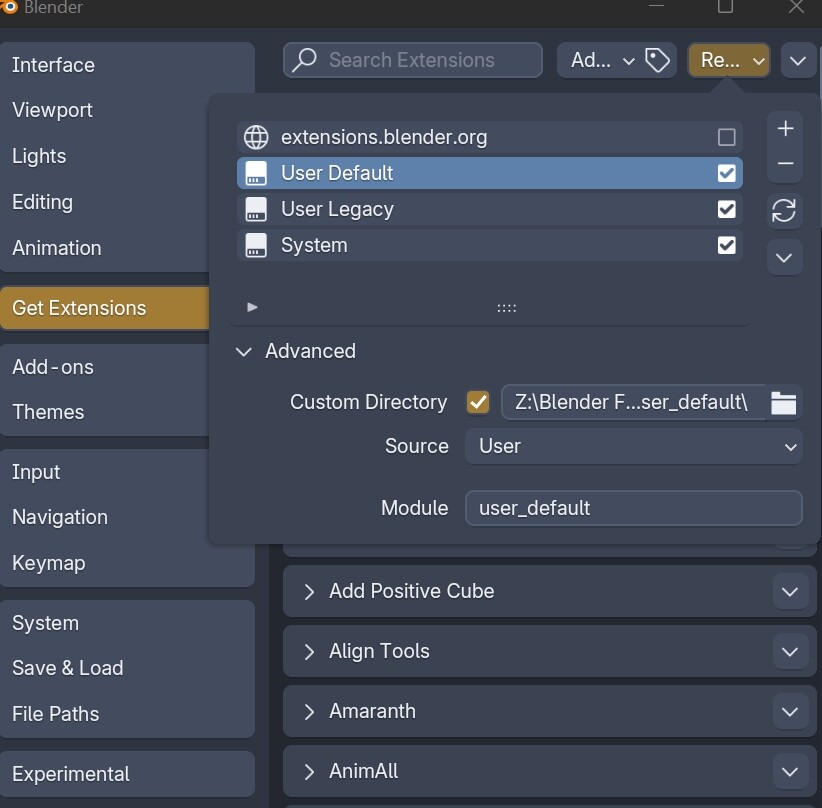
The path to this folder can be found in
Preferences -->Get Extensions (on the left side)
–>Header (right side) -->drop down menu “Repositories”
–>mark “User Default” -->Advanced.
It’s also possible to create there new repositories (folders)
as the target of your addons. (Image 1)`
When you install your first extension online, Blender
creates the folder “extensions” (if it not already exists)
with the subfolder “blender_org” which then contains the addons
of the repository “extensions.blender.org”.
Installing a Legacy Addon
If you want to install a legacy addon, you can do as follows:
If the folder “…scripts/addons/” doesn’t exist in your
addons/config directory (…Blender Foundation\blender\4.2),
create it manually beforehand.
"c:\Users\username\AppData\Roaming\Blender Foundation
Blender\4.2\scripts\addons"
- Copy your unzipped file “wiggle_2.py” into your addons
directory …\4.2\scripts\addons
This works too, if your addon consists of a folder and
not a mere file.
or
- If you like it more, go to
Preferences -->Add-ons (on the left side) -->Header
–>on the far right side of the Header open the drop-down
menu (the downwards pointing arrow) -->“Install from Disk…”
But don’t try to install the zipped file, cause this throws
the error “Missing manifest…”
So, when you used the unzipped file, then you should find
the file “wiggle_2.py” in the folder
"…\4.2\scripts\addons" which Blender in this case created
automatically.
This doesn’t work, if your addon is a directory/folder.
It did work only with one-file-addons, when I tried it.
Converting a Legacy Addon
And now the thing with the manifest file or
how to convert a legacy addon into an extension:
Create a temporary folder somewhere and name it
what you want to, e. g. “Wgl2_ext”.
Move your file “wiggle_2.py” into this folder and
rename this file to “init.py”
The so-called dictionary “bl_info” inside the file “init.py”
(former wiggle_2.py) provides most of the information
needed to create the manifest file. Information of the
license can be found on the addons website.
The “bl_info” files then can be deleted, but that’s
not mandatory.
Then create/add a new text file in the “Wgl2_ext” folder.
Name it “blender_manifest.toml”. This name is mandatory.
The addon “Wiggle2” consists of only one file.
If (another) legacy addon consists of more than one file
and possibly subfolders too, then an “init.py” file
already exists in the root of this addon directory.
In this case it’s sufficient to just add the file
“blender_manifest.toml” to the diretory’s root].
Open now the empty file “blender_manifest.toml” with a
text editor e. g. Windows’ Notepad.
Write or copy and paste the following code:
schema_version = “1.0.0”
id = “wiggle_2”
version = “2.2.4”
name = “Wiggle2”
maintainer = “Steve Miller”
tagline = “Simulate spring-like physics on Bone transforms”
type = “add-on”
tags = [“Animation”]
blender_version_min = “4.2.0”
website = “https://github.com/shteeve3d/blender-wiggle-2”
license = [“SPDX:GPL-3.0-or-later”]
With the exception of “website” these informations
are mandatory.
The required and optional details are listed in the
Blender-4.20 manual -->Advanced -->Creating Extensions
–>Getting started -->Manifest.
Assuming you have gathered information about the addon
“wiggle2” from various sources like manuals, tutorials,
YouTube videos, website copies, stored locally on your
computer, replace the target of the item “website” in the
“blender_manifest.toml” with your local path.
E. g. if your storage is located at “d:\tuts_wiggle2”,
copy this path and replace the URL of
website = “https://github.com/shteeve3d/blender-wiggle-2” with
website = “d:/tuts_wiggle2”
On Windows pay heed to replace the backslashes with slashes,
because the path is an URL now.
After saving and closing this file, your folder “Wgl2_ext”
should look like this:
Wgl2_ext (folder = believable name)
|_ init.py (file = mandatory name)
|_ blender_manifest.toml (file = mandatory name)
Zip the two files together into one zip file
(for the special naming scheme for the zip file see below).
You can also create a folder within the folder “Wgl2_ext”
and give it an appropriate name, such as “Wiggle_2”
Move the files “init.py” and “blender_manifest.toml” into
this new folder.
You can add as many files/folders as you want.
Wgl2_ext (folder = believable name)
|_Wiggle_2 (folder = believable name)
|_ init.py (file = mandatory name)
|_ blender_manifest.toml (file = mandatory name)
|_ …
Now zip the the folder “Wiggle_2” with its content inside of
the folder “Wgl2_ext”.
Rename the resulting zip file using the following scheme.
This is important!
The format is:
“add-on-”
name-of-the-addon-
“v”
version.of.the.addon
“.zip”
The name of the addon should be recognizable, but to make
it more identifiable, e. g., in a list of addon files,
take it from the blender_manifest.toml file, as Blender does.
For the “Wiggle2” addon, this would look like:
add-on-wiggle2-v2.2.4.zip
No spaces, no underscores in the name of the zip file allowed.
Replace them with “-”.
Please note that the version number should match the one
specified in your blender_manifest.toml file.
Now go to Preferences -->Get Extension …–>“Install from Disk…”
Navigate to your file “add-on-wiggle2-v2.2.4.zip” and install it.
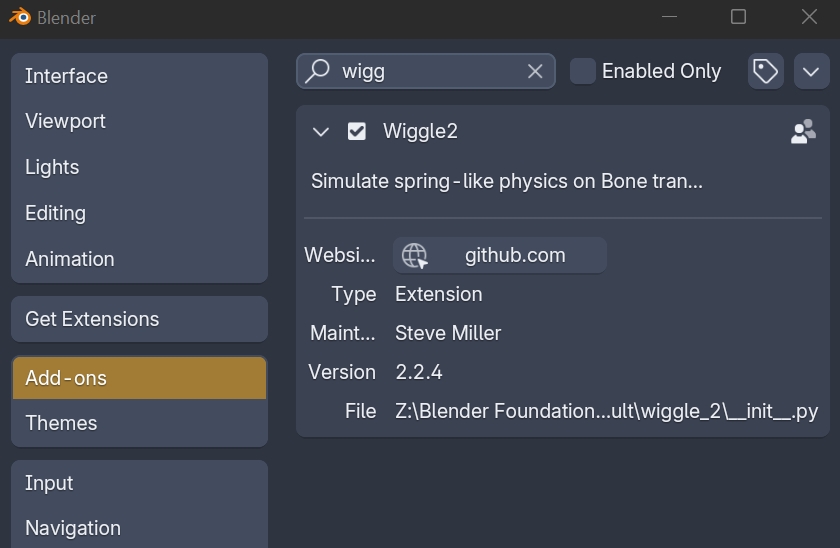
After installation you can convince yourself in Preferences,
that the promotion of the legacy addon to an extension actually
has happend. Look under “Get Extensions”, where it should appear
now and to “Add-ons” where the “Type” of the Addon now is
“Extension” (Images 2 and 3).

“Wheels”
If you should stumble upon a legacy addon you want to convert,
but get troubles because it needs some additional
Python site-packages Blender Python doesn’t provide,
and you need help to overcome this obstacle, just ask.