I am new to blender and I’m trying to mimic an After Effects project I’ve made that uses Element 3D.
In the AE project, I have audio key frames that control the brightness of lights.
I have figured out how to add the audio in blender and have it produce key frames from the audio. In blender the key frames are controlling the strength of the emission from a material but the values from the key frames are not bright enough.
In after effects, I’d fix this with an expression like this:
ease(value, 0, 20, 50, 100)
This expression would take the “value” of the key frame. Those values fall between 0 and 20. In the expression we tell it to… turn those values into 50 to 100. So for example, 0 would now be 50. 20 would now be 100. And everything in between would be calculated on the fly accordingly.
I’m looking to do the exact same thing in Blender but cannot figure it out.
I saw that you can type simple math equations into some property fields but I haven’t been able to find anything similar to the after effects expression.
I also saw curve modifiers in the graph editor. I’m wondering if there’s something in there I can use that will help.
I’m hoping I’ve made this clear enough to understand.
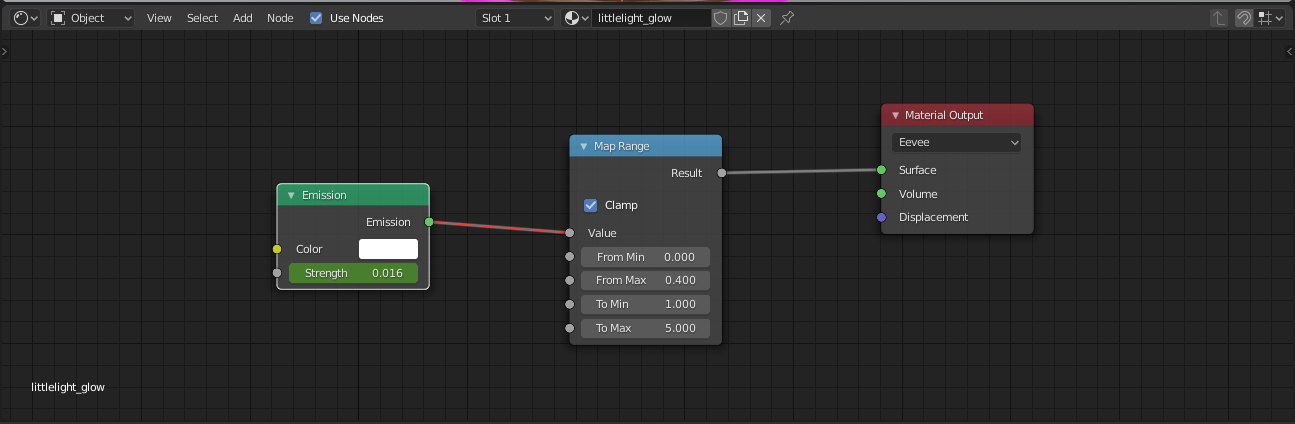
Thank-you for the reply. The “Map Range” node looks like what I want to do, but when I connect it, it just turns the material purple.
It’s an emission shader, and I have the strength being animated by baked audio keyframes. I added the Map Range node between the Strength of the Emission node and Surface of the Material Output mode.
Please see the screen shot. Do you know what I’m doing wrong and how I can get this working?
The above node setup will not work because you cannot connect the output of a shader node to any other type of input. You’ll want to pay close attention to the colors of the dots here. Green means it’s a shader and its data only works with other shader-type nodes. Green can only connect to green.
The Map Range value, along with anything that has grey connectors, operates on a scalar value, like the “strength” value of the emission shader. That strength value is what’s important, but because you are currently animating the strength value directly, you can’t put any nodes in there to affect it. Add a “Value” node (Add > Input > Value) and copy the keyframes to that.
Then connect the nodes like this: Value > Map Range > Emission > Material Output
OK, I’m trying to figure this out, but I’m having trouble trying to copy the keyframes. Here are the steps I took if it helps:
I right-clicked on the value from the “Strength” field under the Material Properties tab and select “Insert Keyframe”
From there I switched to the graph editor, went to the “Key” menu and selected “Bake Sound to F-Curves”
I selected my audio file and it displays a graph, which I thought were keyframes but I can’t select them or copy them. If I right click on it, even after pressing “a” “a” to select all the key frames, “Copy” is grayed out.
I read online that I have to convert it to keyframes first using “Sample Keyframes” under the “Key” menu, but it’s grayed out too.
I really thought this was going to be simple. What do I do to copy the keyframes and paste them to the value node?
I’ve attached a screen shot so you can see what I’m seeing.
Looks like the “Bake sound to f-curve” produces a curve which is difficult to edit. I didn’t realize that! You’ll have to repeat the operator on a different animation channel to use my method, but the f-curve modifier should work as well.