I will split the tutorial into different parts:
Planning
Modelling
Materials
Compositing
PART 1
PLANNING
<i>this is not absolutely necessary but I find it makes life a lot easier in the later stages.</i>
First you must decide what scene are you creating. One similar to mine? Either way you must decide:
What will be in the hallway (a empty hallway is boring and uninteresting)
The mood of the scene. Are you going for a spooky scene? A morning hallway?
With these 2 points in mind you can decide what colour the lighting will be, the materials, camera angle, etc.
You must ensure the 2 points mentioned above work together. A spooky scene will not look spooky if there is a boring human in the hallway for instance.
By the time you are finished you should know what you want your scene to look like.
Part 2
MODELLING
***With your plan in mind now you should have a idea on what you want in your hall.
In my case it was a scary monster.
I googled reference images and i advise you to do the same.
Then I proceeded to create the model. The model itself is not very detailed and there is no need to spend a large amount of time on it. Essentially in my scene the model was a outline.
So here is how to create the model.
Start off with a cube. Go into edit mode (press tab). Press control R and create a cut down the center of the cube. This splits the cube in half. Select one half and delete it. Make sure your cut placed upwards.
Next proceed to delete one half of the cube.
Add the mirror modifier and choose the axis that will mirror the cube. (for me its the X axis).
Next grab the top face and drag upwards.
Create a cut down X axis and a couple of cuts in the Z axis.
Add clipping to the mirror modifier
Scale the cut on the X axis up then pull it out.
Grab the top vertice and pull it up.
Press O to add proportional editing then pull the vertice uppermost on the Z axis and at the corner then proceed to pull it back and inwards.
Pull the bottom most vertice on the same side and corner backwards (for me on the Y axis)
Hence we have created a simple body shape.
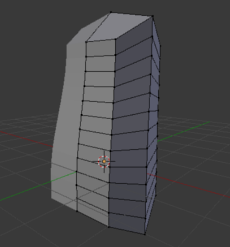
Proceed to select every alternative face loop by pressing alt while in face select and then starting from 2nd from bottom go up selecting every other face loop.
Switch pivot point to individual origins.
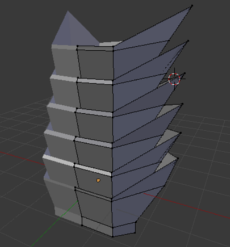
Making sure proportion editing is off extrude (e) it and scale outwards. Then drag it upwards (on the Z axis).
Then scale down on the Z axis. Then grab it and move backwards(for my scene Y axis). Adjust the mesh until it looks like this. Im sure you all get the picture by now as the process is very simple. Keep modelling and add little spikes and details on the side to help create the picture of a evil monster. Note that due to my picture’s lighting my model was essentially a outline and possibly yours will be too if u want a similar scene. In this case i recommend not too much detail on the front. But a fair amount of detail sticking out as his own body will not contrast with itself but with the background. Hence spikes and other such things (only if u modelling a scary monster for ur scene).
Also u may want to add a subsurf modifier
My final model:
Very simple. I coulda gone on and on on how to model it but i wanted to keep it brief as their are better modellers out there. In the next bit i continue by modelling the hallway.