Like a n object disappearing but not instantaneously. Doing from Fully visible -> partially visible -> Invisible Slowly.
(this might be a duplicate thread but the search function was not operating correctly so i do not know.)
Trust me, it’s best to do it in post. Render an overlap with/without the object (eg 0-125 with 100-200 without) and fade between the two sequences. You can of course rig up a shader and mix with a transparent bsdf but then you loose flexibility.
That being said, if said object interacts a lot with the scene (casting shadows, appearing in reflections, etc) then erasing it in post is going to be extra tricky. Depends on your setup. Usually I’d go with the animated mix shader.
Hadrien
I would do a Transparency animation on the Material > Alpha.
Animate an transparency shader with a mix node. Or the alpha value in Internal Render. Very important is especially for cycles is that when the object is invisible that you animate the function which makes the object part of the Render, in the outliner the little camera. It will speed up especially in cyles.
ill try a mixed node
SO i have a mix node that mixes the diffuse and the transparent, But i do not know how to make that change over time.
Because I couldn’t find a node that detects the frame #
You can keyframe the fac value of the mix node. Go to the frame where the object is meant to be fully visible, set the fac value accordingly, right click on it -> Insert Keyfame. Then go to the frame where the object is meant to be fully invisible, set the fac value accordingly, right click on it -> Insert Keyfame.
In the graph editor you can then mess around with the curve to choose how it will interpolate between the keyframes. You can also add some more keyframes to manually adjust the effect.
omg that worked thank you so much.:yes:
Moved from “General Forums > Blender and CG Discussions” to “Support > Materials and Textures”
I moved it to this forum because that’s the solution currently in hand. However, if you have a complex object with multiple materials, this can get unwieldy very quickly.
A potentially better solution would be to do the fade in post using the compositor. You can put the entire object (or multiple objects) on the same render layer and animate the transparency there.
Of course, it depends on the shot, but if you can get away with doing it in the compositor, it will be faster and less of a hassle to maintain.
Oh I apologize, I did not know that there was a “Support” Section.
I realize this is an old topic, but I’ve looked everywhere and can’t find a good answer.
I’m trying to fade out a logo, which should be a very simple thing, but it’s not. None of the solutions I’ve read about will work for this. I don’t want to be able to see inside the logo as it’s fading out. I just want to reduce it’s entire overall opacity.
Here’s what I’m getting:
Notice in the corners of the B and the bottom of the R. I want a uniform opacity that gradually fades. (I tried turning on Backface culling, those are front faces we’re seeing)
If there’s a way to do this in the compositor from the Render Layers, could someone fill me in please?
Thanks!
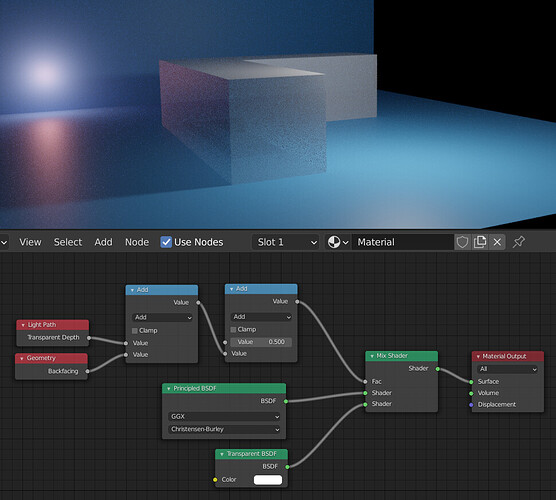
Hi, you should add “backfacing” to the mix shader (from geometry node)
But those are front faces.
What exactly is the set up you are suggesting, and what does it do?
Thanks.
Oh I thought they were backfaces sorry. I guess you could cull them by transparent depth ? Like this. But this will only work if you have no other transparent surfaces in between the title and the camera, since this doesn’t discriminate between objects (until we get light path expressions, one can dream).
If you want to get rid of shadows as well you can add the shadow ray output to the mix.
I think you’re missing my point. I don’t want to make it transparent, as if it’s made of glass or something, I just want it to fade out, with a uniform opacity level over the whole object.
That’s what this does, haven’t you tried ? If for some reason that doesn’t work for you just do it in comp
In that image you posted, I can see inside that box. I can see the other edge where it meets the ground. That’s what I’m trying to avoid.
What you’re seeing is the projected shadow from the point light, hence my comment about leveraging shadow ray as well. I mean it’s like four nodes, just try it


