Hey, guys! Could anyone tell me the secret how to unwrap each loose part on top of each other instead? P.S. The precision isn’t needed here, just to stretch every part over the surface, that’s it. (edited)

I’m not sure I’m following you here, but if all you’re worried about is maximizing UV space, and you don’t care about any overlap, just scale both your islands up to fill the space, and stack them on top of each other.
If you’re worried about the seams that would show from that, you could use a triplanar projection instead of unwrapping it.
edit: It’d help if you’d throw in an image of the object itself to guide us along. Right now, I’m assuming what you’re trying to model is a lump of old asphalt.
1 Like
The thing is, we’re talking about a lot of road dents/holes here. I try to make it as quick as possible. I can’t afford to do anything manually here. Naturally, they won’t be all exactly the same, but the generally speaking they all will be created from somewhat a circle as in the picture.

Is there a way how to mark all vertices at once and somehow move them over each other in UV editor? I noticed there are some addons for this sort of a stuff, but I figured this is so “basic” Blender could already do that anyway. I’d love to keep all those individual UV parts always centered at the target texture. Some overlap or left out space is not a problem. But with later deformities, some UVs would end up covering edge of the texture instead. That’s what I want to avoid here mostly.
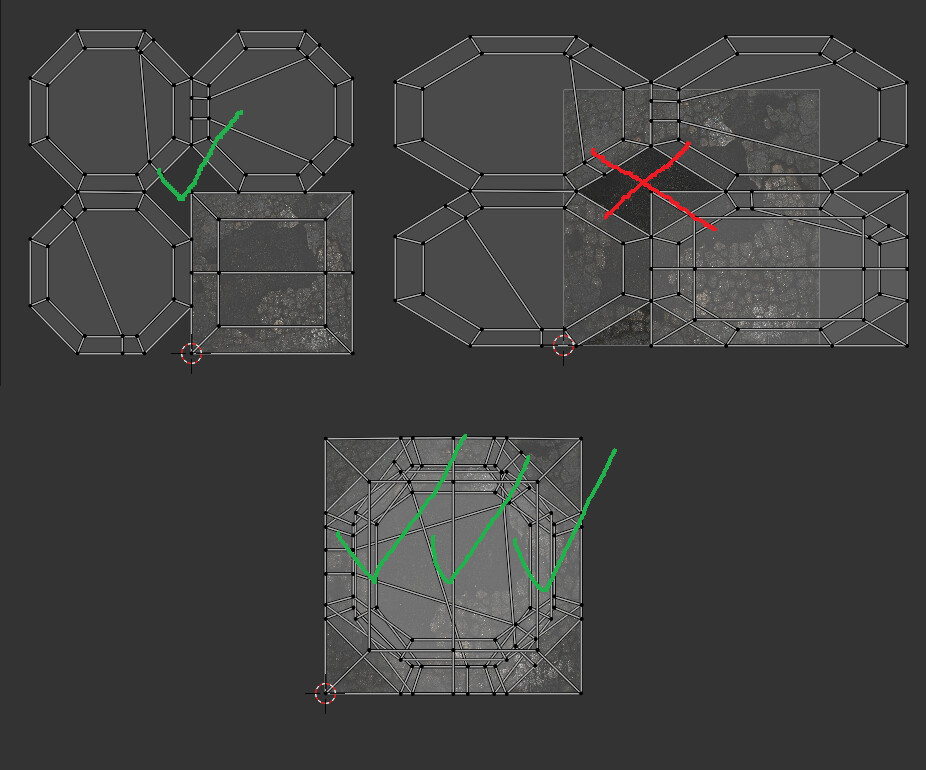
All dents now are almost perfect circles, but that’s only for the demonstration. The final shape will change a little, get deformed slightly to mask the repetition of the same process creation.
For decals like that, it’d probably be better to put an alpha mask in along the outer edges of the texture, so you won’t have to worry about any seams or potential clashes. The effect will be about the same as what you have now, except you won’t have to sink your decals into the road geometry (which is what I’m assuming you’re doing here) to blend them together.
Also, you don’t have to worry about re-UVing your decal geometry after making a cut or moving some verticies. Just make a basic decal, copy it a few times, then deform it. You’ll end up with some stretching, but it won’t be noticeable if you don’t go too crazy with it.
1 Like
I was just about to ask about that alpha mask. The way I’m making those decals now is that after using boolean modifier (1*), I’m creating these cut outs, creating new faces in the middle by “I” shortcut, then sinking those new mid faces slightly (2*). After I copy this whole cutout mesh, slightly moving it all above the original cutout version and assigning decal texture with vertex alpha mask alongside edges (3*). Under this decal layer is still original cutout with road texture as a base. And after this, I merge back original cutout back to the road mesh. Creating simplified, but actual, physical dents in the road mesh, with extra (also sinked) decal layer on top. This is how Rockstar games does it, I’m basically trying to emulate their process. But with this last part, i don’t want to defor any mesh any further, because those two already deformed layers could easily flicker, as they might clip easily over each other.
-
road mesh is fully procedural from a curve, boolean cutouts are currently done after road is converted to a mesh
-
to my delight, when creating new faces, it creates them respectively to all cutouts simultaneously at once. No need to do that individually for each piece
-
just an inch above the road mesh. And this is where I’d like to get an advice. When in edit mode, just before creating new faces and sinking them, I’d like to assign to all outer vertices I currently have selected this alpha mask. Is there an option to not just paint, but also erase alpha mask? After creating new faces, outer vertices are no longer selected, so I could simply pain every newly create innerd vert with vertex layer again, making the smooth transition as in my image below.
1 Like
I’m away from my comp for the night, but it sounds like you’ve got an interesting setup going on here. When I’ve got time tomorrow, I’ll try to replicate your process, and see if I can offer up any advice.
1 Like
I’m back!
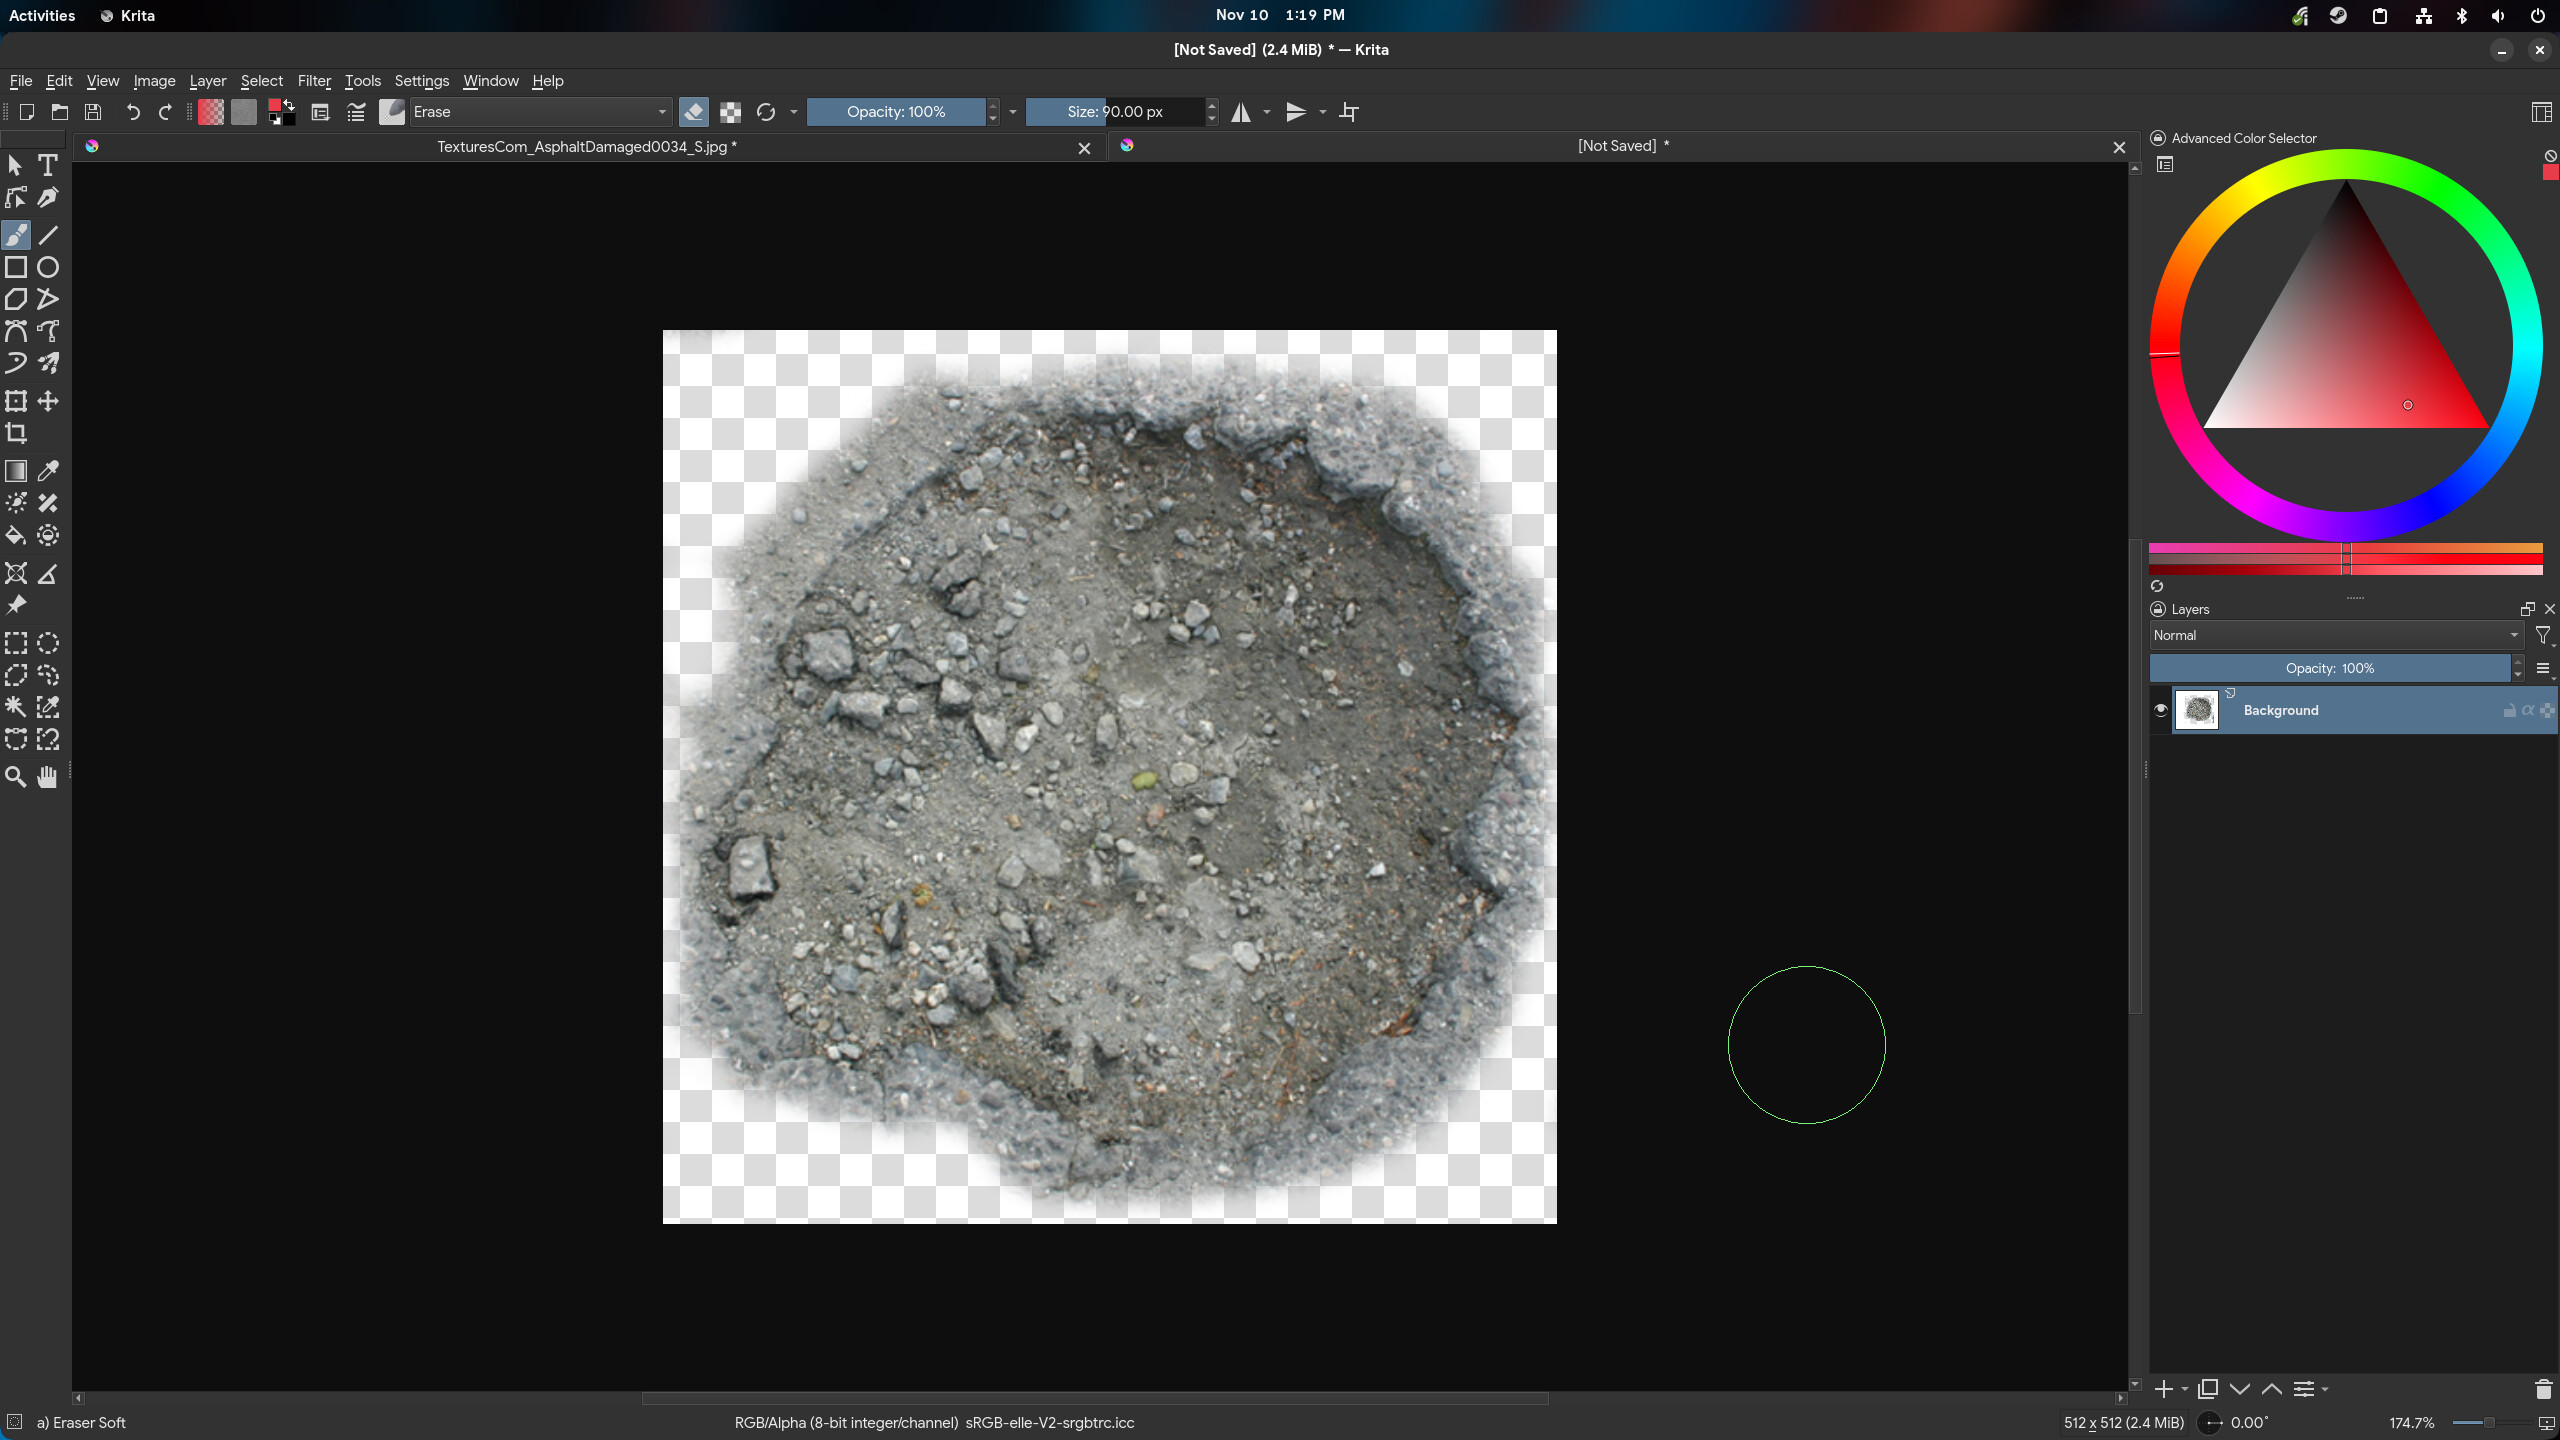
I tried replicating your process, though I didn’t have much luck getting the vertex alpha to look good, so I just painted one myself in Krita. You could do the same thing in Blender if you wanted to.
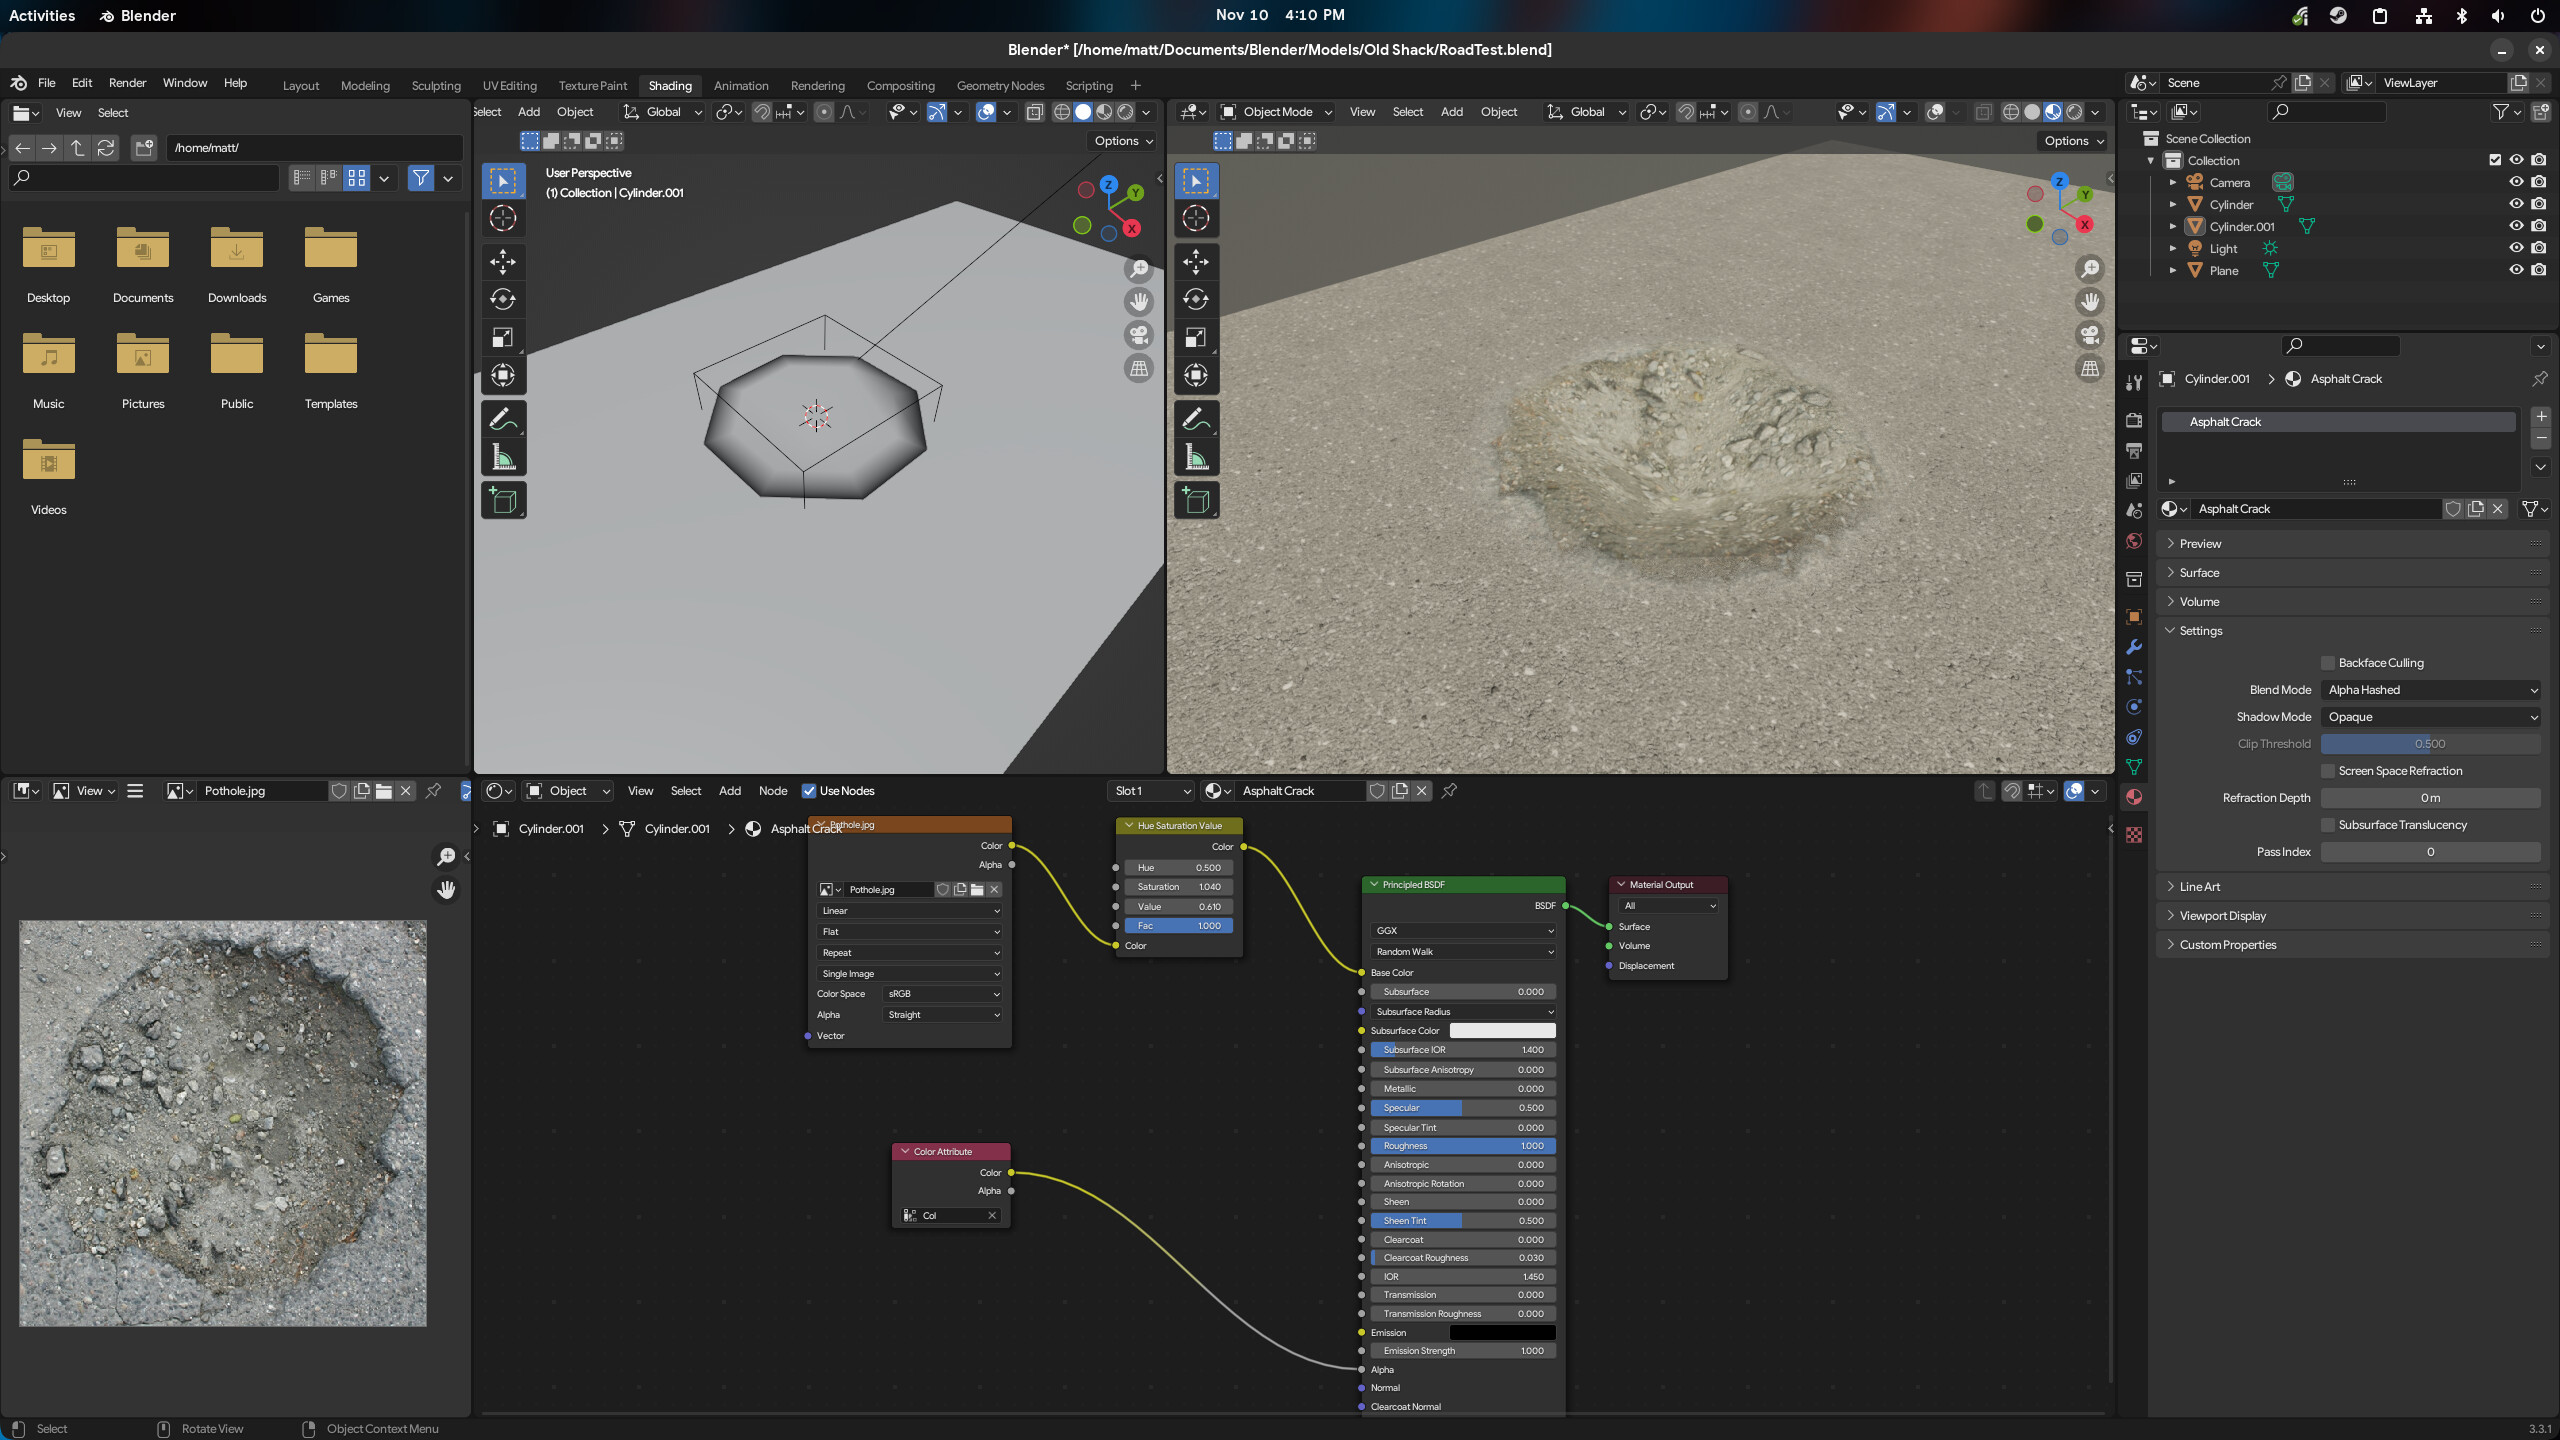
I made an object that looks somewhat like your decals above, and unwrapped it without any seams, since it’d flatten itself easily enough. Applied my alpha’d texture to it so that it blended in along the edge, made a cylinder to boolean out a hole in the asphalt, then laid the decal over it.
It looked like so…

And the Alpha masked texture looked like this in Krita.
You shouldn’t have to deal with too much UV craziness with this setup. So long as you don’t have any faces sticking out or exposed holes anywhere, you should be good to go.
Aah, so that’s what you meant by alpha mask. I’m silly.
Yes, R* uses decal such as yours as well, just in same cases, alpha was made via deleting vertex colouring instead, as many of their decals are intentionally made as seamless tiles.
I’ll still have to figure out the easiest way how to deal with mass colouring then. I really want to reuse as many already existing R* materials and techniques as possible, so my maps will be as light weight as possible (drawing original textures instead of downloading new ones for example).
Thank for your time!
I might’ve been confused as well, since I was trying to use weightmaps and the Mask modifier. Let me experiment a bit with actual vertex painting. See what I can do.
1 Like
Okay, I used vertex colors for the alpha. It’s a lot better than my previous attempt.
The one thing that’s most stumping me here is that I don’t know how Rockstar does their decals, so I can’t tell you how to achieve a similar effect.
If I wanted maximal results with minimal fuss, I’d slap a bunch of road damage textures onto a single sheet, like a texture atlas, make a decent amount of potholes out of geometry, unwrap and line them up in their appropriate places on the atlas, then use the vertex colors to create an alpha blend, like you did before.
1 Like
Maybe I’m already tired, but I think I lost you there a bit. Texture atlas?
Would you know how to manipulate those vertex colours for all faces at once?
In the end, I already know how to do all this in a very efficient way, but the only thing for that to work, I’d need either a button or a piece of Python code to:
- unwrap all of those loose parts/potholes individually, all being unwrapped around the center of the target texture, something like
for object in selected_objects:
   unwrap()
- being able to set colour/delete vertex colouring for all selected vertices at once (not the whole object, only selected vertices)
for object in selected_objects:
   # how to define selected vertices?
   object.vertices.colour = "none"
Something like that. It’s stupid, but I haven’t done any research on this possibility yet. Will do so tomorrow and if I’m gonna figure this out, I’ll leave it here.
1 Like
If you want to make this an entirely automated process, you’d probably have better luck hitting up the coding forum. Generating the UVs automatically wouldn’t be too difficult, since they’re fairly flat objects, and could unwrap cleanly with just a simple command. But aligning them in a certain way in UV space, then assigning vertices on your objects a specific color value and strength? Yeah, that’s beyond my paygrade.
A texture atlas is just a single sheet with a number of different, though usually related, textures embedded on it. It could help you out in some way, since you can think of a single 4096x texture as being a 4x4 matrix of 1024x textures. If you knew how to generate code that could place a UVed object within the center of series of predefined mini UV spaces. All you’d have to do is be mindful of the size of your damage textures.
You could also use this setup for your alpha masks, avoiding the necessity of having to find a way to automatically assign vertex colors to specific vertices.
1 Like
I did a little of digging around and found exactly what I was looking for. Unwrapping of multiple objects roughly to their UV center respectively. Besides fixing some obsolete code, all I had to do was to separate my boolean made mesh into separate pieces in edit mode (split by loose parts).
Here’s the code
import bpy

print("________________________________________START")

selection_names = [] #declaring array

for obj in bpy.context.selected_objects: #loop through all the selected objects
  if obj.type == 'MESH':
    selection_names.append(obj) #add to array
    obj.select_set(False)

if selection_names != []:
    for obj in selection_names: #loop through array
            bpy.context.view_layer.objects.active = obj
            #lm = obj.data.uv_layers.new(name="LightMap") #new UV layer for lightmapping
            #lm.active = True
            bpy.ops.object.editmode_toggle() #entering edit mode
            bpy.ops.mesh.select_all(action='TOGGLE') #select all objects elements
            bpy.ops.mesh.remove_doubles(threshold=0.001, use_unselected=False) #optimize vertex- not necessary for low-poly
            #bpy.ops.uv.smart_project(angle_limit=66.0, island_margin=0.222, user_area_weight=0.0, use_aspect=True, stretch_to_bounds=False) #the actual unwrapping operation
            bpy.ops.uv.smart_project(angle_limit=66.0, island_margin=0.222, area_weight=0.0, correct_aspect=True, scale_to_bounds=False)
            bpy.ops.object.editmode_toggle() #exiting edit mode

print("________________________________________END")
Credits for these to users here
https://blender.stackexchange.com/questions/103195/smart-uv-unwrap-multiple-objects
Here’s the result in action

1 Like