I actually did something a bit similar just earlier, but with displacement. Yours look better for rigid objects, although, I do think the intensity should be driven down.
I was thinking of using a lattice to animate extreme angle warping changes. Like a camera viewing a house from the front then going to the top which then the house is skewed in a weird and interesting perspective for that camera angle.
Hah. I had no idea that in newer Blender, you can do pretty much the same thing I used the custom geonodes for with just a Displace modifier. I’m always upgrading my version too late. Anyways, in my setup, Displacement variable controls the intensity of deformation, and you can also reduce TextureScale so your object receives less iterations of noise texture
Good call on using lattice for forced perspective. Since you’ll be able to animate a lattice with shape keys (and possibly even Armature) like a mesh object, but also have to deal with less vertices than full object
So you’re not able to animate the seed? It would be nice not having to recreate the whole path and empty setup and just animate the seed (if possible).
Unfortunately, there doesn’t seem to be input for a seed in Noise texture. You can animate the helper to rapidly change position every frame, and then just copy-paste this string of frames as many times you need to cover your entire animation
Would this be possible with geo nodes? (I have not really learn much about this yet, but there seems to be a great level of customization with this feature).
So far, I meant “keyframing the helper manually”. But might be possible to automate with new Simulation Node functionality. So we randomize the noise coordinate offset based on frame time. Haven’t tried it yet
I have been attempting this same thing and I found this thread. Here’s what I came up with.
Thanks for that! I downloaded your file and made some adjustments. I’m not too experienced with geo nodes yet, but I figured some things out to get the results I wanted. I’m sure the nodes could be cleaned up and perfected. The main thing I changed is getting rid of the empty to control it. I replaced that with a random number generator, so instead of moving through the cube, it’s randomly displacing it from frame to frame. I wished I could make it only animate on twos or threes, but I don’t know how to do that. I also added a Grease Pencil Line Art object with some modifiers, and I used the compositor to make it more pencil looking. Again, I know there must be ways of improving on this. I’m just getting started. I want to add a pencil texture to the line art, but I’m happy with this for now.
What you’re talking about isn’t a “boil” effect, it’s more of a “controlled shape instability” and the subtle volume changes and off-model drawings that give hand-drawn animation a “life” of its own. Unfortunately there is no built-in way to create those kinds of frame to frame mesh variations in Blender.
There are some methods that you can try:
Probably the most controllable is the “Shape Keys”. Instead of making a library for each frame, you could make a small library of variations (5-10) and drive or blend between them with drivers or the NLA.
To warp an entire character faster, use a “Lattice” or “Mesh Deform” modifier. When multiple objects share the same deformer, they’ll remain consistent and not be obviously clipping.
Slightly more complex procedural deformations can be applied with the help of Geometry Nodes, which can be further manipulated by frame number or noise. It is not as mechanical as a simple outline boil, but it has an organic effect nonetheless and will require artistic tuning.
When the desired effect is a hand-drawn style like that of the Spider-Verse or Arcane, there are a number of studios that use a combination of mesh deformations, pose space corrections, custom rigs and 2D compositing.
A shared deformation system (lattice or other), is usually preferable to random deformations for each individual object for clothes and layered meshes, as it allows the body to maintain its relationship with the clothes and the accessories.
I would be interested to know if anyone has created a Geometry Nodes setup or add-on for this type of “off-model” animation. It’s a technique I think could be done in a lot of creative ways.
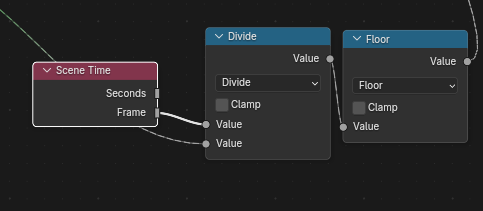
I tried one alternative later, to make animation automatic, and that’s using Scene Time node. It can be used as input to the Random Value, and also has output in Frames, meaning you can animate on two, or any arbitrary delay, if you use math like divide by delay number => Floor.
Well, the simplest is the displace modifier that you can control either from UVs or with an empty mesh.
Anyway, while getting the wobbling effect is doable, it became much more difficult when you really want to emulate animation for characters.
Because animation isn’t only on twos , it’s always a mix , and it varies depending on motion, like in animation you can have the body static for some frames, then only the head is moving stuff like that.
So yeah, it’s doable in 3D but at some point it gets uncanny and the whole image is wobbling in a bad way instead of looking cool most of the time.
So yeah, easy to make in theory , hard to make it look good in practice…
Honestly I haven’t. Just remembered I already tried something similar to what you described. If you already figured it out by yourself, then sorry to bother
And it is late probably, but my wobbling nodegroup solves consistency issue between multiple objects, because it operates in world (scene) space instead of local object’s space.