(double post)
Here’s an update:
I’ve had several questions that have popped up along the way that I haven’t got around to asking. Especially regarding the cranium and jaw. I’ll try to get to them in the next update.
I have a particular dilemma, in that I’m trying to model an athletic woman (with upper body development,) but without exaggerating the ribcage, or extending the shoulders out too far.
Here’s a good reference site – this gal is jacked but still very obviously female:
Update: Well, I think I’ve updated this to death:
After scouring several tutorials and making numerous re-edits of the facial mesh, I have finally decided… it’s not helping… enough. I can tell from suggestions online that my structure of the facial mesh is perfectly fine, so whatever it is that’s keeping me from achieving the effect I’m looking for isn’t too far off. During the progress, the head went through several states, and I noticed at certain times it looked more alien, other times too masculine, etc. I think I’ve improved it considerably, but I still haven’t quite figured exactly what’s wrong. Either that, or it’s fine, and I’ve just been staring at it for too long.
Strange how it looks okay from angles but not so much from side or front views. Does anybody have any suggestions for revising it?
Working on the hand now, trying to find a good design:

Update: Bottom hand mesh plan:


Finished the hands. Altered the cranium. Made adjustments to the hip and core muscles, blah, blah, blah, on to the cool part!
While I haven’t actually done the feet, I’m eager to use this model in a scene. My original plan was a library scene, her standing in front of a shelf, holding a book, midday, silhouetted by light from a window in the background.
This means the next two things I have to work on are clothing and rigging. I just want what’s necessary for this particular scene at this point. So I need to work on neck and arm rigging. Having never done rigging before, I’ll need to ask a few quick questions, like how do I keep this from happening:

Some quick terms to look up regarding rigging and ‘keeping that from happening’ -
- fan bones
- shape keys
- ipo drivers
- mesh deform modifier
That should start your research off in the right direction. 
Okay, so I tried switch from using the armature modifier to armature parenting, using the Name Group setting when I assigned parenting, and I had some pretty good results with the elbow, but had some other… errr… obvious issues:

The ForeArmLeft bone should be assigned to the ForeArmLeft vertex group. And it is, so why is it controlling vertices that aren’t in the vertex group? All bones are behaving this way. They’re not controlling just their assigned vertex group. What do I do about this?
Seems most probable that in binding the Armature to the mesh, you chose an option (such as Bone Heat) that “repopulated” your Vertex Groups, adding verts that were not originally in the groups before binding.
In Editing mode, check the vertex groups for membership and I think you’ll find that they’re a lot more extensive now than you expected. Whatever binding option you chose, it looks to be based on proximity of the bone to the mesh, so because the forearm bone was alongside the leg, it gathered those verts into its vertex group as well as those of the forearm. This is one reason for the classic “T” pose often use when making armatured figures – it keeps the bones well-separated so the binding doesn’t over-reach the intended parts of the mesh.
Altering the mesh to take on the T shape might be a problem, especially given the apparent density of your mesh – dense meshes are good for sculpting but can increase the problems involved in binding, weight painting and animation, especially if you’re new to these things. You’d be hard put to construct a mesh deform cage for this mesh also, again, because it’s not in T pose.
If you “unbind” the mesh from the Armature and edit your Vertex Groups to get them back into line with what they were, you can either re-bind the mesh using Parent, but choose a binding option that doesn’t modify your Vertex Groups (since they are already set up), or go back to using the Armature modifier, and use weight painting to fine-tune how the mesh responds to the Armature movements. Also consider reducing the poly count in your mesh, if it is as high as shown above. You can do this on a duplicate of the current mesh so you don’t lose the Sculpting work already done. Lowering the poly count will make weight painting a lot less difficult in troublesome areas like shoulders.
Once you have the lower-poly mesh & armature working together, you can use tangent space normal mapping to give the less-dense bound mesh the same detail your higher-density sculpted mesh has, but without increasing poly count.
I actually didn’t do any sculpting (Never have actually.) That’s just regular level two subsurf. I checked the vert groups. They haven’t changed. But I can imagine if I distanced the arm from the waist, it would resolve the problem. I can’t really decrease the mesh detail, but I bet can still raise the arms. I’ll try that.
The names of the Vertex Groups probably haven’t changed, but I’ll bet the vertices that belong to each group have. The forearm bone wouldn’t deform the leg if verts in the leg were not part of the forearm bone’s vertex group.
In Editing mode, make sure no vertices are selected, then go to the Vertex Groups listing and choose ForeArmLeft, then hit the Select button – you should see a lot of verts in the leg and waist area highlighted along with the arm verts.
If the posted images show Level 2 Subsurf, how about posting the wires with no Subsurf? Makes it easier to see the base topology, which affects deformation a lot.
By sculpting I didn’t necessarily mean using the Sculpt tool, but the process of forming the mesh, which can be with Sculpt or the Mesh editing tools. The point is that higher-detail, high density meshes present more problems in binding, weight painting and deformation control than lower-density, so it’s usually better to keep the animated mesh fairly sparse, and add higher-level detail with normal mapping.
Also, unless this is just “practice,” you should complete the modeling (feet!) before binding the rig – adding bones and mesh parts later on can mean re-doing a lot of the rigging and weight painting steps.
Very impressive! I still gotta learn that, I’m still very bad at using blender haha… I like your work and as some other people might have said, there are a few anatomy problems, but the modelling still looks nice.
Umm… So… I got bored, and just, changed the mesh pose by hand. If that makes me an idiot, so be it.

I did check the vert groups, deselecting all vertices and then selecting in the edit tab/ mesh tab (wachyamacallit) the various vert groups. No unusual vertices were selected in the 3d view when I did that. Just the ones I expected. I did raise the arms, without too much problem, and I will be learning more about successful rigging, but don’t worry about me jumping head to rigging too soon. That was just a test. Some times I like to jump ahead, just to change things up, or if I’m getting impatient.
Like so ^^^^^^^^^
Feet constructed:

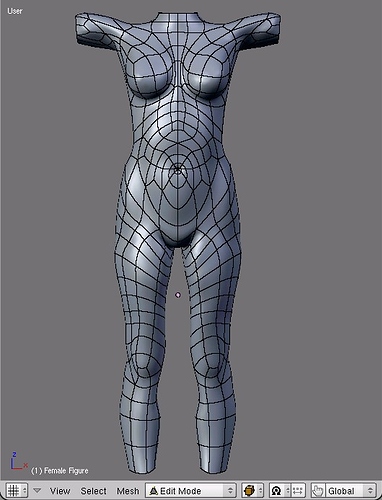
Made more adjustments to the waist. Shoulders seemed hunched somehow, so I lowered them a bit.


Comments? Where do I go from here… I’m thinking there are some anatomy issues at the waist. Even with oblique development I think the rib cage should branch out more than the waist above the hips, yet at the same time the hips should be wider than both. Remember, my human anatomy studies are all relatively recent, so feel free to give specific advice. It would be much appreciated.
my 2 cents: the waist should be thinner. the thighs start out the right size and then get too small. and the bottom half of the leg seems kinda fat. and the neck seems a bit too long and a bit too muscular.
but good job… better than i could do.
