That looks so real. Also, teeth and gums on their own are kind of gross.
1 Like
Well, 'tis the season. 
2 Likes
Teeth are looking great! Can I ask why you use Krita in addition to painting in Blender and how you use it? And also, is the subtle yellowing of the teeth nearer the gums just due to color map, or is there a SSS map as well in there?
I was very surprised by how many ridges and details there are in the teeth. On the grey material it looked to me like it was too severe, but in the final render with color and specularity it all comes together and looks awesome! Thanks for posting a fresh rendered image, I love looking at’em.
1 Like
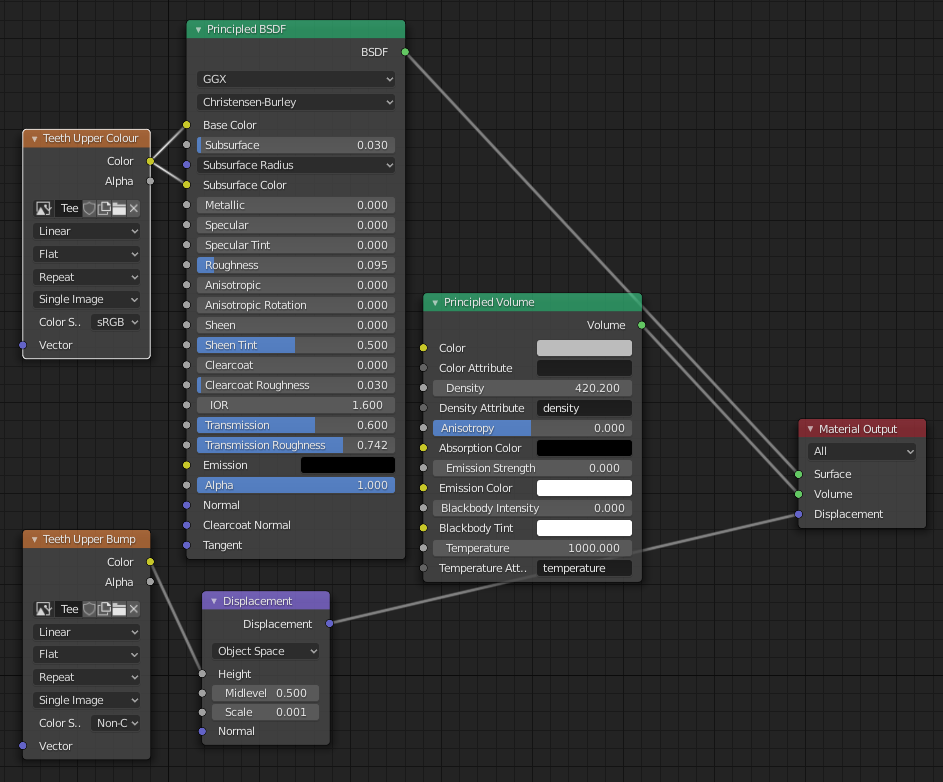
how you did make this look son shiny what its the material node setup?
finally! ive been waiting! what does it look like in the head though?
whats the node setup for the teeth and gums?
Will this be for sale?
That’s the SSS. This is why it’s often important to exaggerate any details that will be affected by SSS.
Painting in Blender is a somewhat slow and glitchy experience for me (even in 2.79), so I put up with that for a while and then moved it into Krita - except then I couldn’t tell exactly which part of the model I was painting on. Then I realised I might as well do it in the UV editor since that works better than painting directly on the model, but mirroring doesn’t work in there so back into Krita again… and there was that kind of back and forth going on.
I still haven’t nailed down the workflow, but with some brush presets it would probably make sense to do most of the painting in Blender, and save editing for Krita, at least until there are some image editing tools in the UV editor (e.g. for copying the top teeth to the bottom ones and warping them to fit, to save having to paint them from scratch).
It’s the colour map. I didn’t bother with a SSS map this time, I’m not even sure whether it’s entirely necessary. I’ll save that for the next round after I’ve done some more experimenting.
For the bump/displacement render I did actually enhance the detail a little by adding the bump image to the colour channel, but yeah the SSS does knock the bumps back quite a bit.

5 Likes
Oops, accidentally hit the reply button before I’d finished.
Looks better than it used to, but now I need to bring the lips up to par.
Most probably.
Have you looked into ArmorPaint? My recommendation would be Substance Painter, but that’s pretty expensive and Adobe is busy screwing up the license system. ArmorPaint, however, looks promising.
Thanks for explaining your painting process and also from showing the nodes. Sorry to hear you’re having such a bad time with it, but the issues with the process don’t show up in the final result. Maybe there will be much better tools soon, have you seen the stuff Pablo Dobarro is cooking up? It was vertex painting, but still, looks like a step up.
With the nodes, if you have the time, could you explain why you are using a volume node? I thought it was good for stuff like fog and other atmospheric effects, but I suppose with a density value of 420 you are using it to make the teeth and gums a little bit translucent, am I guessing it right?
I was also curious as to why you use separate nodes and mixing them together, rather than using the Principled BSDF node. Do they give you more control, or is it because the latter has parameters you don’t need?
Sorry about the barrage of questions, feel free to ignore them if explaining all that takes too long, I’m just curious about all that stuff.
1 Like
i was wondering the same lel…
I’m trying to use as few apps as possible, and part of the objective with the teeth was to assess the texture painting in Blender. I might give it another chance and see if I can improve the performance, otherwise it might be back to Sculptris (or ArmorPaint, which I haven’t tried). Frankly I wouldn’t touch Adobe products with a barge pole…
Yes I’ve been keeping an eye on that. He’s already been improving 2D painting, wouldn’t surprise me if he does the same for 3D.
Correct. Teeth are more translucent at the edges, and SSS doesn’t achieve that by itself. The volume node isn’t solving it too well either, but it’s better than nothing.
Principled’s SSS is inferior apparently (I intend to test this properly one day), and there was another reason that escapes me now. Something to do with separating the glossiness from the refraction. I’m trying a version with Principled now to verify.
No problem, all good questions.
4 Likes
Here’s the original vs Principled. There’s not much in it, even using Principled’s SSS. Maybe I was trying something earlier that meant I had to separate them out, but then it evolved into something that Principled could have handled after all.
The fresnel looks a bit stronger, so I’m starting to wonder if I had it set up wrongly in the discrete version.
12 Likes
whats the gum nodes??
so you going to use the discrete vestion or the principled version?
I mean like, what do you do when you’re not doing this? (Needed to replace another one, that’s why I replied to a different post)
Another exciting UV unwrap, this time for the rest of the body. The old one became a little bit mangled after I altered the geometry, so I’ve redone it and improved it in the process.
The object of this game of course is to keep the checkers as undistorted as possible and of uniform scale (or thereabouts - I allowed some extra res in places), while making maximal use of the surface area. In addition to this I wanted the UV islands to be legible for painting in a 2D app, and symmetrical so that they can be mirrored easily. This required a good deal of manual reshaping after the initial unwrap.

I’ve also redone my alternate UV map that maximises the facial area, so it now also has a bit more resolution and less distortion than before.

Those are the teeth and gum nodes.
Haven’t made my mind up. Which do you prefer?
Eat, sleep, browse the forums, go to the shops to get more to eat… that sort of thing.
7 Likes
I think the principled bsdf version looks better here, just for the stronger fresnel effect. But the difference is so small that is only visible when you put them on a comparison gif like this so really it doesn’t makes much of a difference which one you decide to use.
I’d choose the one that renders faster…