question remains: what to do with the boxes and boxes of DVDs?
I haven’t watched a DVD in like 6 years? I have stacks of them. They are now waiting to become landfill or an art project. LOL What are people doing with them?
Maybe switch over to patreon and offer the HD digital copy as a gift to patron supporters? And share your human project info there as well? As JP calls it - the artists’ curse - It is very difficult to make money as an artist, no matter how good you are. The art is only 5%, almost all of it is marketing/self-promotion, and us artists usually hate marketing.
I will have to take a look at Krita - I have recently hunkered down to learn grease pencil for animatics purposes… so I should probably learn that tool properly first.
use the shape key mirror topology option for shape keys, if your model is merely asymmetrical, of course you will need to tweak them, and use blend from shape option to clean up some undesired results, and sculpt the shape equal as the original as possible… also you can you this addon https://gumroad.com/l/tOKEh with a little cheat, you take a duplicate copy of your character, symmetrize it completely, do the shape keys there (with symmetry enabled when sculpting or in edit mode) and use this addon to do a raycast of them in the asymmetrical sides in the original model…
also similar thing you have to do with vertex groups (the vanilla way, but there is a vertex groups + addon for that) to mostly symmetrize a vertex group with asymmetrical models (yep you will need to tweak them later perhaps after simmetrizing) using this transfer option in weight paint mode, you need to have active as last the target object to add a new vertex group from an active vertex group into other active vertex group in both objects…
First off, thanks for sharing this massive thread and the in-depth technical and creative discussion going on here! I’ll go ahead and buy your Universal Human Rig as it will help greatly with our animatic project which uses a lot of 3D as base for illustrations (https://dividedstates-project.com/)
I’ve been searching for a good realistic human pipeline for b2.9 around the internet and this seems to be a great place to start! I am working on my own realistic character model project which currently has some WIP renders set up in Cycles
Emily-Turntable-GIF-v3|690x388
(Handsculpt, scan textures using ZWrap into 2.9 cycles. Nodes are a mess so only the diffuse is really working with some fractal noise pretending to be bumpmaps)
This is about as far as I can take it with my novice knowledge of shading, however, so I am hoping to stick around here to learn more. Some questions
• I checked out your GumRoad page and noticed you are currently not selling .blend files or tutorials for skin shading - I would be greatly interested in this if you ever have the time.
• It’s hard to navigate this big thread so I will probably ask questions you have answered before, is there a place you are keeping all the links and advice you are posting for new arrivals like me to traverse?
I am looking specifically for the skin shader setup (I’ve found the image you posted in 2019 but not sure how recent that is), the render setup and HDRI environment.
@FletcHR Maybe, although I’m not sure if Patreon would be right for me at the moment, since that would add some extra obligations.
@fried_lemons Yeah I have to think carefully before changing any topology (or at least remember to repeat the changes to the other side before moving any verts). Lightwave had similar problems maintaining symmetry… I find it strange that computers have such a hard time with this.
@MichaelBenDavid I don’t have too much trouble keeping shape keys in symmetry - it’s the base mesh, vertex groups and UVs mainly. The model is symmetrical (most of the time), but still mirroring things frequently fails, even when using Topology Mirror.
Thanks @Vincent_De_Nil, textures/materials are on the way, but since they need to work in concert with the model, hair and such, refinements are going on all over the place. I also have to work out how best to segregate/integrate them into/from the other products, so it could take a while.
Unless somebody’s been doing some collating, most of my shared info and links reside in this thread. You can condense it a bit by clicking on my username, and then on the filter icon to show only my posts (which I sometimes use along with the search option to find something I wrote earlier).
So I’ve been trying to make an “Anatomical BaseMesh” of sort and wanted to know what you think
the idea is building a strong base rather than just casual topology, so I cna use it in a charatcer creator [Currently MB-Lab]
These results are without any corrective shapekeys or extra bones, only a shoulder bone and an upper arm bone with twist.
I’m listening. [Just to clarify, the topology is “odd” on purpose, I’m experimenting with an anatomy-based topology rather than a standard perfect loops one]
A thought I had - have you considered making the skin shaders available in ‘Early Access’? You mentioned they need work in order to be fully functional with your other packs. My own projects are at a step where I can’t progress without setting up my full scene and shaders in Cycles for previz. Having your shaders, even early, is something I would love to work with.
I’ll also be starting some anatomy sculpting studies, which I’ll Zwrap onto your Universal Human rig when done to see if the workflow can be approached from any direction. I’ve had great results with Zwrap on face topology so far.
I’m afraid that would be akin to selling a painting that’s still in the blocking stage, partially detailed, with most of the canvas still blank…
The different versions are all derived from the same master file, so it’s not so much an issue of compatibility as working out how to make them easily upgradeable, and documenting the process. Before I can do that though I have to decide whether to sell the materials independently of the texture maps; whether I can make a single customisable material or if I need to make variations for different ages, genders and skin types; whether vellus or mesh elements like tears should be bundled with the skin, etc. For now I’m working towards a fully textured “finished” head, complete with hair and other details, and hopefully all these uncertainties will resolve themselves along the way.
Also bear in mind I’m aiming for realism, so the texture fidelity might be overkill for your previz.
Thanks for the updates Chris! And definitely understand the way you are approaching it. The realism is definitely overkill for my project, but I just want to do an experiment to push to CGI realism as fast as possible in Cycles by using bought assets
On the shaders vs textures point you make: I think setting the shaders up so they are easy to plug maps into will be the most important part, especially if you are pushing the Universal Human project further. For example tools like MetaHuman will soon change our workflow into scan/node based portraits.
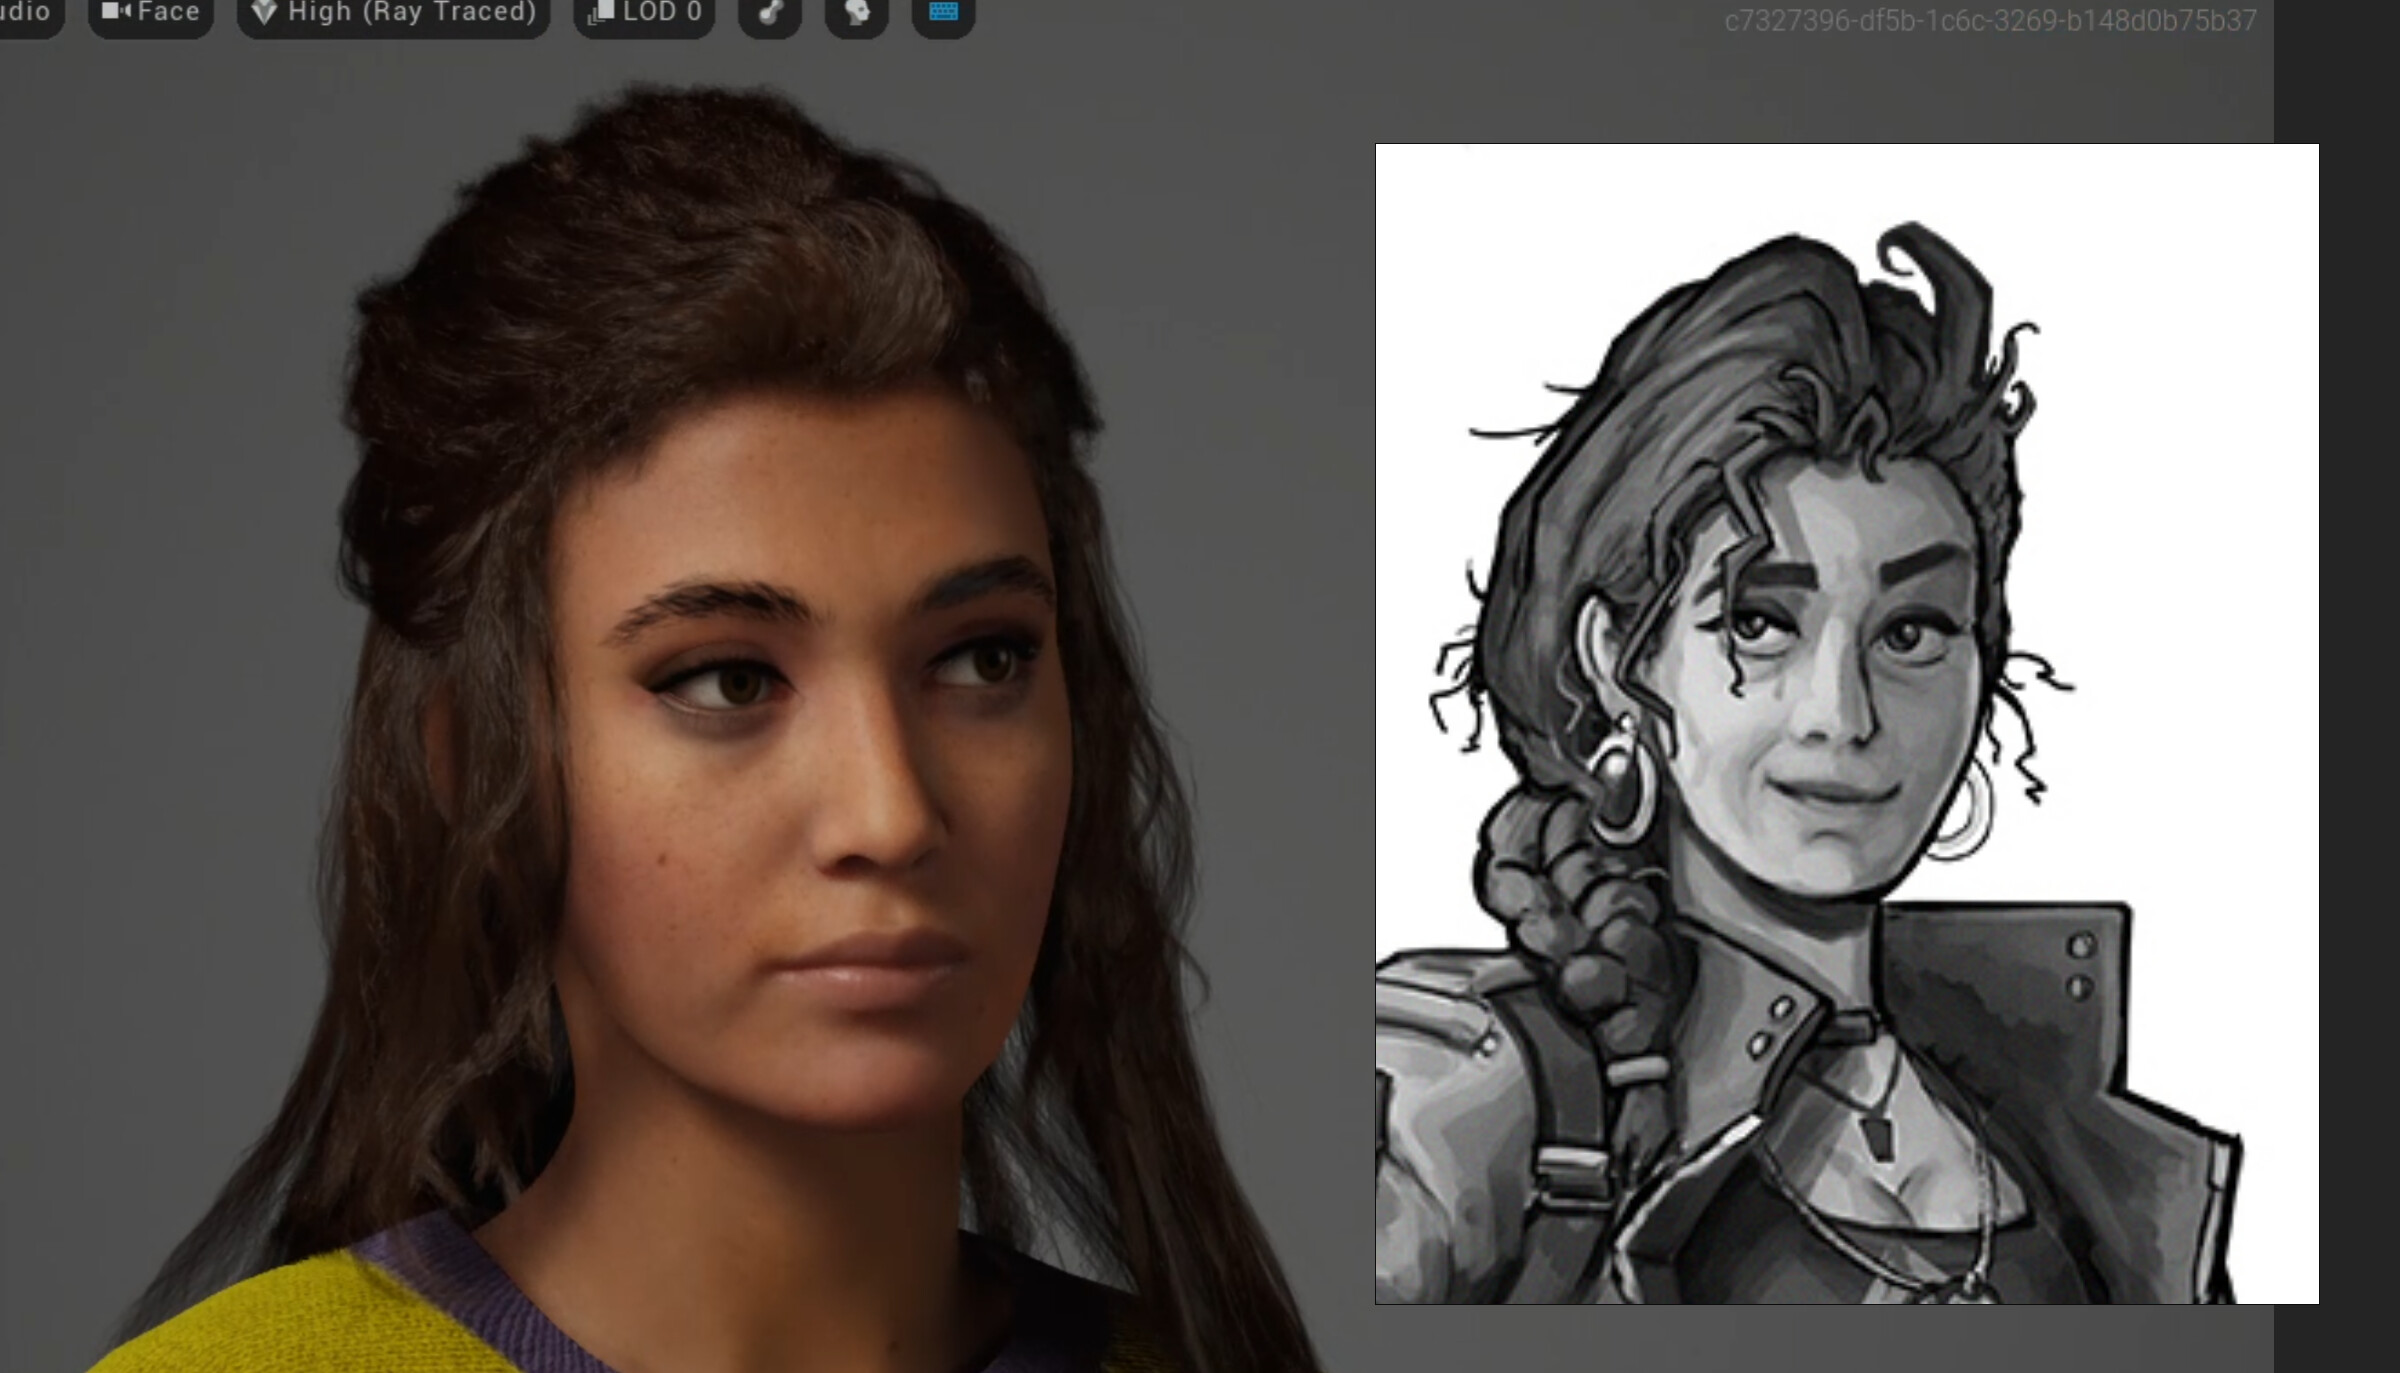
I think the most logical approach would be a one-size-fits-all shader that will take maps from scans and UE4 metahuman exports, allowing for realistic previz in Cycles. I have another project in mind that uses the MetaHuman-first workflow. If I could take this, go to Zbrush to sculpt the finer details of my concept art, and then steal/hack maps together to go straight to CGI realism I will be a very happy camper. The left-side image took 15mins to mix together, which is pretty crazy.
hello i highly recommend you these courses https://www.flyonthewall.studio/ i think with one is just enough to learn most of everything, but you can buy the other courses if you like for more learning…
Thanks! I will give it a look. I think what I’m lacking right now is a Cycles tutorial as most of the really good ones online focus on Arnold and Vray. And fair enough, those are great engines
i was talking about mirroring a shape key with slightly asymmetric topology in a model, but not making a shape key in a completely symmetrical model and then do the mirroring (which obliviously it wont work)
Either way that’s a given, since I’ll be packing them into group nodes.
The difficulty there is that the shaders are fine-tuned to work with specific image values, and there’s no one-size-fits-all UV layout (maybe scan vendors could be convinced to contribute their own, since that would be in their interests).
Metahuman would be out of bounds though, since that’s restricted to rendering only within UE.


