Im getting it!!! 3 point lighting again. Cannot figure it out!

:stuck_out_tongue:

I changed the title to make everyone happy because they thought I was insulting blender. I was insulting myself!

Different cultures act differently.

I have the scenario below. I am using 3 point lighting and added a 4th in front to try to smooth the look of the inveted V shadows.

But still I get them. I tried moving all the lamps to different layer to see which one is producing it, and apparantly? none of them are.

I am really really confused by this. Can you explain how to fix it?:eyebrowlift2:

And even though the body/head was made using mirror, and the lights are the same distance etc from the model, look at the lips and eyes, how wierd the lighting there is…

Attachments


I guess the first questions would be where exactly are these 3 - 4 lamps, what are their colours and their strengths? Where did you learn about 3-point lighting? Did you follow a Blender tutorial? Tell us more about what you have and what you want.

It appears you have two lamps of almost equal strength facing inwards from opposite sides of the model, both casting shadows. That’s not a typical setup unless you want “flat” studio-type lighting.

Also, turn on OSA so we can see a better render.

Also note that people don’t pick on people here for being new. With Blender, even intermediate/advanced users find themselves having to ask for help sometimes. However, people may pick on you if it appears you ask questions without ever trying to find answers in the wiki manuals or by searching here for similar problems and answers or if it seems you have a bad attitude. TELLING people not to pick on you will often have the exact opposite effect. Just be genuine and polite, show initiative and try hard to learn and you’ll get by just fine.

Generally though, this is a really friendly forum filled with people who WANT to spread their knowledge. It’s one way some of us can repay our debt for a fantastic piece of FREE software.

Three point lighting:

your KEY light should be the only shadow casting lamp. Use a sun lamp or a spot light and adjust its position to get the shadows where you want them.

your FILL light should not cast shadows, (use a hemi lamp, or turn shadows off) and be about half the strength of the key light. Position it so it lights up and softens the harsh shadows cast by the key light.

your BACK light should also not cast shadows, is fairly weak and is used to put a little light on the back of the model (which also brightens up the outline some)

If people are harassing you, Slink, it’s probably because of your attitude. Your title to this thread is a case in point: it implies there is a problem with three point lighting, which is a basic lighting standard for a very good reason: it works. The problem is not three point lighting, the problem is your understanding or implementation of it.

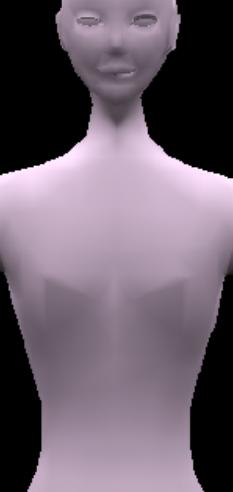
I am using the 3point light setup outlined in the wiki.

I have moved the two in front around, farther away on the y, or the x or both. I have them all set to a pale blue.

All spec is off. I have not checked the shadows though. Even if I put the 3 front lights to a different layer, I still get that shadow in the front.

Energy, and distance were both as described in the wiki, but it was to bright, so I changed the energies to much lower. OSA is always on.

I added the fourth lamp, and put it right in front, next to the model and pointed it up, and still got the shadow there.

So then I came here. I have been playing with this for 3 days, I thought I gave it a good go, before asking for help in this forum.

I am not new to blender, just this forum, and lighting people.

I can smooth it in shop, but would rather understand how to do this in blender. It would be faster if I could get a set up, to reuse, etc.

If you do a search here for 3 point lighting, the search facility throws out 3. It gave me only 4 posts that did not apply at all.

Perhaps I need search lessons too? lol.

Orinoco:
Thanks I will try that tommorrow in the daylight. lol.

So my title is inappropriate? Really?

I think it is obvious that my understanding is the problem, thats why I asked for help.

it implies there is a problem with three point lighting

No it does not. So if you thought it did, then I think I am right about a noob asking questions here. Some, not all, come to answer with an attitude toward the noobs (not just me).

Or maybe I should say a preconceived agenda.

I feel I have asked my questions in a decent manner. I may not give enough info, as in this case. But that happens?

Anyway, I would just like some answers, without sarcasm, etc. I was told I am thin skinned, yet look who is calling the skin thin, lol.

Have a good day, and thank you for helping me.

Orinoco: You forgot to mentino that he should turn of specularity on the backlight to prevent undesired highlights.
@Slink: You might want to defer from the 3point light system since it is not a natural setting rather it is more of a studio setting. Try to set your lights for emphazising the stuff you want to highlight in your model. And do lot’s of renders. Experimentation is the key here. For comparision you can use the backbuffer of the render window simply press J in the Renderwindow. This will bring the backbuffer to the front. If you now press F12 to render again you get a new render while preserving the old one in the backbuffer. Pressing J again switches you back to the other render. Voila you have a nice way of comparing the two renders and the effect the different options have on it. Be aware that you shouldn’t press J during a render as this might cause weird effects and crashes.

Musk, thanks very much, didnt know about the backbuffer thing.

And, thanks for suggesting a change in the lamps altogether. I had played with them for a day or two, before deciding to read the wiki. LOL.

Everyone always talks about the 3 point system all over the net, so I thought I needed to do it that way instead of trial and error. But then when I couldnt get that to look like the ‘pretty picutures’ , I was lost.

3-point lighting can give decent results, it just can’t mimic outdoor reality.

Again, it appears you have shadows turned on two lamps at the front. Also, if all lamps are the same basic colour then you may never get “good” results. Colour and temperature contrasts are a part of good lighting. For “natural” results you would use, for example, a warm, yellowish key lamp with a cool, bluish fill lamp. As Orinoco said, only the key lamp should have shadow turned on (usually).

Note: none of this is law, just a basic starting point.

Did you actually do the wiki tutorial exactly as written, step by step, using a model of similar scale? I ask because I’m not seeing any sign of it in your render. It’s also possible your defaults are non-standard so you may have settings turned on by default that are assumed to be off (or vice-versa) in the tutorial.

As for the thread title, it is easily read as a comment on either the 3-point system or Blender’s ability to deliver. Whether that’s your intent or not is largely irrelevant. Sorry. Admittedly, after reading the question I chose to take it as you apparently intended but it is not how I first read it. Lecturing Orinoco about your intent might not be the best response, especially since you said you wouldn’t waste your time with people harassing you. At a guess I’d say that if you’re struggling with 3-point lighting you’re going to need a lot of other help down the track so just chill and give the forum a chance to help you. It’s often wise to be aware that the people you choose to argue with, regardless of right or wrong, might well be the people you will need assistance from down the track.

a large, soft, area or hemi light tied to the camera and pointing at the model will simulate ambient lighting and soften any shadows. The wiki discusses 1-5 point lighting in the “lighting rigs” section that I wrote out of your very frustration. Different lights give very different results as mentioned.

The other thing is to Set Smooth your model, or turn on Subsurfacing, to cause the chest to be more rounded.

My nuanced sarcasm comes in only two flavors, Slick, strong and extra strong. Get used to it. If you’ve got a problem with that, you really need to understand it’s your problem.

One of the main reasons I lecture new Blender Artists on the importance of titles is that a properly posed question often leads directly to the answer. How? I’ll demonstrate:

you are obviously having a problem with shadows, but since you haven’t thought it through well enough to explicitly identify that as the problem, we find

This definitely qualifies as a middle schooler’s “Well, duh!”

Secondly, your title should attract people who have answers to your question, or can help you solve your problem. A title like “Having problems using 3 point lighting” will attract people who can solve 3 point lighting problems. Your current title “3 point lighting leaves a lot to be desired” reads as the opening line to a rant bashing 3 point lighting set ups or, worse, Blender. People who have been around a while get tired of reading “this feature is broken” posts from newcomers who have not yet learned how to use a particular feature.

Finally, lest you think this is a “harassing” post, please recall your other request for help:

If you truly would get answers without sarcasm, take the advice on how to ask questions to heart. Just because we bill ourselves as an artists forum doesn’t mean we aren’t going to try to work on your social skills as well, when we find them deficient, or when the poster implies that help in that area is needed.

Thanks to all, except one. He knows who he is.

I have PMd him in private since he obviously is only interested in one thing and cannot take what he dishes out. ooo, Im shaking in my boots.

AndyD:

Did you actually do the wiki tutorial exactly as written, step by step, using a model of similar scale? I ask because I’m not seeing any sign of it in your render.

Yes I did. But as I said, I didnt like it so I changed it this way and that. Sorry for the confusion.

And I really have to ask, why is it all right for the members to lecture me, and I cannot lecture them? Or at least answer their implied statements.

You know why? Because in the forums eyes I am new. So for some unknown reason you have the notion that you can freely lecture me with out regard.

Think about that. Having a conversation, back and forth, is not arguing, and doesnt need the note to ‘chill out’?

Im very chilled, actually. And I dont really care, if the person I am conversing with gets all upset and decides not to ever help me.

Hey, thats up to them. Really, its a free forum. I do however care about the things I have stated already.

I would hope the members could answer my questions the same way as I answer others questions here.

No need to climb a pole, swing a sword and declare I am the ruler, so do it my way or I will stab you with sarcasm and disgust. LOL.

And I like you, I understand what you are trying to say. do you understand what I am saying ?

Anyway, thanks very much.

Papa Smurf:

I did not read far enough! Thank you very much, I will visit the wiki again. I do have subsurfing on, just not a lot. It made her arms skinny, and weird as I recall, smoothed it out to much?

Ok, here is an update. Its much better. But you can see I still have to do a lot more work.

Shadows?, I think I only had one lamp that had a shadow option, and I wasnt using it.

I moved one lamp to the camera and then changed the gamma on the other two…

added in some yellow and some green, why? because I could, lol.

Thanks for helping.

Attachments


After an hour and a half playing with this just now I have a much better render… Thanks for helping.

Now if I could just figure out the skin color… I think the texture is ok. But the color was a little too grey.

And that line on her chin is driving me crazy… there isnt a vert that is pointy there, it is pretty smooth, yet I keep getting that bow of a boat on her chin!

Attachments


You might have a normal problem. Have you tried pressing Ctrl+N to recalculate normals (or Ctrl+Shift+N for inside normals)

Thanks for the help. Naw, my norms are ok. Actually everything is ok now. Except I need a little moister look than I have.

But since this is a game character it doesnt really matter. Except for close ups etc.

You are probably talking about the darkest shadow there? Its gone now in the updated version and she has a new stomach too. LOL, more muscles.
There was just one vert deep on the y access giving it a deep shadow, one of my many test to make the shadow where I wanted it…

Now I am challenged by modeling the muscles to appear smoother, yet still give the depth to show them off. Its low poly, so it is trying my patience.

I have found that moving a vert a smidge sometimes dramatically affects the subsurf algoritym, and a crease immediately smooths out. Also of course make sure doubles are removed.