Hey,
I’m doing some 2D animation in Blender (I know, a little weird) and I am using images for all of the characters/props. Basically I’m wondering if there’s any way to set different texture/image for each shape key. In most 2D animation software, it is set up so you can create different images for each mouth position. If there’s a way to do this, that would be awesome.
Is there any way to use it with the actual shape key settings in blender?
try creating different image textures for each mouth position and then you can animate the textures influence on material diffuse as if it were the influence of a shape key.
Do you know if there are any tutorials other than this one? http://kompak.pl/index.php?id=28 It’s outdated, and the modifier is different now.
No, I don’t know of any other tutorials. I haven’t read the thread that I posted the link to, but that is likely the best source of information about it. I wouldn’t think it would be that hard to figure out for someone experienced with blender, but I’m guessing you might be a bit new to this…
Hadn’t thought about this, but yes you could do it with shape keys. You’ll need to create geometry for this, in the case of a mouth, you’ll need 2 loops where the lips would be. 1 for the inside of the lips and 1 for the outside, and the mouth would have to be slightly open. I’d think you’d want it to look something like this:
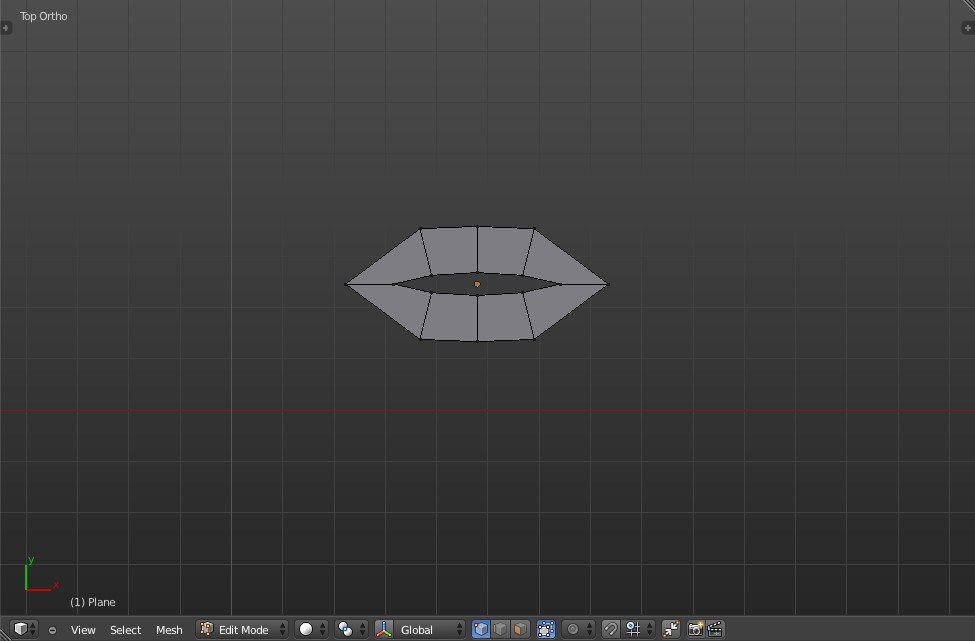
Maybe more loop cuts thru the lips for more verts for better control. For teeth, I’d add them in as another mesh, but still part of this mesh object. They’d be vertices in this mesh object, but not connected to any other part and slightly behind the lips. This way it would be easier to select verts while making shape keys.
You could even use an armature and bones to control the whole thing if you wanted.
In your first post, you mentioned mouth shapes, what’s the whole character look like? How are you controlling the rest of it? What method?
What’s the desired look of the finished product? The uv warp modifier will give you a hanna-barbera looking style of animation. Shape keys and/or armatures would give you a more fluid look to the animation, transitioning from one pose to another smoothly.
So fill me in, give me the info, what do you want?
Randy
I’m using armature to control the whole character. I’m using this tutorial for the bulk of the project. http://mmm.albinal.com/2d-in-blender-2-6-tutorial-part-1/
And as far as what I was saying about mouth shapes, I still want the whole mouth to be an imported image, but I wanted that image to be able to be interchanged with other images. Basically, the original UV Offset thing you suggested is what I wanted, but I just wanted to know if you could set it so that shape keys would control the image interchange, rather than armatures controlling it. Now that I think about it, you could probably just set it so that the shape keys move the armature, which then controls the image… A little complicated, but I think it will work.
But in the whole project, none of the props would be created in blender, just imported.
Thanks
AFAIK, you can’t have shape keys control bones, unless it would be by using a driver, not sure on that, never tried. If you are already using bones to control the character, then I’d want them to control the UV Warp modifier as well. It keeps things simple when animating.
The dope sheet editor has 4 modes: dope sheet, action editor, shape key editor, and grease pencil. The dope sheet mode allows you to see all key frames on everything in your scene, lights, camera, shape keys, armatures, etc, etc,… It shows a lot of data. The action editor only shows key frames for the currently selected armature. The shape key editor only shows key frames for shape keys on the currently selected object. I’ll skip the grease pencil editor.
Anyhow, if you use an armature to control everything about the character, when animating, you can work in the action editor and see only the key frames for the bones. If you use an armature and shape keys, now you have to work in the action editor and switch to the shape key editor, or work in the dope sheet and see all key frames. If you want to adjust the timing of key frames for the whole character, and it’s all controlled by bones, you can do that easily in the action editor. If you use bones and shape keys, now you have to adjust key frames in 2 editors, or in the dope sheet and filter out all the channels you don’t want to change if the have key frames where you are adjusting key frames.
Tell/show me what you are doing and I might be able to suggest other ideas,
Randy