I agree, that if blender was configured like this out of the box, more professionals would be using it. I hope you continue to update this for many years to come! ![]()
Whoa!
I’m a MODO user trying to once again have a look at Blender after trying and disliking it many times over the years… but this setup changes everything! Why the hell isn’t Blender set up more like this by default?
It’s brilliant! With this I can actually continue figuring out what Blender is all about.
Thanks a ton - and I concur; please do continue to update and document it. This is amazing and should be rolled into the main release of Blender.
Posted it again here in the MODO forums.
By the way, someone mentioned some bugs with this setup in the MODO forums:
Quote from Colin Wood :
I’ll need to make a list of them.
They aren’t major and can be worked around / remapped. ‘W’ for example doesn’t bring up the move tool in pose mode, as it’s already assigned to something else.
There’s also a bug with the restrict render icon in the outliner, where it doesn’t always let you switch off/on children of a parent with Ctrl + Click.
I said over there that I feel like this setup could be a game-changer for Blender and I’d support its further development (and eventual merging into default Blender) wherever I can.
Hey Chris Offner, glad the setup is working out for you. I hope it gives you an opportunity to spend some time in Blender and give it an honest go. It’s a pretty good tool (if you can bare to use it, and hopefully this setup will help in that department).
As I had mentioned earlier, Blender is my preferred 3D tool for personal projects and at work as well. So I’m basically just sharing what I had made for my self. As long as I keep using it, I’ll keep updating this.
I’m open for suggestions on how to improve it. Especially when it comes to Animation, as I mainly use it for content creation. Any time I do some cloth sims in Blender and have to work with keyframes, I realize that I need to put some more work into that area. Colin Wood seems to be a good candidate to pick his brain in that regard, as I have a feeling he gave this setup a good go.
The goal is to eventually extend this paradigm and make it as consistent as possible throughout all the different windows.
If you continue using this setup, pop back to this thread and leave some notes after a couple of months, I’d like to hear some feedback.
…
Update 2015 07 15:
Updated Mira Tools
Added Tissue by Alessandro Zomparelli
Tweaked the theme and probably some other minor cosmetics.
0rAngE, that would have been me that made that post over on The Foundry forums.
As mentioned, I use this layout on a daily basis I run into these sort of problems every day, mainly with the Animation tools and animation layouts, image editor etc. I’m usually so caught up in what I am doing I don’t have the time to note down what isn’t working and just find away around it (usually one of the default keys), but i’ll try my best to start noting things down so that we can get this keymap working better across the board.
I don’t know how far off any official keymap is, but this can certainly become a long term solution for me, and couldn’t go back to using the default keymap now. Just need to work on getting it more optimised for things outside of 3D view.
One of the main issues for me is that outliner problem. Has it happened for anyone else? I’d assume it’s a conflict with one of the addons as opposed to the key mapping?
Also, the guys over on The Foundry forums are really into Blender, which is good to see. I would never have found this thread if I didn’t see it linked over there, and that I actually visit BA more frequently of the two. I think this thread is a little hidden from people in this section, as more of an artist I would never in a million years visit the coding section of this forum. Just an opinion though.
Oh, one final thing. Auto save temporary files is switched off by default. Caught me out badly the other day when I had a crash and no auto save to fall back on.
Cheers, will do! ![]()
Since I intend to get into Blender mainly for rigging and animation (which is where MODO unfortunately fails me at the moment, not because of its tools but because of its poor deformer performance) I hope I’ll be able to provide some valuable feedback.
Agreed, I also wish this thread was visible more prominently on the forums.
The artist and user types like you and myself who would benefit the most from a more streamlined and workflow-optimised setup like this are the ones probably least likely to look into the Coding section.
coljwood . I spend most of my time within the 3D View, obviously that’s where most of my focus was to make it feel the way I prefer it. And any time I have to go to the UV/Image editor or have to deal with keyframes I realize how good it would be if I can make all those windows behave like 3D View.
Unfortunately Blender’s Widows/Editors behave as independent entities, and just trying to resolve it through the input editor won’t cut it. A good deal of heavy lifting has to be done on the developer’s end to allow us to customize it so everything is consistent. I’ve had some sporadic success in reporting (and getting fixes) for some of the major breakdowns with customizing the 3D View.
I haven’t had the issue you described with the outliner. Granted I don’t use that action too often, just tried it a couple of times after you reported that. I’ll keep an eye on it.
As for AutoSave, I disable it in all of the apps I use. I prefer to be my own autosave  i just save often. It bugs me when I work on heavy scenes and AutoSave interrupts me. I’m sure you know you can enable it on your end and save as StartUp File.
I’d appreciate any input you have regarding all the other Windows/Editor outside of the 3D VIew, what’s bugging you, and how you feel it could be made more consistent. Once we have a good documentation of all the discrepancies that can’t be fixed through the input editor, we can file a bug report.
coljwood, Chris Offner… I think this thread is a little hidden from people in this section, as more of an artist I would never in a million years visit the coding section of this forum. Just an opinion though.
I believe this is the section to post it, but agree that it’s fairly invisible. Feel free to link to this thread if you know a place it could garner some interest
…I have to update the hotkey list from the first post, have you guys tried Up/Down Arrow for Child/Parrent selection, also Shift+Down Arrow.
…
2015 07 21
cosmetics +
Updated Border Lines Addon (N Panel > Shadng)
Mesh Check Addon (N Panel > Shadng)
Viewport Info Addon (N Panel > Viewport Info)
Update:
2015 07 31
I was using bones the other day to deform a mesh and it reminded me how that section never got any love from me.
I had some time today to remap a couple of things.
These tweaks address some of the issues coljwood pointed out on the Modo forum.
Things that were remapped, and where, in order to allow more consistency throughout the different Modes.
Pose:
Shift+R Clear Pose Rotation
Shift+G Clear Pose Location
Shift+S Clear Pose Scale
CTRL+W Specials Menu
Armature:
CTRL+R Bone Roll
Shift+S Bone Envelope
ALT+E Armature Extrude Move
CTRL+W Specials Menu
This now allows for consistency in WER toggles of the Manipulator, and also ALR+R; ALT+S, and G fro widget-less transforms.
Edit:
Moved Multiple Objects Editing Addon from Tools Tab to Addons Tab
Update:
CTRL+SHIFT+MMB . Set 3D Cursor (resolved a conflict that overrode it)
Added 2 more Pie Menus.
Both are bound to SHIFT+MMB, they are context sensitive
SHIFT+MMB (Object Mode)
Mapped some things I used from several Addons into a Pie.
Simple Align Addon, Display Addon, and Multiple Objects Editing Addon

SHIFT+MMB (Edit Mode)
Mapped some Addons I use on a regular basis when poly modeling + a few other commands I was missing.
Mira Tools Addon, Offset Edges Addon, Edge Tune Addon, and Multiple Objects Editing Addon

Edit:
Updated 2015 08 05
Thank You so much !!!
I dig the recent additions. Thanks!
By the way, ctrl + A in edit mode is supposed to scale vertex radius (used with skin modifier), but there seems to be a conflict with this config?
AN, glad you dig the updates 
ALT + A to Scale vertex (Skin Modifier)
Cool, that works! Thanks!
If anyone is still using this, there’s a bit of an update.
Added another Pie Menu, something in line with the post #73. Same hotkey as the other 2, SHIFT+MMB. This one is for Sculpt Mode and it’s a Sculpt Brushes Pie
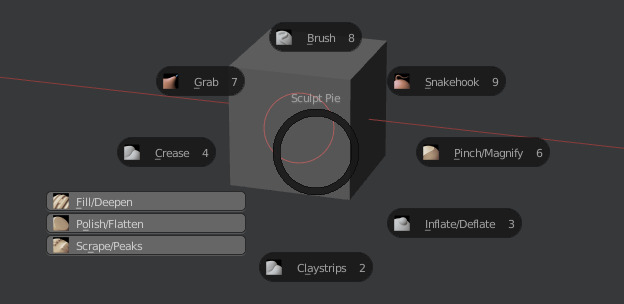
I noticed if I’m sculpting in the dark, and I can’t see my keyboard well, I tend to loose time taking my eyes off the screen to find the hotkeys for SculptBrushes. And although there are already 2 Pies from pitiwazou as part of the Wazou_Pie_Menus Addon (SculptMode: W, ALT+W) they did not fit me well in terms of orientation and brush choices, so I decided to make my own (as not to mess up anyone who was using them and got used to the mechanics)
Another addition is the ability to Select Objects while in SculptMode, a feature of the DeafaultSettings. This is now MMB while in SculptMode. The rRMB Addon (which I have remapped to MMB) makes it a bit awkward, but it works. I’ll see how much I use this and if I’m annoyed by rRMB addon interferance I’ll remap something.
Anyway the way this works:
- Select Object, go to SculptMode
- MMB on another Object. It will be selected, in ObjectMode (and you get the rRMB pop-up, ignore it)
- Go to SculptMode on that second Object
- Now you can MMB between the 2 Objects while in SculptMode
- (Eventually, you will have to exit SculptMode from both of them individually)
Download in the first post (updates are only in the 2.76 setup).
I’m still using this! Thanks!
So am I thanks.
Sponde . I wasn’t aware you were using this. Cool to see it’s not just 2 ppl using it … it’s 3, yeey!
Thought I’d post the update here. Added an addon to move and copy keyframes in the timeline. Courtesy of ohsnapitsjoel. Makes the timeline tiny bit less reduntant.
The way it works is on Selected Object + Current Frame:
CTRL + LMB Move KeyFrame
SHIFT +LMB Copy KeyFrame
CTRL + Arow Right Next Keyframe
CTRL + Arrow Left Previous Keyframe
Also tweaked the theme so Keyframes are more visible in the Timeline
Download in the first post (updates are only in the 2.76 setup).
One of the things I wish this config had out of the box would be the 1, 2, 3, 4 keys mapped to verts, edges, faces, edit/object. I know you are using these for camera views now, so I guess you feel that is more useful. Is it because you work on a laptop without a number pad?
I’m right-handed and hardly use the numpad, I used to use the number keys for Views but switched completely to Wazou Pie Menus for switching views. I find that more comfortable. I also use Wazou Pie Menus exclusively for switching modes (TAB).
That means I actually don’t use the 1-4 keys any more, so it’s not a big deal to remap it.
Anyway, I heard of this comment before regarding my setup.
Updated the file with your request ![]()