Hi all,
I am very excited about this post, as it is not only my first one in this community, but the first large scale Blender project that I have completed. The following are select renderings of a 3D model I produced to visualize a school project design of a future urban interchange in the city of Winnipeg. This was for the “final year” Capstone course for civil engineering at the University of Manitoba. It is my attempt at capturing the essence of the excellent work produced by our group of 9.
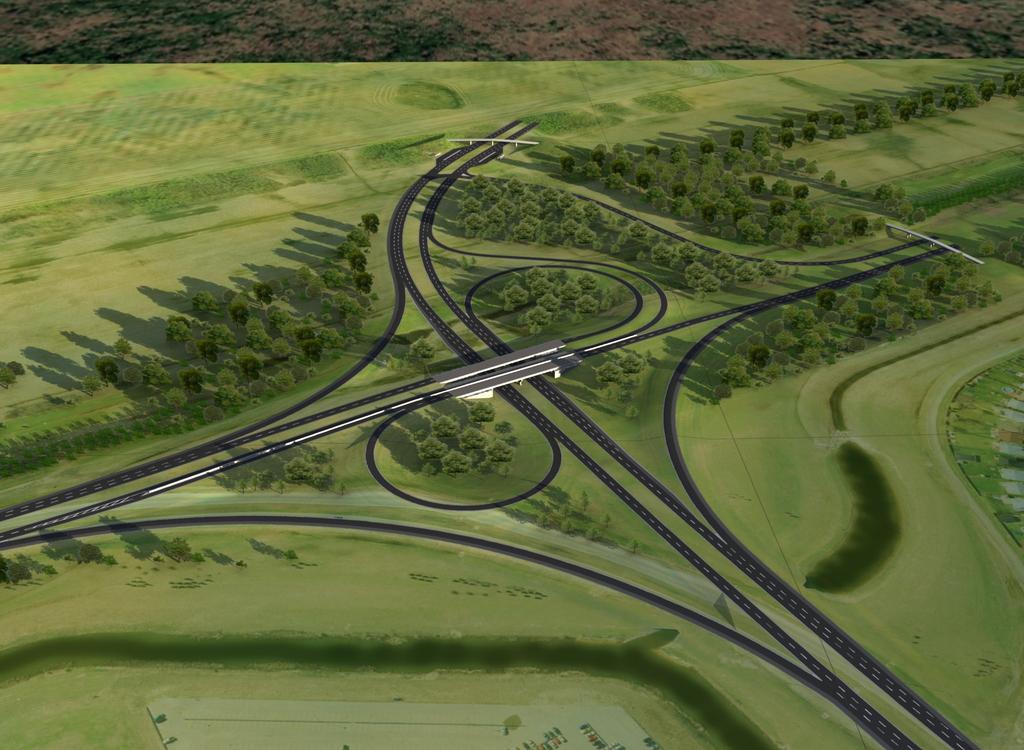


I realize somebody might find this, looking for ideas on how to do a similar project. And, since I was one of those people only months ago, and only found one Blender project specifically related to visualizing transportation projects, I feel I owe at least a brief explanation. This is not an engineering forum, so I’ll spare the details of how the design was arrived at and skip straight to how I got from a fully designed interchange to a visual presentation that blew the class away.
First, I chose to model only 1 square kilometer. The exact area was easy to choose, since the city provided aerial photographs of 500 x 500 metres, 4 of which nicely covered our design area. To start, everything was scaled at 1 metre = 0.01 Blender units. This made it easier to convert exact design numbers in my head. Later, everything was scaled up 2x because the size was somewhat small considering Blender’s numerical limitation of 3 decimal places.
Terrain modeling
I started with a simple, flat plane, scaled to be 1 square kilometer, or 10 Blender units. Plan view images of the roadway’s horizontal alignment were exported from AutoCAD Civil 3D, and used as a background image (also set to fit exactly 1 kilometer in the viewport) for modeling reference. Most of the plane’s faces were deleted, since new faces would be created wherever the terrain surface was designed. This is more of an engineering detail, but it’s important: the CAD drawings had 25 meter stations, so I “Ctrl+clicked” vertices every 25 metres along each road segment, or profile of the interchange. Then, taking exact profile elevations (vertical alignment) of the same road segments at the same intervals (again from the Civil 3D design), I manually selected and entered the “z” value of each road vertex. This was tedious, but using such wide stationing of 25 metres really cut down the work.
From these "floating vertices representing the road centreline profile, things can go real fast. Selecting one profile, duplicating it and offsetting it to fit the curbs, duplicating again and lowering several times to represent the basic road cross-section is easy. Along with this, I kept making faces and edges and tweaking things until the whole surface was built to closely match the actual design.
Texturing
The aerial photographs were 2500x2500 pixels each (x4), making them detailed enough to use as part of a texture for the terrain. They even stand up pretty well in perspective renderings close to the ground. To keep the terrain from looking like Google Earth, I added a simple, 2-coloured blender texture layer on top, with enough transparency so that the images showed through to make the terrain look natural.
For the pavement textures, they were created with AutoCAD using the existing alignment drawings, and edited in the Gimp. A single 7000x7000 pixel image was too large to edit easily and didn’t yield enough detail. I broke it into 4 images of 5000x5000. If I did this again, I would go with either 9 or 16 images instead, since the pavement markings and edges where quite pixelated in closeup renderings. Anyway, these images were .png’s with everything except for the pavement transparent. That made it possible to just add them as another layer on top of the terrain texture as part of the same material.
The trees were made using the popular “billboard texture” method. They were placed according to a plan schematic provided by architecture students.
That’s all the details I’m prepared to give right now. If anybody has questions, I would love to answer them!
very nice 