Hey guys, i’m doing this piece for a free-lance, I’ve got some time left and i’m trying to use area lights instead of AO, for i’m atempting for a more realistic interior and lights.
I’m having some problems with overexposure, and some with noise at the dark areas… I’ve tryed a lot of things now, but i can’t get it right (it’s not working even with 16 samples)… Can tou guys give me some advice at lighting? Is there any way of controling the area lights better than just adjust the distance… thanks a lot…
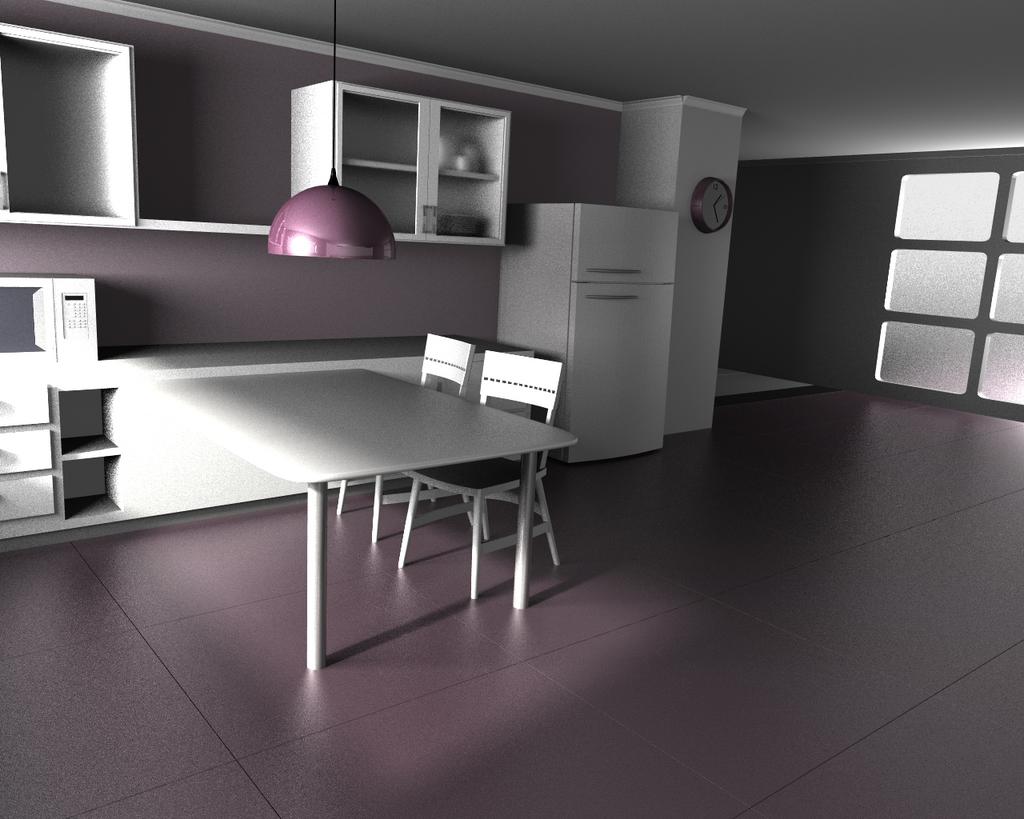
This is a rendered image of the scene… if you’d give some advice… thanks a lot again…
also, the shadow areas are too dark… I tryed placing an area light ponting to the purple wall but it doesn’t help at all… I thought of AO plus the lights, but then the image would get even more overexposured (does this word even exist? lol)… thanks a lot guys… fell free to give me some tips and critiques. I also would like to know what you think of the whole scene? It looks like a kitchen?
Have you looked into the indigo renderer? It is a little frustrating installing it correctly on your computer, and then learning how to use, but I find it to render light much more realistic than blender’s renderer. In blender light doesn’t bounce around like it does in the real world. You need to set up many lights, so that the shadow areas get some light. These other secondary lights should be set so they don’t cast shadows. It gets a bit confusing and tedious. Indigo renders light much more realistic. you can get by with only the light sources found in the real world scene. Indigo also takes a lot longer to render. There are pros and cons to each of them. Do a search on indigo and you should be able to find it. They have a good forum where you can find help with questions. I hope you find this info helpful.
Thanks, but I did look into Indigo, the big problem is that indigo ain’t free for high resolution renders, and it take too long… this image above, on BI took about 7 hours at 1280x1024… Indigo would make it twice the time lol…
I need the image on high resolution 'cause it’s for commercial purpose… Is there anyway of using indigo render at high res for free?
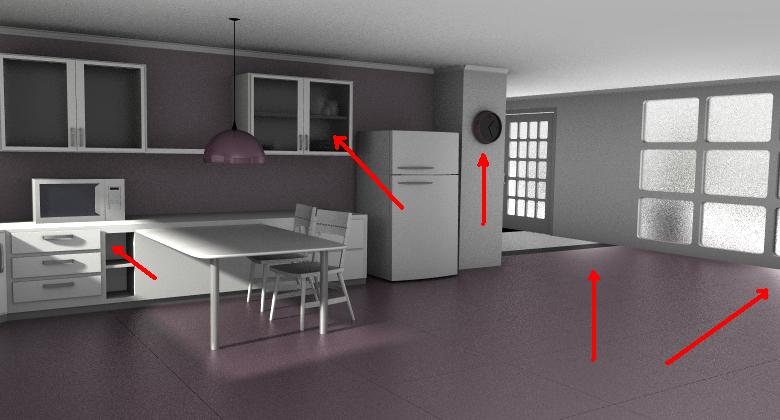
It looks great. You could use some secondary highlight lamps to lighten up the shadows a bit and the light on the far left where it first enters seems really bright to me.
Well there’s rendering, the different options pertaining to that including external renderers.
Then there’s the option of importing the file into a more realistically/flexibly lit program.
But generally I’d say that if you need professional standards then you should use all the changeable lights to the best of their ability.
get yafaray or luxrender installed. they are far far better than BI for this kinda of work. yafaray is far faster, luxrender is more accuate but slow. Im quite confident I could make this scene real with yaf for sure. if you can make the BI give this sort of result, Im sure you could as well.
then re work the lights and materials as you need, they look fairly straightforward though, so for lux is might just work straight up, yafaray might need you to reset the yafaray materials - it doesn’t use all the blender material settings, as it has some of it’s own.
your lights are way way to bright, and the fall off is wrong. try the different fall off types, linear, square, inverse, etc…
kind of… I’m looking for a more difuse light… can you see the shadow on the refrigerator? It’s looking too fake to me… that’s probably because I’ve set an area light outside the window (not the window in the scene) and made it produce shadows. I’ll try playing around with the light setup and see what happens… How can I correct the gamma on blender? I’m trying to achieve something like those HDR images, with vivid colors, lights and shadows, but still looking realistc. Can I make it all on blender or I’ll have to do it on photoshop? I’ve read about nodes, but honestly, I don’t know how to use it… Can you help me on it?
sorry man, this work is commercial, I’m afraid I can’t post it here. Not cause of you guys helping me out, but clients wouldn’t like to know I’m posting on the internet what they’re paying me to do lol…
those HDR images your referring to, i take it thats the ones with 3-7 different exposures of the same scene and then comp’ed together with hdi-shop? those photo suffer from a huge gimmicy feel imo. some are nice, but you should be able to produce a striking image using the standard palate. You can use HDR lights, and get a great result, but the result image image should have the proper spread of tone. The HDR images have massive visual distortion and its a completely different concept to a photo real image. I would steer away from using it a lot. besides, your scene could be properly captured with a standard single exposure, so nothing would be gained by having a hdr final render. (imo)
if you use yafaray you can produce a image with floating point colour, so you can modify it with a near unlimited colour values instead of the 256^3 of bmp imagery, which will give you much higher control over the end exposure, which you need to work with read the following stuff about tone mapping… its kinda complicated, but its very valuable
the modelling looks fine, though its a bit empty - you need to put in the rest of the features of a kitchen, sink, microwave, crockery, decorations, etc… the textures are very good as they are, but a little boring, it would be nice to see some cool tile work or such to give the place more life.
You can do the gamma correction in Blender as a post process using compositing nodes. See this thread concerning Tone and Gamma correction where you will find sone hints and instructions on how to do that. It is really not hard.
For you more diffuse shadow look, I think you need to use ambient Occlusion (AO) to help soften those shadows. Using only area lights will not be enough for that. You will need to find a good balance between AO and the lights.
thanks guys… I did download the yafaray, but it’s a little bit complicated to redo the setings of every material… is there any easy way of doing this? I don’t know what to do with the lighting too… would you please once again help me out with that?
its suggested around the various rendering boards that you decided to use one or the other pretty early on as the way lights and materials are handled is different. you then build for one renderer, so having to redo your scene for yafaray is the end result if you started building it for BI… its not a big deal, unless you have a bunch of procedural shaders, but you’ll lose quite a bit of time.
for your lighting i would suggest putting a sun in the scene outside for ray casting - lux and yaf will make use of this a lot - its intensity value can be anything >0 for to affect the scene. then move those area lights away from the window a bit to get rid of that over burnt lighting on the table etc near the window. keep the current intensity value, just move them away, see how it changes things. the rest of the scene is nicely lit, but you need to get ride of the initial burnt white values.
I redid the lighting and rendered on BI once again, but i still got some problems… the glass of the clock and of those cabinets (is cabinet the right word for it?) on the wall are too dark, I can light’em up by placing an area light pointing through them, but then it overexposures the wall and the white materials. AO won’t help me with that, unless I’m missing something on the AO setup. Do you guys know something about it?..
Also, why is my floor reflecting light when it’s suposed to be reflecting the wall and window? I read the last post, I just got to move the light a little bit away from the wall?
What do you think of the light?
Thanks a lot…
I’m sorry for my noobness at lighting and stuff… And sorry about the lack of “knowing if the image is good or not”
lol… I really need a lot of people opinions before deciding if my own work is good or not