Just wanted to say thanks for this awesome addon, Khalibloo. It’s working like a charm. Thank you so much for sharing this.
If you have the “dsf-tools” addon (by millighost), you will also be able to import morphs straight from their native (.dsf) formats. Just specify a folder and click the “Import Morphs” button. This addon can be found here https://github.com/millighost/dsf-utils
This script produces a syntax error in blender v2.77. Extensive google searches en forum readings didn’t point me to an update of the script. Are there other way’s to import daz genesis-3 morphs? Your Khalobloo panel script works very well (except morph riptimporting obviously). Big thumbs up for this powerful and elegant script.
The more I am working with this addon, the more exited I get. Great job Khalibloo. I managed to get cycles materials by copying them over from a figure that I imported using teleblender. First that, move it aside then imported an collada version with the bonestructure and ran you script. Working fine, even got all the morphs in as OBJ’s. One thing is bugging me though. I can’t move the feet. When I click on the foot controller, the color becomes pale blue which is my “selelected” color, but I see a gizomo (with arrows). On pressing R, I can rotate it just fime, just no way to move the foot forward or backward. Also when I move the hips down, the knees don’t bend, but everything is just pushed down through the floor. Any tips on what I am missing? Thanks in advance.
@willardjansen, the dsf-utils addon doesn’t seem to be in active development. So for now, if you want to import morphs, just use the OBJ method. You seem to have succeeded in that, congratulations 
As for the feet bones… Rigify rigs come with 2 bone structures for each limb. IK (Inverse Kinematics) and FK (Forward Kinematics). when using FK, you can’t move the feet. instead, you’ll have to rotate the thigh and leg bones until you get the feet in the right position. This is a bit difficult.
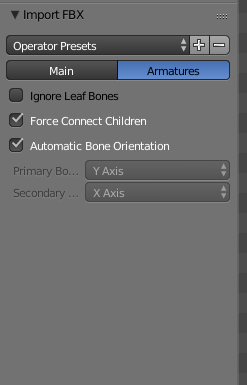
However, when using IK, you can move the feet and the thigh and leg bones will automatically follow. To use IK, follow the settings in the screenshot

Rigify takes some getting used to but it’s well worth it.
Thank you very much Khalibloo for the explanation and the screenshot. I didn’t know about the separate FK and IK rigs in Blender / Rigify. Thanks again and also for sharing this great tool.
You’re welcome @willardjansen. It’s really wonderful that you like my addon  have fun working with it

Yes I’m having fun and it goes well except for this little mess. I’ve been fiddling with vertex groups and modifiers in the armature modifier and although I get different results I can’t seem to get the whole shoe sticking to the foot. There’s alsys some part that sticks to the floor. I guess it has nothing to do with your wonderfull addon, but hope that you know what is going on. Can you help maybe? Thanks in advance.
The newest version of Daz Studio can now export FBX meshes with correct weight painting. This could be worth looking into as FBX can maintain the morphs, scale, and geografts used in D|S.
Thanks Kross. I have 4.9. I have tried FBX with all morphs but FBX doesn’t come in right into Blender. Besides I am using Khalibloo’s panel and instructions for this, which seems to me to be best tool around for importing DAZ Genesis 3.
@willardjansen, the shoe problem is caused by unassigned vertex weights. It’s probably a problem with the import/export process. You can either paint the weights manually, which can be a bit difficult… Google up some tutorials on weight painting.
or you can simply select the lady,
SHIFT + select the shoe,
go into weight paint mode (Ctrl + tab),
under the tools tab of the T-panel, click the “Transfer Weights” button.

This will copy the weights from the lady to the shoes.
This solution works for most clothing items, but not all. So always keep a backup of your object or blend file before doing this. It should work for your shoes, though.
I’d recommend watching/reading some tutorials on rigging.
@Kross, thanks a lot for the info. I’ll look into it to see if the rigs are similar. This could really streamline the morph export/import process. Thanks.
Thanks Khalibloo. You are absolutely right and that is just what I did the last few days, over at digitaltutuors.com. And I painted the shoe red and assigned it, with the IK footcontroller selected, but that didn’t help. But luckely the weight transfer you suggested did so thank you very much again. I’m all set now.
The FBX pose glitch is easy to fix, but it adds a few steps to the process. There may be a better way to do this, so I’m all ears if anyone finds it.
First, use these settings.
Which brings up his mess…
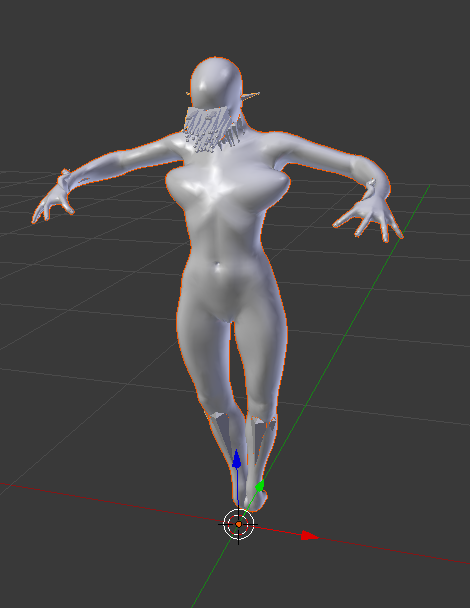
But, if you go to Object Data > Rest Position the figure is restored. So…

and figure is almost ready.
One issue is that the bones at the end of a chain, like fingertips and toes, end up pointing at the world Y axis and have to be adjusted manually.
Another issue is all the morphs are in positive values, so you have to edit the min/max values whenever needed.
@willardjansen, The weight painting method would have worked if you had painted into the correct vertex group. The IK and FK controllers do not have any weight by themselves. They drive other bones which drive other bones that have weights. For the toes, the correct group would be something like DEF-toes.L (".L" for left side). To do that, just select the vertex group before painting.
So just remember that in case you run into any further issues.
those issues should be quite easy to fix from code. Collada had similar issues with bones at the end of chains (leaf bones), so I used the positions of certain vertices to generate the metarig rather than the bone positions.
The main issues would be the more technical stuff like whether or not vertex indices are preserved, or if geografts are stitched, or if bone hierarchies are similar, etc.
I haven’t looked into using fbx in recent times, so there may be other errors further down the road. When I find the time, I’ll explore this. My schedule is just a bit chaotic right now.
Great Thanks Kross and Khalibloo for this helpful information. This FBX workflow workaround is just what I need. I had rigged and animated Genesis 2 in Motionbuilder. But since Genesis 3 combined morphs like EyelidsTopDown you need to be able to use negative values. In Blender this is easily acomplished. I had indead painted the weights in the wrong way, alhtough I knew how to do it. Stupid mistake probably because of long hours work :-). Luckely you guys com to the rescue. Thanks.
One little issue still. No matter what shapekey I change the value of, both feet also rotate down. It seems to bee cumulative, the more shape keys I setm the more the feet rotate and it makes no difference whetre values are driven bt a driver or are changed manually. I never touched any other shapekeys than that of the face. Anty ideas what might cause this? Thanks in advance. Maybe I deleted not enough from the list-all-properties text file. It occurs with a list-all textfile with nothing deleted. Do you have a Genesis2 Female one for me as a reference to check?
your shape keys were not exported correctly. i’m guessing she had her high heels pose when you exported the shape keys from daz studio. the pose was then added to each shape key during export.
Reset (zero) her pose before exporting the shape keys from daz studio and see if that works.
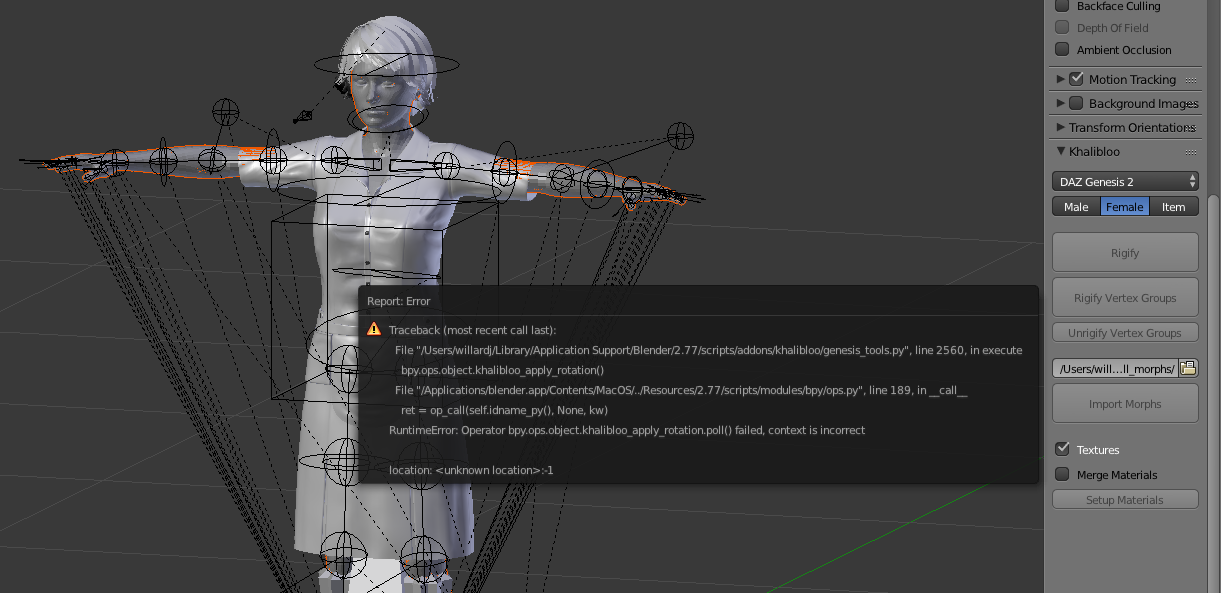
Thanks Khalibloo, I tried this but I keep getting an error now. I did everything from scratch, re-exported the collada, ran the script exported the obj’s with you obj export settings. I have even reset Blender to factory settings, but I keep getting this error.
UPDATE:
Don’t know how but I got it to work. Morphs are fine now, no foot rotations any more. Thanks again.