And eventually it landed into 2.79 goals![]()
Wrong first quote poster’s name. ![]()
I’ve actually said that it was just a friendly talk with no intent of going deep on subjects.
And good. It was already on suggested targets last week, now it’s official.
Not surprised since the effort needed to put it in master is close to 0 and the benefits are huge.
Little OT (more or less), not sure if there is some issue with IES support and disney shader to be eligible for the master, probably they are not finished yet, but their inclusion would be a good news too.
ooops! forgot to paste… done!
Sorry (maybe not the right place to ask) but does anybody knows if Natron is OK for post production or even if it can used in conjunction with filmic_blender? I can load filmic_blender config.ocio in my color management where the default is blender. Is this valid or am I doing something wrong? I’ll also repeat this question in Natron forums. I’ve read troy_s mentioning in a post that some things are “broken” in blender compositor, also on PS and GIMP so I guess we need another compositor for post production
i think he talkes about “blend” modes in the mix color node
I repeat that I’m not that deep inside color management so If I say something not correct and someone would correct it I’m happy.
If you in post production try to do the math in your mind between scene referred values and display referred values you’ll get unexpected results.
I make you a math example with no reference to real value, just a math example.
If you have your render with a value on a point, let’s say, of 2000 and you want to multiply it for a value of 0.5, you expect the result must be 1000, that after the EOTF (Electro to Optical Transfer Function, which is pratically the encoding transformation from an electrical input to an optical output signal, from scene referred values, linear signal, to display referred values, non linear signal), would end up in 1.
But you’ll end up with a result of 0.5 simply because the math you did was not done in scene referred but in display referred, so after the EOTF. You think something is broken.
To summarize in poor words, what’s broken and what’s working?
It’s broken the math operation done on display referred data, so after the transform.
It’s working the math operation done on scene ref data.
Is there a list of those broken math operation in blender compositor?
Honestly I don’t know blender compositor, and its code, that much to say it, probably all that Adobe operations of blending that are also in the compositor are broken because they are natively intended to work on display ref. non linear values.
This includes also photoshop as a non good candidate if you need for example to work with EXR because it natively works on non linear signals.
It is wrong to work in display referred?
Personally I think no, but you’ll end up with losing data, how much that data is useful it could depend.
Let’s say I’m not that nazi-purist thinking.
So Natron and others?
I don’t know, as said I’m not that much into CM.
I suggest to use whatever software you find comfortable without being extremely paranoid, until you get something unexpected.
What I really suggest is to try to put in the blender’s 3D scene as much elements as possible, first of all because of correct energy balancing between elements, second because you’re sure that blender compositor works on scene ref data, with the exception of those broken operations that would be nice to know:p.
If something is wrong, please correct it, I admit my high% of ignorance in matter and I’ve tried to answer just because I’ve seen not much people did.
@Lazy Virus
Thank you for your answer.
Here’s a link to Natron forum where I’ve also opened a thread.
here’s the most important answer so far:
Keep in mind that the filmic blender is designed to deal with scene referred data and using a much wider Dynamic range than the default sRGB, so it only makes sense if you are using EXRs or other formats that are not display referred.
The Filmic blender is designed to deal with the unnatural saturation that CG images produce when it comes to dealing with bright values. So it only makes sense to process GC images through it and not images form photographic (or video) sources.
And here’s what I understand combining all the information from both posts. Correct me if something is wrong.
You can take full advantage of filmic_blenders power only if you save your image to full float EXR or immediately after you finished you render before applying any Display Transform.
That means passing the rendered image to Compositor and apply your Color Correction there and save after all.
The problem here is that many blender compositor nodes are build to work with Display referred imagery (EOTF/sRGB) and not Linearly so they should be avoided cause they don’t take advantage of all the information that there is.
As far as it concerns Natron the same things are true.
If you want to take full advantage work with EXRs any other format seems kind of limited since you’ll be working in Display referred space and all the color and light information are already processed.
Maybe I’ve simplified things a bit and also English is not my mother tongue but this is how I understand it so far.
Here’s also a useful link where troy_s explains it a lot better.
While EXR is ideal, the base view transform, Filmic Log Encoding Base, is suitable to encode your scene referred data into a sixteen bit display referred format for use in applications that are largely display referred. To achieve a similar look to the seven base looks, you would need to apply a sigmoid shaped (‘S’) curve to the log data. At sixteen bits or greater, such as with a TIFF, you should have near original data granularity.
If an application has proper DPX support, this would be the ideal format to encode your Filmic Log Encoding Base to. Sadly in Blender, the DPX code is totally broken and it can’t work.
Once you are in the nonlinear domain however, beware of things that won’t behave “correctly” such as blending, painting, blurring, etc. For these sorts of transforms, only properly linearized visual energy will avoid fringing, bad blends, etc.
Natron should be able to load the OCIO configuration properly for use, but last I looked their developers had some lower level broken bits on the viewer etc.
As for broken things in Blender, these are left for the folks who have been experimenting with proper scene referred rendering to discover. Note that the broken bits have been there ever since Matt Ebb first added the sRGB linearisation code years ago, but few had enough of the knowledge pieces to see them clearly. Here are some things to try:
- Curves. Try using false colour and moving part of a curve to adjust the middle grey zone of your image. What happened? Where did you grab the curve? What did you expect? What about the red range? Where did you need to grab it? What did you expect? How would you design the UI to repair this brokenness?
- Colour Mix: AdobePDF Blend Modes. Overlay, Soft Light, Hard Light, Screen, Linear, etc. Why are these broken?
- Lift, Gamma, Gain. What happens?
- ‘Gamma’ related blur toggle. Why is this ridiculous in modern Blender?
See if you can find more. There are many broken little Easter Eggs in Blender, and it behaves better than most applications. With more folks discovering the nuances of proper scene referred image editing hopefully these problems can be fully understood and ultimately, repaired.
@troy_s
Thank you for the answers, some things are more clear now.
On the other hand I have more questions to ask, more topics to read and more tests to do :yes:…
Don’t know if this is the best place to ask: In respect to textures, do I have to make any adjustments for use with the filmic transform when exposing 0.18 to 50% grey?
I am asking because textures are usually created in sRGB Gamma 2.2 colorspace, wouldn’t for example Quixel/Substance textures look off under this mapping?
@Hoverkraft
AFAIK you don’t have to do anything. Blender “linearizes” textures behind the scenes.
Here’s a link that explains it far better than me, including an answer form troy_s .
Of course be prepared to have desaturated highlights (one of the super cool benefits of using filmic).
Thanks for the answer. I experimented a bit and found that I am probably doing something wrong that hasn’t got to do with textures:
Say I create a scene, add geometry, add diffuse shader with 0.18 value, add an HDRI, set to false colour and adjust HDRI strength until 0.18 is exposed to 50% grey. So far correct?
The problem I have now is that the strong HDR is overpowering the fresnel of a standard diffuse/glossy mix to the point that even a completely black shader with 0 roughness is very shiny and bright. Am I doing something wrong?
I could lower the glossy shader value to darken the reflection but shouldn’t that be set very bright because reflection approaches 1 at glancing angles?
Let me sum up quickly what I do based on Lazy_Virus Method (take a look a few posts above) (all credits to him).
-
I add plane with a diffuse material R,G,B all set to 0.18.
-
I make the plane facing the camera (manually or with a constraint)
-
I turn my view-port to camera view, select as render region only the plane and turn to false coulor.
-
If exposure is set up correctly then the whole area will be grey (or close to grey).
-
if not, I play with exposure (instead of my lights energy, just because it’s easier) to understand if I have to increase or decrease my lights strength. (Again refer to Lazy_Virus a few posts above).
-
I turn my exposure to 0, tweak the energy of my lights till the card turns grey and never touch the exposure again.
(Of course I don’t ever touch the gamma). -
Then I choose one of the presets (Meidum High contrast usualy) according to my liking.
I render and check if the card in the image viewer Ctrl+click gives values close to 0.18 (scene refered values on the left) and 0.5 (display refered values) on the right. -
IMPORTANT! No Clamping, No AO, No BS…used
-
All my materials are made by using custom made ‘PBR’ shader based on an older tutorial by Cynicat_Pro. (They seem to work fine to me).
-
A lot of people claim that Fresnel node is Faulty in Cycles (check Cynicats great tutorials on PBR on Youtube ), maybe this is the problem of your materials.
Never use values of 0 or 1 for black and white, they are not physically correct.
Do some more reading about PBR in Marmoset and Unreal Engine documentation. There are tons of information out there. -
Export to EXR and do fine adjustments and color corrections in compositor of your choice. (First check if anything’s broken there too).
Hope that this is helpful.
If anyone spots any mistakes please correct me!
Many thanks for taking the time to type all of this up. I have followed your process and made the following screenshots to explain.
Ok, so here is the scene without exposure calibration:
The upper plane is 0.18 diffuse, lower plane 0.5 diffuse. The shader on the sphere is the standard cynicat pbr setup, diffuse set to 0 to see only the reflections. Background is plain white value 1, strength 1. No AO, clamping, etc.
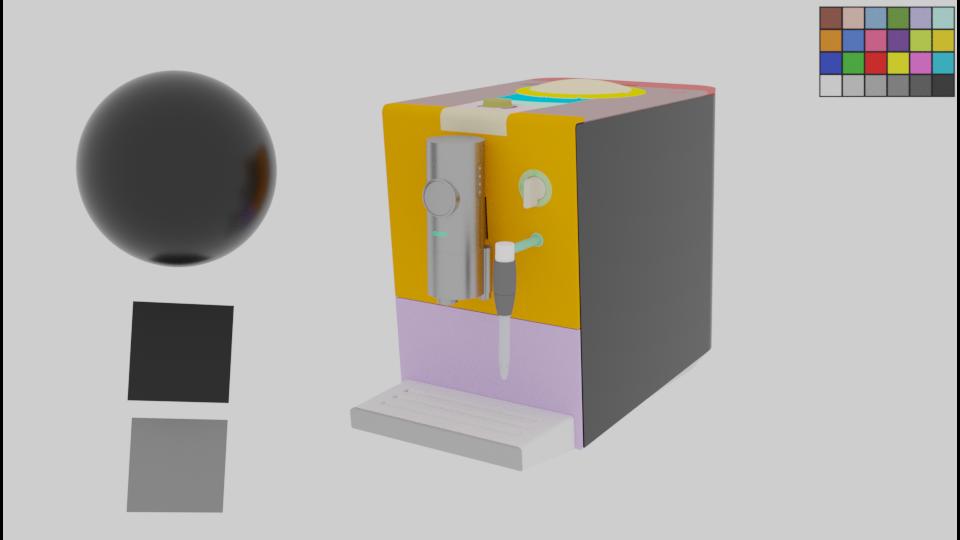
In false color view the lower plane is grey so 0.5 scene reffered corresponds to 0.5 display referred.
Now after calibration:
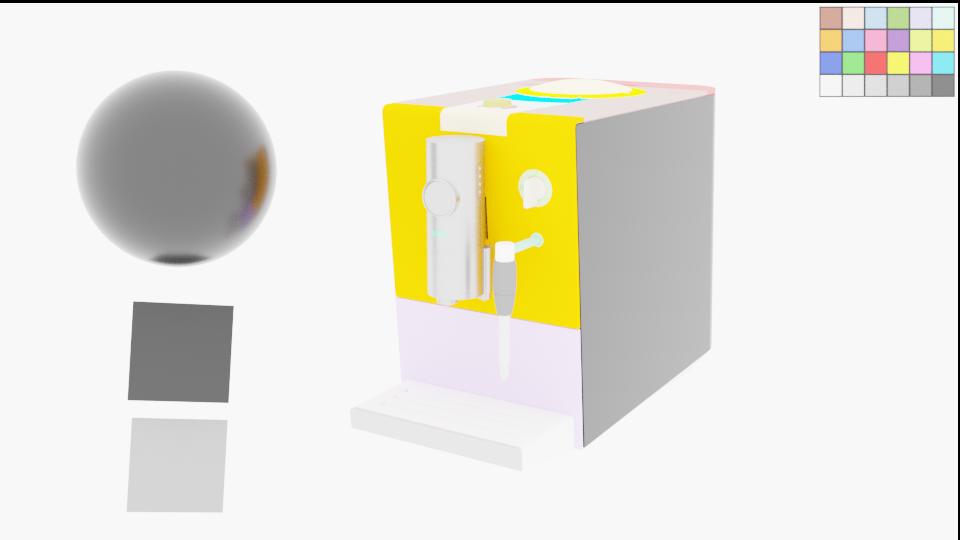
I had to bump the background strength to around 7, now the 0.18 diffuse plane is exposed to about 0.5 display referred. But if you look at the sphere the reflection is completely overpowered to the point of the whole sphere looking grey even tough there is no diffuse reflection. I can adjust the reflection strength in the shader but that would not be physically correct anymore for dielectrics, would it? Reflection approaches 1 at glancing angles. I had to lower to 0.5 to get back to this:
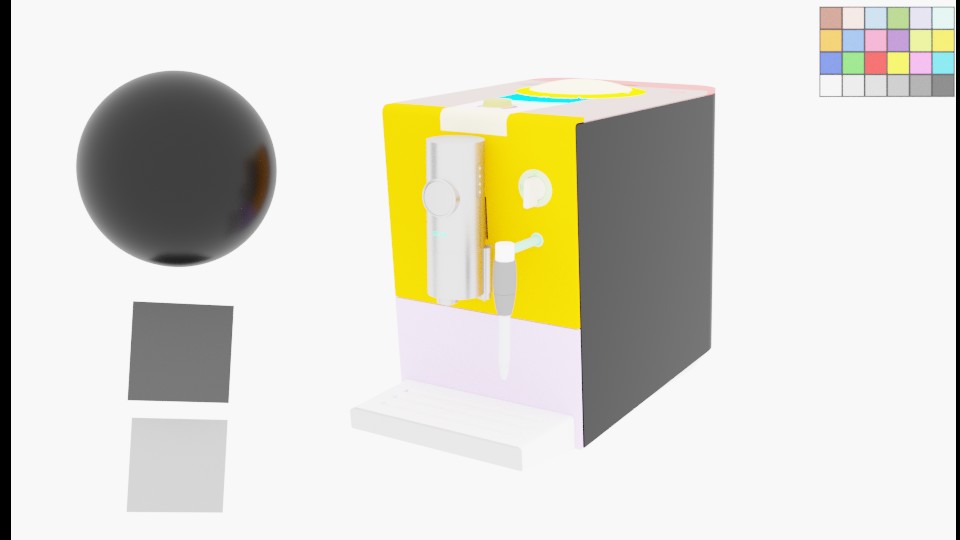
The side panel should be a black glossy plastic. The problem is, if 0.18 translates to 50% grey, to get a rather dark shader the diffuse values have to be miniscule (lower than 0.1). Serious question, does my black plastic keyboard reflect less than 10% of light? This leaves the range for adjustment for shaders darker than 50% grey very small, between 0 and 0.18. And it messes up my reflections.
Clearly I am doing something wrong because all the renders prove that. I would just like to know where I am wrong.
SunBurn, did you have to adjust the reflection strength in you pbr dielectric shaders or did you leave it at 1?
Edit: The PBR shader I am using has a “specular” adjustment which controls reflections strength at oblique angle and is set to 0.033. I have never needed to adjust this but now this seems to be the knob to tweak to get the reflections to behave. I will do more research on why this is set to 0.033 as a default.
First all I’m not sure I understand fully the process you have followed.
If you share the blend file I can surely give it a quick test.
I wouldn’t use a white background to light my scene. Use an HDRI or area Lamps
…0.5 scene referred corresponds to 0.5 display referred
0.18 scene refereed should correspond to 0.5 display reffered
…did you have to adjust the reflection strength in you pbr dielectric shaders or did you leave it at 1
I never ever had to touch the shaders since their first build, but probably we are using a little different shaders.
As for the blacks and whites according to Unreal Engines Documentation (and also others):
Charcoal (the “blackest” thing on nature) = 0.02
Fresh snow (the “whitest” thing on nature) = 0.81
Don’t use values higher or lower than these.
It looks unnatural and causes a lot more noise and fireflies.
Ok I will prepare a scene!
Of course I wouldn’t use a plain white background, it’s just easier to “debug” the scene that way.
0.5 scene to 0.5 display is what I get before setting light strength to expose the scene correctly!
New scene with filmic, set exposure 0, gamma 1, base contrast, bg shader value 1, strength 1, diffuse shader with 0.5 scene reffered then renders to 0.5 display reffered. Is that different on your end?
But that is not what we want, we want 0.18 to be 0.5, correct? So I adjust the bg shader strength for that exposure but then I get the problem with the strong reflections, as pictured above.
Thanks for the value examples, if charcoal is 0.02 then I can believe that black plastic has a diffuse reflection that low!
Ok so SunBurn found the error:
I set the VALUE of the 50% grey shader (in HSV mode) to 0.18 to set the exposure. But you actually have to set the R,G,B values to 0.18 each! A value of 0.18 in HSV corresponds to 0.027 RGB and that threw of the whole process (very much :-).
Thanks!
Which version to use?
The original
or the Fork
Blender Cycles is now finally starting to attain the realism previously only associated with Maxwell, in a large part due to Filmic Blender.