Yes, it is really a linked copy when you create it with linked copy, but you can always unlink things. The scene itsself izs not linked.
More like they’re in a collection that is temporarily turned off. It’s not like passepartout is a big deal for me, it’s just that this sounds like feature creep for the sake of feature creep.
Linked scene stuff, I just don’t get it. Tried it a couple of times on production stuff (I mostly do stills, and no “movie” stuff - animation limited to walkarounds, orbits, and exploded views), couldn’t really understand why nothing worked as I would expect, so the experience was disastrous.
Now I instance collections and animate the visibility of the instance (and relevant material properties that need to be changed per “frame”) across various camera bindings. Left/right arrow for “changing scene”. Has its own drawbacks, like having to turn off the instance and turn on the collection if I want to edit stuff.
Practically all my outputs are 2k/3k/4k in 16:9 for usage reasons, but I definitely see how animating resolution could be extremely beneficial to some without having to deal with scenes. Not everyone does animation or VSE stuff where this could be problematic. Outputting to 9:16 for portrait mode could be done by banking the camera and rotating image in post, but seriously?
I do this with light groups. Way more flexible - or at least convenient even if a mess to setup initially - just change color and intensities in post.
Ditto. Everything I’ve tried involving linking ends with some flavor of “ok, why doesnt something work, and what mystery fucking right click command am I supposed to look for this time.”
It is bizarrely obtuse and aggravating, to the point of “how was this feature even approved by any in-house standard.” Makes me really question the standard, and what standards do and don’t apply to.
I have not worked much with light groups. Correct me if I’m wrong but I don’t think they work if the light setups and shots vary too much.
Not sure what you mean “vary too much”. I render with everything enabled, then tune it in post. The major negatives are:
- Hard to setup, get it right, and be generous enough while setting it up in order to future proof it; i.e. having enough groups available to you. I have 15 groups, incl Nishita Sky (no sun), Sun Lamp (for control), and Unassigned.
- Can’t render at once using different world setups. So for night and day setups, use some hdr that can be color balanced to look like night. In example below I’m just toning it down significantly and going more into blues to fake a more nightish look.
- If you want control over sun and sky separately, you have to use Nishita sky (only) with a regular Sun lamp. That means doing test renders to make the Sun lamp match the Nishita sun.
The two lamps at the bottom of the outliner are not assigned to a light group, so they are affected by the “Unassigned” coloring going all green here for illustration.

The thumbnail shows what’s really being rendered out and handled in comp - everything on. One massive benefit of doing all this is the ease of isolating a type of light to examine if it produces an unreasonable amount of noise, then try to fix the offending materials and/or lighting.
Note that I’m assigning blackbody in the lamp as I want to keep the colors correct relative to eachother (ref white level settings in Curves) using temperatures we get from lighting engineer. For others it might be more benefitial to set lights to pure white and color their influence in post. Special node group to calculate blackbody is required, as for some reason we don’t have one available to the compositor.
How does this type of setup impact render times? I might be wrong but I was of the impression that you have to multipy your samples with the number of individual light groups you have.
I don’t think it affects sampling, but don’t take my word for it. Try it out for yourself, although using some simpler youtube tutorial initially. No need to go all the way only to find it has problems. This scene is a slightly modified startup file I use with everything prepared, but geometry and so on is kept to a minimum.
That is not very complicated.
You have a blend file with one scene. If you create a linked copy of scene, all objects will be the same : they are data linked.
But in each linked copy of scene, active camera and render settings may be different.
That implies to have all cameras in all scenes.
A variant may be to use a background scene.
You have a scene in blend file without camera.
You create a new empty scene. In this empty scene, you reload world, precise scene with objects as background scene, and add a camera specific to this scene.
And you can do that for as many stills as you want, to create from background scene.
You end up with one camera, one render output per scene.
One rendered scene per still, but only one background scene with rendered objects in file.
I prefer to use real world light values so I can’t just swap night lights for day lights without also swapping the scene world and changing the exposure. Really wish there was a way to associate both of those with the cameras.
Collections can be kept in a different scene and you can open a 2nd main window set to view that scene. This way you can edit the source collection in isolation on a 2nd monitor and see the results on the instance in the context of the main scene.
It is also possible to move source collection contents away from the origin. Just put an empty on the origin and move it along with everything else. Then use the empty location to reset the collection origin point
Not necessarily. For example when cameras are bound to markers you can always ‘use’ them, no matter if they are hidden.
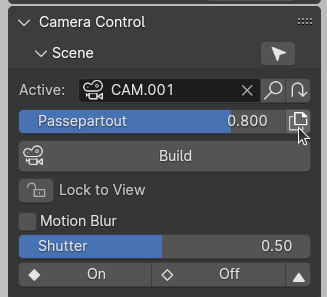
When I use a multi camera pipeline, the inconsistency in passepartout can get a little annoying. So currently it takes good organisation to remedy it fast. Though a simple global solution would be nice.
2 Likes
heh heh. The closest I could make it a global solution.
Passepartout slider is for the Active Camera. Button next to it copies to all cameras.
3 Likes
What I meant by that, is that you can’t select them in viewport.
So, you don’t tweak them, anymore. So, you probably already set them, as you want.
You could have set passepartout settings before hiding them.
Anyways, if you can’t select them all with shift G, you can still use filters of Outliner to reduce its display to cameras. Unhide them in order to be able to select them and copy to selection.
The idea that cameras are multiple and lost deep in hierarchy, is absolutely not an issue if you adapt Outliner’s view.
I prefer to use Camera scene strip option in VSE for a multicamera pipeline.
That is a lot more flexible about timing to me, than bounding to markers.
In VSE, there is no passepartout. VSE preview is not a complete 3D view.
So, there is no issue of continuity in passepartout setting that way.
To me, use of bouding to markers is a kind of preview to that work. It is more flexible if you are setting camera positions. So, they are not hidden, yet.
In my experience, sometimes I like to change passepartout at any time during production, for single camera or all cameras. And since all my cameras end up in 1 hidden collection, this thread gave me to idea to write my own operator, so… yay.
I prefer to use Camera scene strip option in VSE for a multicamera pipeline.
Heh, I completely forgot about VSE in that regard. Does this still require a second scene? That was kinda a deterrent for me to choose it over Bind to Markers.
Yes. A second scene for video editing is necessary.
But several scene strips can reference to same 3D scene.
Basically, I just create another window. Each per scene.
So, difference is just that, instead of switching workspaces, I switch windows.