The search function seems to be barfoofkied today.
I have several files for a project I started out at a 30fps frame rate. I’m trying to time it to music at a 12/8 meter which calculates out to 4.5 frames per beat at 30fps. I am beginning to think I might want to copy these files and convert them to run at 60fps which will make for an even 9 frames per beat. The simplest thing I can think to do to adjust the animation is to double the time coordinate of all the keyframes. My question is, is there a script existing which does this, or does anyone know what I would type in the way of a loop which would sequence through all the keyframes in a scene or a file?
I may have found something. In the DopeSheet editor one can scale selected keys’ time coordinates based on the current frame; setting the current frame to zero and scaling by 2 lays the keys at double their time. I have to look at the Graph Editor more closely to see whether this also scales the handles with respect to the keys.
Yeah, I actually came across that while listening to the Amadeo videos. I ended up staying with the Dopesheet Editor scaling. The only kink was that I had to double the frame numbers as well in my particle systems after the objects with explode modifiers vanished!
See, my question though about time remapping is this: if you render out to images, does time remapping alter the number of images? I wanted to do the way I did so that there would be twice the number of images.
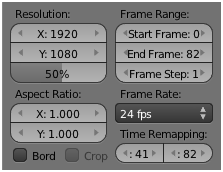
the value on the left, set that to the number of frames in your current animation
the value on the right, set that to how many frames you want the animation to last.
If you then look at the frame indicator in 3dview, it will reflect the new effective frame. You might want to experiment on a trivial cube animation to get a feel for it.
Imagine my animation is currently only 41 frames, but i want it to span 82. then:
The image shows that you must set the animation length to the new length (even though counter to intuition, you don’t see the frame markers in the new extended area in your timeline).
Your situation is one of the occasions that using UI has several benefits, everything scales nicely, the downside is that you won’t see the keyframes in their new positions.
I do not know if this works with a particle system, try it, report back