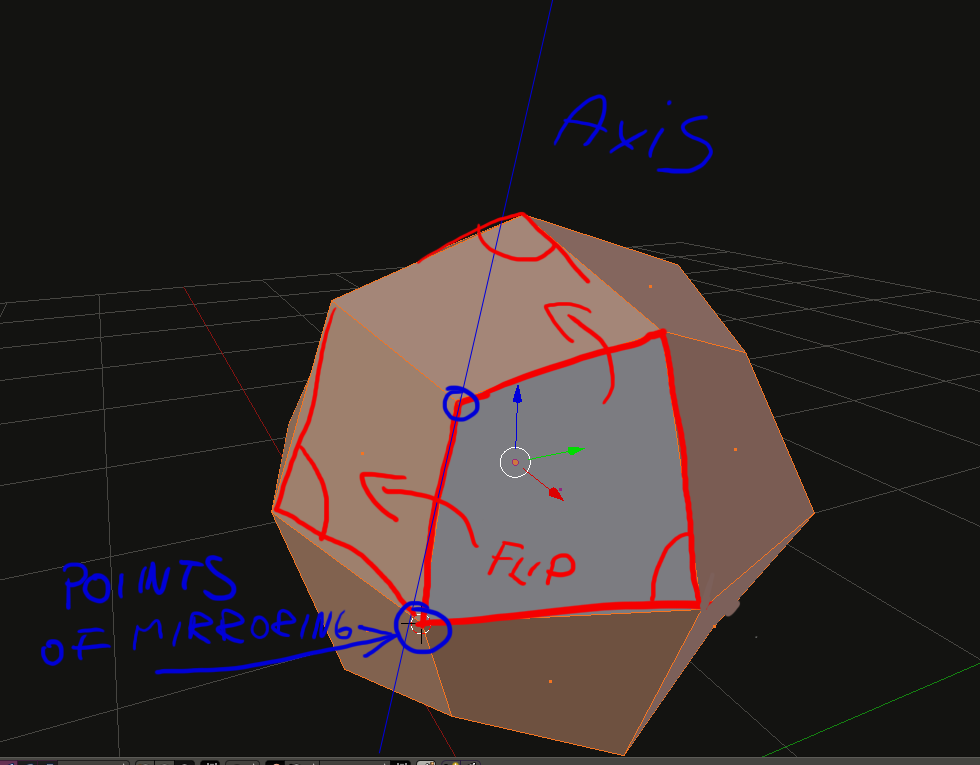
Sketchup has a cool plugin that allows one to define two specific points/vertices (and then an axis) which serve as points of mirroring. This would allow one to, obviously, mirror things in non-axial angles… that would be such a cool feature, and would make things so much easier anyway…
When I follow your suggestion, it stays in its place… when I go SXX and scale by hand, it flips on the other side of the correct axis but kinda in a mirrored way
So how would you create a ‘setup’ that would … well each of those panel would be an instance (or in Sketchup’s jargon, Component)… so when I add an object, like a sphere into that instance, all those panels would also ‘receive’ that sphere … I am really used to Sketchup, which has a simple and intuitive system… Groups are all ‘individuals’ and Components are ‘instances’ of one …
Really need to get used to/learn about this system…
The whole thing with the THREE (THREE!) kinds of cursor’s, pivot points and Origin is on one hand really nifty and might be handy, but a fucking OVERKILL I THINK… it takes ages just to setup a simple scene…
Alt-D or Object->Duplicate Linked will create separate objects with the same mesh data, so changes to one effect all the linked duplicates. But, there is no way I know to nest those duplicates. Let me explain… I don’t know sketchup, but I’m fairly sure I’ve seen programs where an object could contain a lot of nuts and bolts that are instances of the same mesh data, so changes carry over to all instances, and save mesh data memory. In blender I think that can only best be accomplished by making the nuts and bolts linked duplicates, and children of the larger object.
It’s worse than that! You’re not just setting up a scene. You’re constantly switching back and forth between all of the different options depending what it is you’re doing at the moment. It may look like overkill, but it’s actually very flexible, yet I’m still constantly asking myself “How am I going to do THIS!” wishing there were more options.
@1d_Inc had a script for something like this and more, iirc.
Other than that - use Custom Orientation defined by blue edge and 3d cursor on it as a pivot to Ctrl-M mirror selection on double tapped axis (new orientation needs to be selected on the dropdown instead of Global).
“so when I add an object, like a sphere into that instance, all those panels would also ‘receive’ that sphere”
Easy. Alt-D panels instead of Shift-D to copy (make) instances. What you change in edit mode to one reflects on others.
If you hit axis key (x,y,z) once it will assume Global; if twice (xx, yy, zz) this will be the orientation currently chosen in the dropdown (Normal, Custom…). 3d cursor will be the symmetry point, half the distance on a chosen axis, if pivot is set to it.
To have something attached to the faces (e.g we want a monkey on each of the Icosphere’s faces) use Duplication (on Object tab, a bit down); can be set to verts, faces, frames (which is interesting but i personally try to avoid it) and group which is the same as if you had opted for group instancing from Add menu i think, not quite sure.
Process for the Vert and Face is - set Duplication on parent object, select obj you want to duplicate, Shift select parent and P to Parent duplicates. The deal is, while object you use to instantiate other objects (parent) is seen in Object mode, in render it is hidden - you have to use duplicated ‘dummy’ (can be some selected and copied to another object vertices, faces only) if you want original to be rendered.
Downside - you’ll be breaking you kbd in 15 minutes if there is more than one level of nesting and/or some origins are off or objects involved have unapplied rotations, scales. For a quick one level it’s easy and fine tho. Objects origin,scale and rotations matter, ofc. Guess there was a monetized addon for this which brings some humanity to all above mentioned.
For 1d_inc tools there’s an official thread in Released Scripts.