I am having trouble modeling a 3D version of a Crescent Moon. I tried using a boolean modifier, but it creates an object with wacky geometry and surface distortions.
I also tried using two 2D circles and deleting where they intersect (like a manual boolean) but this object will obviously not be rounded or smooth even when subsurfed.
Does anyone know of a more effective way to create a smooth, 3D crescent moon?
I’ve tried using the 2D curves. It definitely is a useful tool and could work well for this shape. The only issue I am having is that I like the rounded shape that the boolean method provides more that the flat shape given by the 2D curve method.
That being said, the boolean method doesn’t seem like an option due to the distortion of the mesh. Is there any other way to achieve the look of a crescent moon that is rounder and less flat?
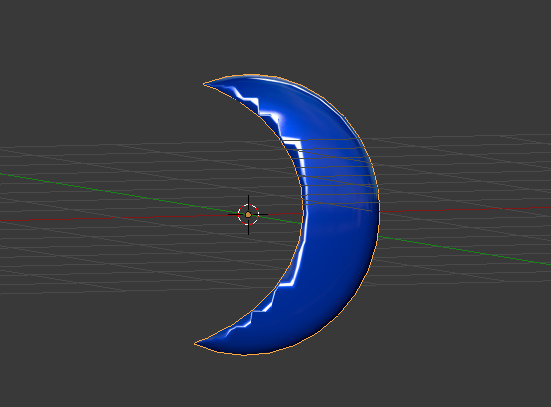
It’s kind of simpler to model this with a very few faces and then use subsurf and mean crease to smooth it out.
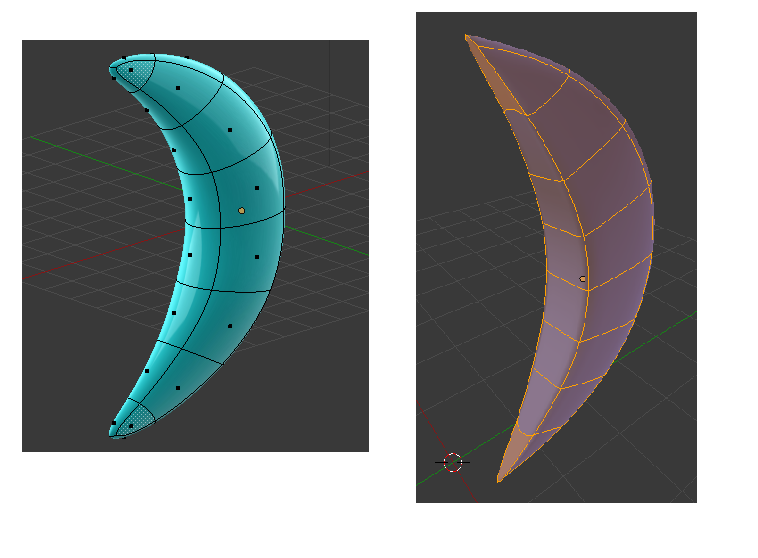
I attached a file but I forgot to keep taking screenshots so I hope you can just figure it out when you see the geometry! It’s just extrude a couple of times, rotate edge loops, scale faces, symmetrize top to bottom etc.
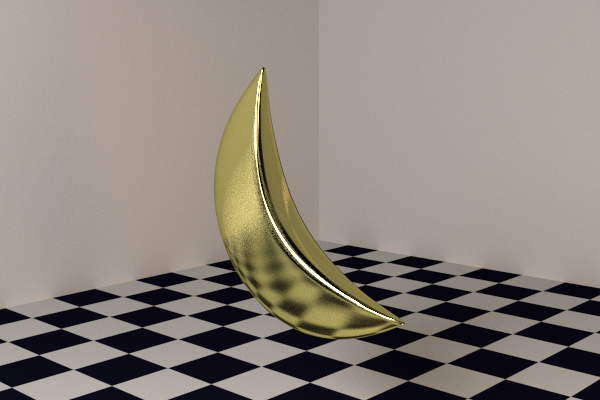
I tried using your technique and was able to get a moon I am happy with! Thank you for taking the time to help!
However, I still think yours looks better! The inside arch of yours looks flatter (like it is not rounded by the subsurf as much). Your topology also looks slightly different.
What step did you take for yours? I just started with a cube, cut the top half off after placing an edge loop, mirror modifier on the Z-axis, deleted internal faces, then just extruded the cube downward to get the shape (basically box modeling), then scaled the thickness to give it a tapered look.
Here is my blend file. Let me know if you did anything differently. (I am trying to be very critical of topology right now so I can learn all the details of how to model.)
Let me join this game ;).
To get sharper edges - use Creasing. Select edges you need and on N-panel top look for slider Crease. But you HAVE to be in Edge selection mode to see it.
Dunno if that’s needed, but there’s a file with one way of building Moon - i started it, then had to drop it for a moment and you had answers already. http://www.pasteall.org/blend/24579
Hey BT Your moon looks great, I’m glad my lack of explanation did not hold you up! Eppo mentioned the crease. That’s how the edge is sharpened in the file I attached.
To crease, you must have a subsurf modifier on the object. In edit mode and in edge select mode!! select the edges that you want to increase the sharpness on. The reason that you want not to use vert select mode is that you don’t always want all the edges that connect a set of verts, in this case the ‘horizontal’ edges should not be sharpened.
Once you have the right edges selected, near the top of the properties shelf (reached by pressing N in 3D view) you will see a slider value for ‘Mean Crease’. (There is no value for ‘Friendly Crease’ yet JK) This is where you can set the crease. I believe I set mine pretty high like 0.9 or something, because the edges ran to a corner. If you want to fade a crease into smoothness you have to do it by reducing the crease for each edge smoothly but for your moon you won’t need to probably. I can’t remember if I reduced the crease at the very tips a little to ease it but from the picture it looks not.
You also asked if I did anything else to the topology but it sounds like you used much the same method as I would. It’s great that you are thinking about topology early because that will build good modeling habits for later.
I like to use Bart Crouch’s excellent addon LoopTools to even out the vertex distribution on my meshes as a matter of course so I probably hit it with a Relax and a Space just out of habit. It should already be in your Blender install and you just need to enable it in prefs.
So it was crease! After I posted I used proximity loops for the same effect, but I am still glad to know what you did, because not knowing would drive me crazy!
I tried using the loops tools relax and space, but it just twisted the mesh around. I will have to look into it more later. I can see how that tool could be very useful.
And Eppo, thanks for taking the time to show me another method, even if the problem was already solved by the time you posted.