MouseLook script [Demystified]

How do work the famous “Mouselook”
script used in most blender games ?

first of all, here are The basics of MouseLook :

The MouseLook script first involve, of course, the mouse ! :smiley: !

but how ?

simple : while in-game, when you move your mouse, it’s actually really moving
the mouse right in front of you. You just can’t see it cuz it’s hidden by default.

but if you could see it, you would see it stick pretty much at the middle of
your screen because the Mouselook code do Try to stick your mouse at the middle
of your screen every 1/60 seconds.

Thus, during 1/60 second, you can actually move your mouse from a few pixels.
If you do so, during the next “game engine computation” = after about 1/60 seconds,
the mouselook script will look at your mouse’s position and say :

0.5 - I musn’t jerk !
1 - OMG !!!
2 - The mouse isn’t at the middle of the screen !!!"
3 - I must rotate the camera from a corresponding value !! ARGARGRG !!!
4 - Put back this cursor at middle of the screen !!! :mad:

And that’s exactly how every single mouselook of the entire community works (AFAIK)
They just use different syntax and differents way of codeing it.
but OVERALL, they’re pretty much all the same.

K, now you probably want to know how the heck you code this hein ?
Well here we go :

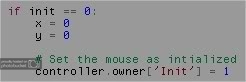
STEP 0.5 : Don’t jerk plz !

This “0.5” step isn’t really a step since it’s only there
to put the mouse in the middle of the screen the first time the script run.

(SO that your screen doesn’t jerk or so.)
(Delete that part of code and you’ll quickly see why it’s quite required :wink: )

The associated code is :

http://i559.photobucket.com/albums/ss36/Ninja_Goliath/BlenderHBlenderFoundation_Workfl-3.jpg

STEP 1 : OMG !!!

This is the common initialization of a script. It is the way
to include the sensors/actuator/owner object/properties into your code

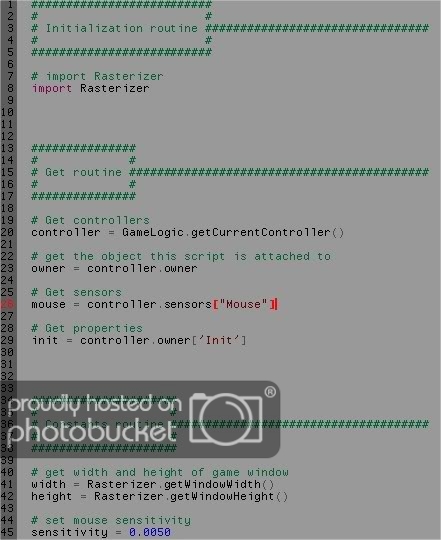
Notice we import the “Rasterizer” module. (At line 8 )
This is to be able to use the mouses related functions
(to get the mouse position in our case and to stick it at the middle of the screen)

The above script will need the following setup (At least) to work
Because if it can’t find a property/sensor/actuator it’s looking for,
the script will crash in your face.

http://i559.photobucket.com/albums/ss36/Ninja_Goliath/BlenderHBlenderFoundation_Workfl-2.jpg

Notice that, in this script, we also set the “Mouse sensitivity”.
This is the constant used to reduce the rotation (In number of pixels)
gathered from the mouse’s position into a realistic amount of rotation.

STEP 2 : Where’s the mouse ??

This step involve 2 different parts of codes :

The related function :
(Note that it’s where the “init script” is contained.)
http://i559.photobucket.com/albums/ss36/Ninja_Goliath/BlenderHBlenderFoundation_Workfl-4.jpg

The related code :
http://i559.photobucket.com/albums/ss36/Ninja_Goliath/BlenderHBlenderFoundation_Workfl-5.jpg

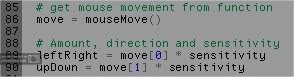
The line “#86” involve the “moseMouve()” function which look for the
mouse’s position and store it in the variable used to call the code
(the info is stored into the “move” variable in our case)

The lines 89 & 90 calculate the x & z rotation from the informations
stored into the “move” variable and with the mouse sensitivity.

STEP 3 : Rotate the camera ! ARGARGRG !!!

Here is the quite simple script who take care of this :

http://i559.photobucket.com/albums/ss36/Ninja_Goliath/BlenderHBlenderFoundation_Workfl-6.jpg

For more info, you can alway look into the API for the “applyRotation” function.
It’s really simple as you can see.

I would only specify that we use the prefix “owner.parent” for the Z axis’s rotation
instead of the common “owner” relating to the fact that, in the code, the owner is
actually the camera and it’s parent is the player. Thus, the player only
rotate to left and right (Z axis) and the camera rotate up-down (X axis).

STEP 4 : Put back the cursor at middle of the screen !!! :mad:

http://i559.photobucket.com/albums/ss36/Ninja_Goliath/BlenderHBlenderFoundation_Workfl-7.jpg

That’s all :stuck_out_tongue:

Here’s the overall code :

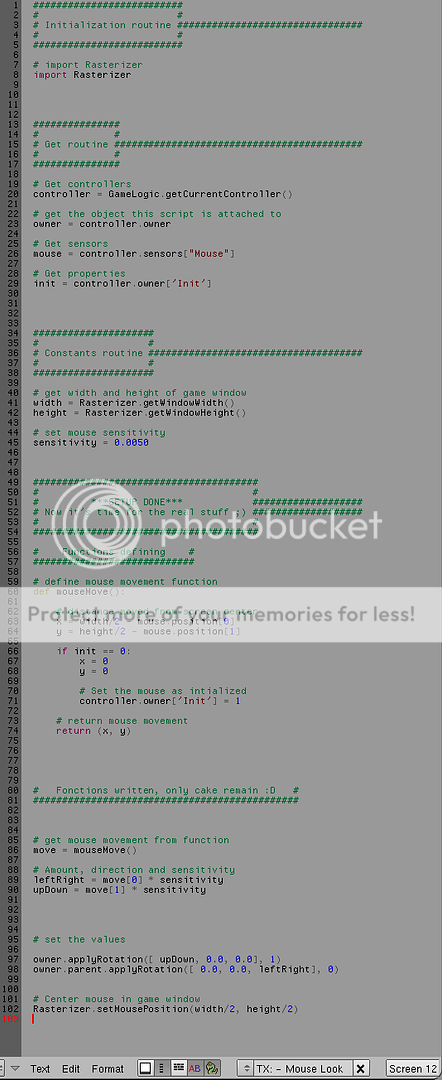
my own code is pretty much the exact
same as this except that it “CAP” the camera.

& there’s a tricky setup so that the camera move smoothly.

Well I can almost get it to work, is just that i can’t which is bothering. Where to put the first lines of code?(the if == init)
EDIT: i realised where to put the code, but it is still not working.

doesn’t work ?

give me your blend file and il take a look

(Cuz it’s defenitively working here :::PP)

great tut, now if only i could figure out how to limit the camrea rotation, im still a noob at python

Read this :

it’s what transformed me from a total python ignorant to a python master :slight_smile:

…but don’t go too far in it,
In blender game, you wont probably need to use advanced
pythons capabilities like classes or stuff like that.
…you can use them, but there’s 21342134512345 others
solutions that are usually more efficient anyway (AFAIK)

Ha ha, “thats exactly how every single mouse look of the entire comunity works”? I know I’ve set up a mouse look system differently than that!

what is the matter with it ? , tell me how to fix it please ?

PS : you have a typo , you made the property an “Init” instead of “init” .

Attachments

untitled.blend (130 KB)

I’m honoured you ask me a question 3DGURU

your problem is relating to the fact that the script is
looking for it’s parent to rotate it on the Z axis.
thus, to correct the problem, you have 2 options :

  • Or parent the camera to the little cube in middle of your scene
    (Or parent it to anything else, you choose :p)

-Or delete the “.parent” from the code
(At line 34 :yes:)

doing any of these 2 options will instantly make your script work :smiley:
(I tried myself to be sure ;))

@The Dawisch

interesting

I’d lov to have a look at your script to see how different
is it’s technique used to “mouselook” :yes:

if you’re not to shy to give me a VIP look of course.

Ninja Goliath : thank you a lot man !!! .

i made this one. but here is mistake. becouse python says here are many problems. i dont know python enought to find out the problem. i remade this my self. but its not good for me…


# import Rasterizer
import Rasterizer
Rasterizer.showMouse(True)
# get controller
controller = GameLogic.getCurrentController()
# get the object this script is attached to
player = controller.getOwner()
# Get sensors
mouse = controller.getSensor("mouse")
lClick = controller.getSensor("left click")
mClick = controller.getSensor("mid click")
wUp = controller.getSensor("wheel up")
wDown = controller.getSensor("wheel down")
floorSensor = controller.getSensor("floor sensor")
  
# Get the actuators
lookLeftRight = controller.getActuator("lr")
lookUpDown = controller.getActuator("ud")
#zoom ipo is an 8 frame scale down on the empty
#that the camera is parented to
zoomipo = controller.getActuator("zoom ipo")
# get width and height of game window
width = Rasterizer.getWindowWidth()
height = Rasterizer.getWindowHeight()
#get zoom property
zoom = getattr(player, "zoom")
# define mouse movement function
def mouseMove():
   
    # distance moved from screen center      
    x = width/2 - mouse.getXPosition()
    y = height/2 - mouse.getYPosition()
      
    # intialize mouse so it doesn't jerk first time
    if hasattr(player, 'mouseInit') == False:
        x = 0
        y = 0
        # bug in Add Property
        # can't use True.  Have to use 1
        player.mouseInit = 1
      
    # return mouse movement
    return (x, y)
#Revmove ''' from around this block to make
#mouse movement only when holding left mouse
if lClick.positive or mClick.positive:
 # get mouse movement from function
 move = mouseMove()
 # set mouse sensitivity
 sensitivity = 0.0015
 # Amount, direction and sensitivity
 leftRight = move[0] * sensitivity
 upDown = move[1] * sensitivity 
else:
 #No movement when mouse not clicked
 leftRight = 0
 upDown = 0
 
#Put this inside the above if statement if you want to
#zoom only when the mouse is clicked
if wUp.isPositive() and zoom < 8:
 player.zoom = zoom + 1
elif wDown.isPositive() and zoom > 1:
 player.zoom = zoom - 1
 
# set the values
lookLeftRight.setDRot( 0.0, 0.0, leftRight, False)  
lookUpDown.setDRot( upDown, 0.0, 0.0, True)
# Use them
GameLogic.addActiveActuator(lookLeftRight, True)
GameLogic.addActiveActuator(lookUpDown, True)
GameLogic.addActiveActuator(zoomipo, True)
# Center mouse in game window
if lClick.positive or mClick.positive:
 Rasterizer.setMousePosition(width/2, height/2)
 

mansim , open your script and click on the button I highlighted

yea, that could help a lot :smiley: