Mr Mannequin has raised his standards! Don’t believe me? Watch thisexport video!
Watch that in 2k or 4k though as Blender footage gets murdered by YouTubes downscaling.
So… I got a MegaGrant late last year and set my mind to making the most amazing animation controls, retargeting and export/import that Mr Mannequin has ever seen.
Now, please humour me while i peddle my wares a little bit…
I’ve spent months upon months perfecting and stupid proofing everything i was doing in the last update of this add-on and the result has turned into more than 15 Blender add-ons that work with and without each other and are being tested by a variety of professionals. This is the only the first of several releases that is going to turn some heads with the functionality it provides…
You can follow me on Twitter, Facebook and Instagram to stay up to date with what i’m doing and where things are headed. (Just do a twitter though… i hardly use the other two)
First let me tell you where to get the add-on… Then lets go through the new things, some planned things and the reason why i’m still bothering with this considering how many Blender to Unreal add-ons there are on top of Epics own BlenderTools.
Get the things…
Get it for free on Gumroad (donations appreciated).
And from the GitHub Repository (read the readme installation if you go here).
As well as Blender Market (10% of proceeds go straight to Blender).
You can sign up on Patreon to get priority support and early access to things!
The newest things…
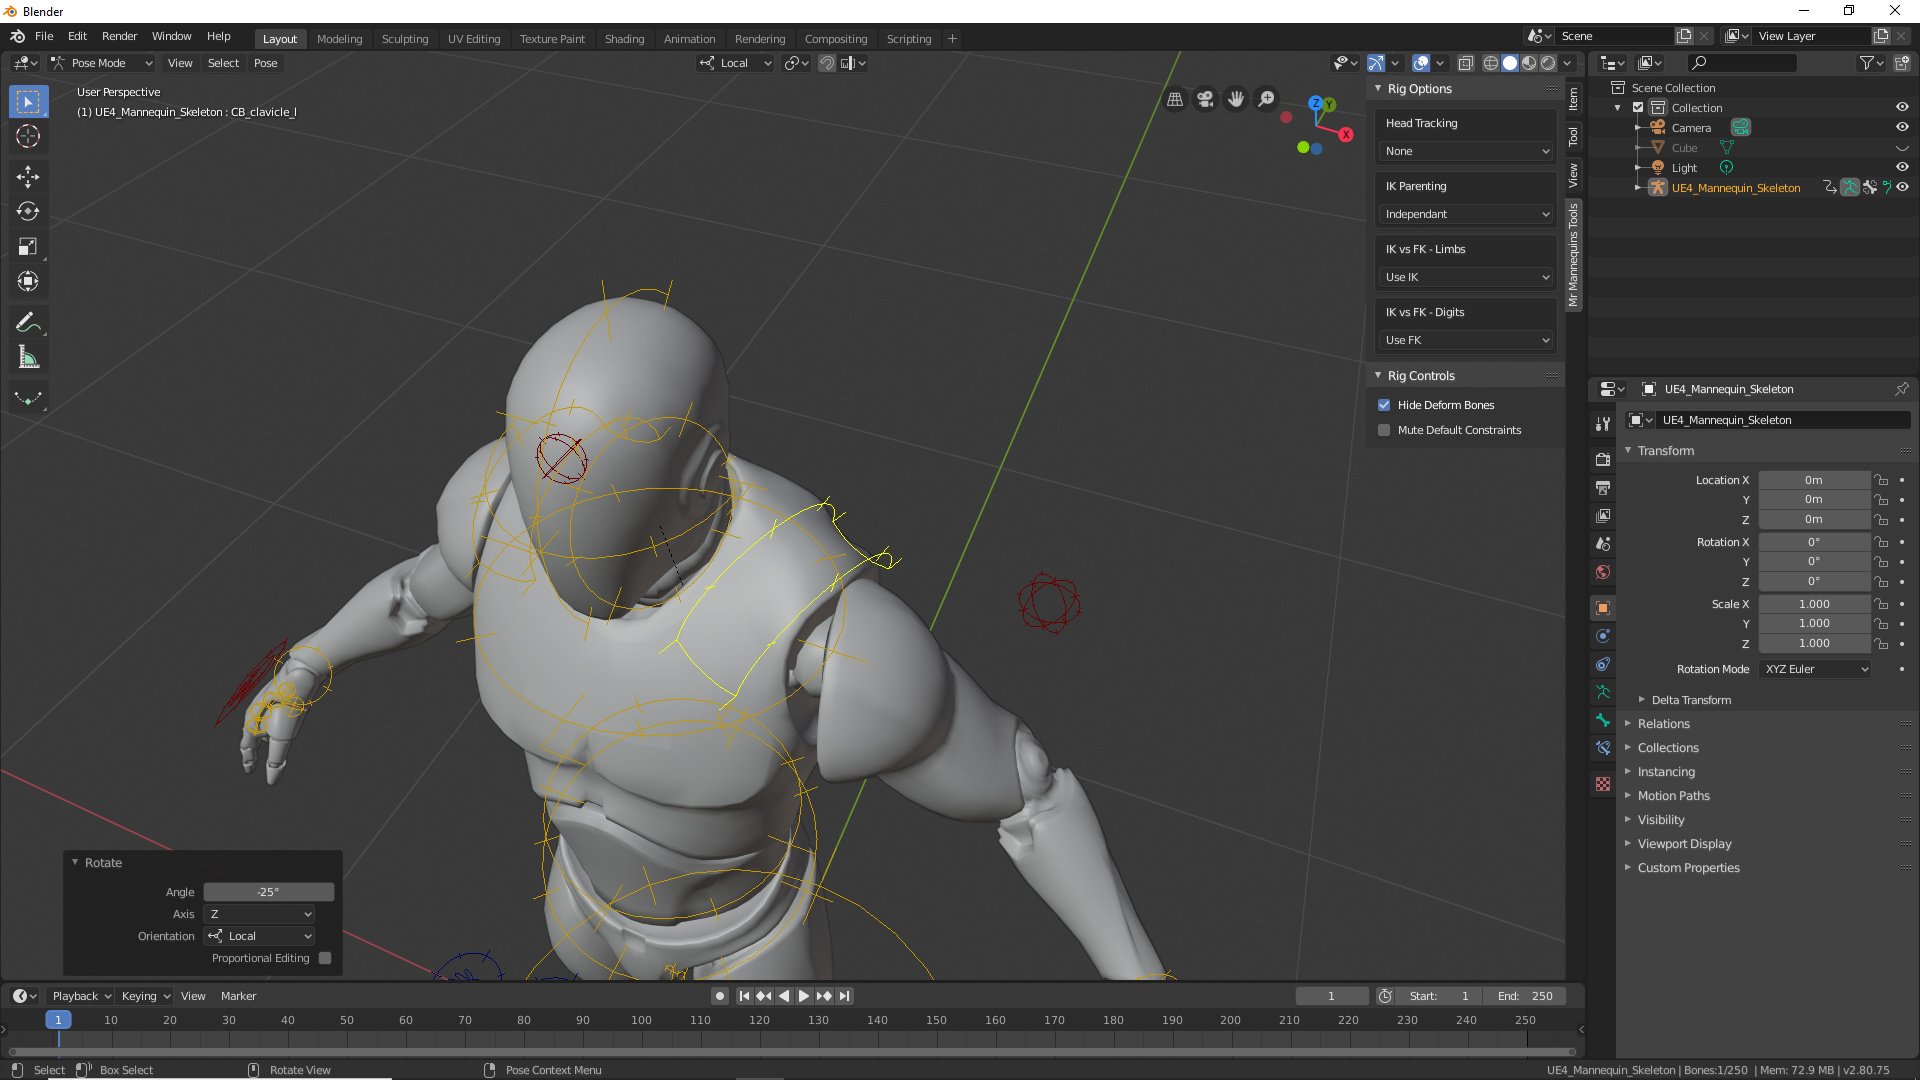
Modular and easy to edit rigging that works on ANY armature with advanced features that other rigging add-ons can only dream of supporting such as automatic IK to FK and FK to IK, spline based controls and a much improved head tracking system. (Much more to come on this front too… RIP Rigify lol)
Intuitive skeletal compatibility that enables you to edit existing assets as quickly and easily as possible without messing around with bone axes.
The export has never been so smooth, you select what you want to export, tweak a couple of settings and my scripts do the rest to provide you with .FBX files that will work with whatever asset you got them from. I even managed to speed up the batch exporting around ten times over!
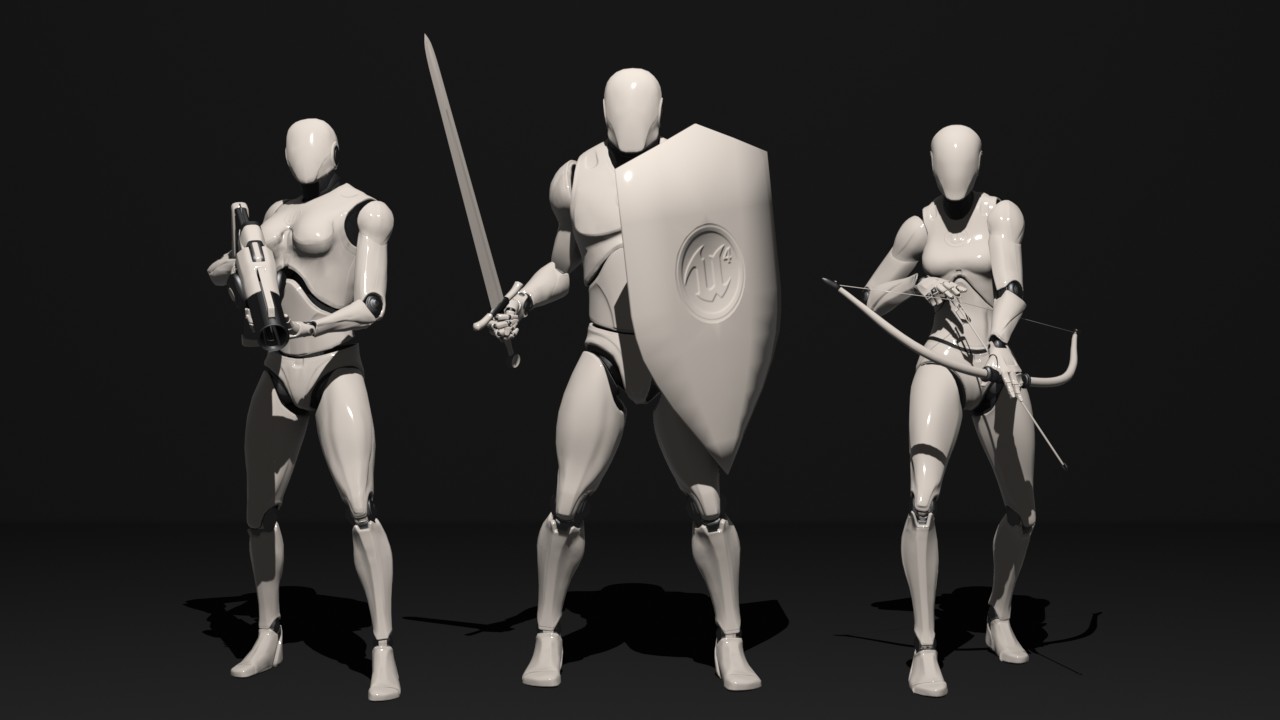
I added a mannequin themed sword and shield, as well as Epics own Female mannequin that got added to the third person template.
A much better pipeline to push updates, meaning i can implement changes and fixes very easily so there will be more of them than before.
Things still to come…
An import guide video as well as some further improvements for importing existing assets to be edited within Blender. (I ran out of time to squeeze those into this update)
A full “Any Humanoid Retargeted to The Mannequin” course, for a while i’ve been doing a put-my-character-on-the-mannequins-skeleton service and all my scripts for that work so well i’ll be putting them into their own add-on and making it a built-in part of Mr Mannequins just like the rigging.
A whole host of mannequin themed templates like my Sword, Shield, Bow and Femmequin, i’m talking cats, dogs, fish, birds, horses etc, there’s even plans to do a mannequin dragon!
Support for my rigging and templates to use Epics own Send To Unreal add-on. (Seriously James and Kaye and everyone who has helped them have done a fantastic job with it! Much love <3)
Why this thing and not the other thing?
This iteration of my rigging is probably more advanced and easier to work with than anything you have ever seen. I can rig the mannequin from just deforming bones to animation ready in less than ten minutes with it, so any semi-experienced rigger could achieve this on their characters as well!
I’m working with the developers of character creation suites as well as other add-ons to provide compatibility with my rigging, the mannequins skeleton and Unreal Engine on a larger scale.
To join Mr Mannequins Army a thriving and helpful Discord community of Blender > Unreal developers with a huge range in experience and the dankest taste in memes. Add-on support is currently in the process of being moved elsewhere but is currently going on there as well.
The ease of use Mr Mannequins Tools provides compared to all it’s competitors, except a couple of add-ons that are easy to use but do not provide nearly as much support and/or content.
If it wasn’t for that discord server and the continued support many people in there have given me i might of given up ages ago… but i didn’t and so i owe them a massive thank you!
Excellent work on this. Making you as legendary a character as the Mannequin himself. Some really nice features on the rig, particularly the rotation limiters on the shoulder/hip.
Looking forward to a demo of setting up a custom character mesh. At the moment I’m using AutoRig Pro with the auto-retarget on export for UE4. It would be nice if somehow Mr. M could be incorporated.
Thanks for sharing. Will definitely donate to support.
Thank you! First person to mention the limiters! I find them so useful
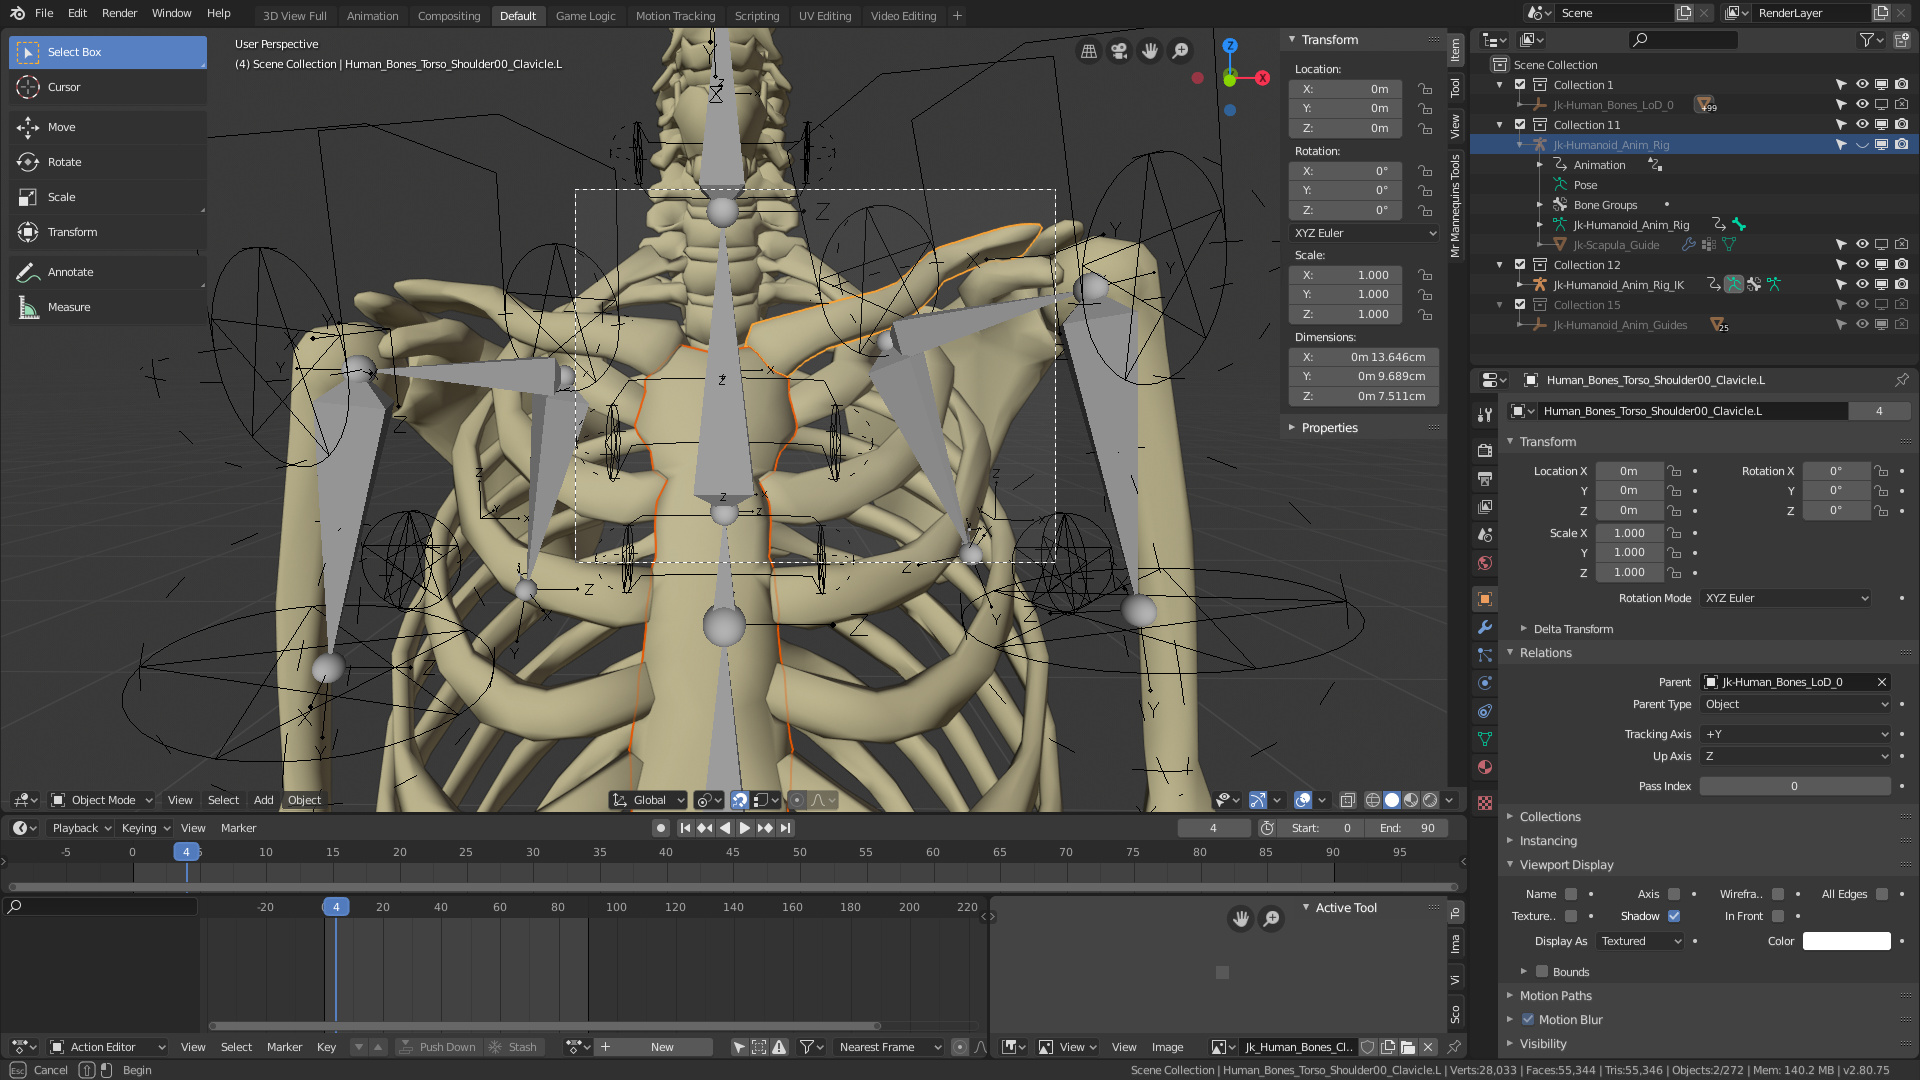
I’ve had a quite a few people talking to me about Auto-rig pro recently… It really is a great add-on but honestly i don’t approve of some the UE4 compatibility. When i watched the process it involved moving the clavicle bones in edit mode? (If that video was up to date) Which is something you should never do, the moment you change a point of rotation on the armature the mesh that follows it needs to be re-weighted or it’s deformation will be inaccurate.
Maybe auto-rig is actually re-weighting the mesh for you but i think that’s unlikely though if it is i salute the creator because weight painting in Python is kind of tricky!
I think what autorig does it’s transforming its own deformrig into an ue4 compatible rig (naming, adding ik bones etc…) it can even rotate the defrom bones to ue4 standard (the weird looking one) and adjust the animations to work on the new armature.
Setting the clavicle in edit mode to look similar to the ue4 position is necessary for the animations to look good. This is done when setting up the rig, before any animation was made.
The two tools are great for differnt things… Mr mannequin can make or now edit animations for the exact mannequin. These animtions however won’t necessary look good on any characters even with retargeting.
Autorig can make an ue4 compatible rig in a few click, and on that rig most mannequin animations will work well, some will not (depends on how precise it must be and how diffrent are the proportions-but you can always make your own animations on he rig)
I hear you and good points, thanks for some clarification! But still… if a mesh is weighted to the clavicle bones and they then get moved in edit mode it could still invalidate the weight painting. In all fairness the difference wouldn’t be very noticeable unless they were heavily rotated, but it could cause serious issues with any realistic or mo-cap animations…
I should also say that issue isn’t really auto-rigs fault! The anatomical point of rotation for the clavicle is at the top of the chest (sternum) not in line with the neck like many stylised (or poorly built) rigs have it.
See i do all my rigging myself, i’ve never used Auto-rig pro so i don’t really have a good knowledge of what it’s doing. I’m very interested in the methods it uses in applying, enabling animation and exporting the bones in a UE4 position though so i might go ahead and buy it just so i can dig through the Python
I don’t know the video you are referrig to, but ofc you adjust the clavicle before weigth painting (same when using autorig). But if you adjust it after weigth paint… I don’t think it causes any problem really… ofc animations which were made with a differently positioned shoulder bone will not retarget well… but in this aspect the unreal armature that is much different from the most common ones (mo-cap) I believe.
Changing the point of rotation after weight paint completely wrecks deformation. There is no middle ground here this is a fact of rigging/animation. If you only move the point of rotation on one axis that can reduce the issue though not completely. I could use a different example than the mannequin but this is the same whichever way round you do it.
Also from my experience with mo-cap you want to have as anatomically accurate armature as possible. The point of rotation for the clavicle is where it attaches to the sternum, the scapula (shoulder blade) is essentially a child of the clavicle and is dependent on it for around 80% of it’s movement. I really dont mean to seem arrogant or argue but i have rigged a true to life anatomically accurate human skeleton with the help of medical professionals.
As you can see this is factually the point of rotation that should be used on any realistic characters other wise the clavicle/collarbone and scapula/shoulder blade do not animate correctly even if working on a character “skin” as these bones are so close to the surface and are frequently modelled onto characters. The only types of characters that get away with having different points of rotation are very stylised.
Don’t even get me started on the issues with the points of rotation in the hands vs the radius and ulna… that almost no animators account for (The hand inherits an axis of rotation from the radius while the rest rotates between the radio-ulnar joint plus the fact that the carpals of the wrist account for around 15 - 25% of the hand’s rotation along with a small amount of play from the metacarpals… )
Could it be that it is your rig that breaks when you move the deform bone in edit mode? (I call the sum of the control bones as rig).
Because it’s quite different: if you adjust the so called ref-rig (quite same as the rigify metarig) in edit mode the actual rig will be generated according to the modified ‘metarig’. weigth paint there can’t be such a huge difference since that only tells which vertices should be under the clavicle influence.
Btw I’m not here to argue long, you are clearly an expert in rigging and I’m following your youtube channel quite some time and appreciate that you made this tool available for free. I’m sure I will use it.
The human body is my passion sorry if i was a bit intense… i wanted to be a surgeon but then i had to take over looking after my daughter 24/7 by myself and had to find work from home… ended up doing the next best thing… Anatomic Character Rigging and Animation!
In my rotation example with the mannequin i had actually moved all the bones, control, mechanism and deform bones in order to keep the example valid, but i could show the issue with a few spheres, a couple of bones and about half an hour of weight painting the result would be pretty much the same.
The weight painting isn’t just an influence though, it moves those verts with x amount influence around the rest pose of the bone the weight is assigned too.
That meta-rig vs weight painting relationship thing is what i dont follow with both rigify and auto-rig. I don’t use either, and i don’t quite get how weight painting can be generated accurately from bones as there are so many niche situations for offsetting the weight that gets painted.
I haven’t watched the tutorial videos yet or read through all the posts, but I’m assuming it’s possible to use this rig on other characters with different proportions to the mannequin?
This is an extreme situation, I moved the first model clavicle’s head back and the other forward, and then gave them the same rotation. (the weight paint is the same, coming from daz).
The rotation was moving the shoulder forward. up and down had much less difference.
It might not be apparent, but there is difference in the pose ofc… the first one being less natural, but I think that’s coming from the unnatural placement of the shoulder bone… I don’t think weight paint can fix that.
About the meta-rig vs weight painting: the trick is that you don’t weight paint to the metarig, but for the final rig (after it is generated from the metarig as reference)
(btw daz characters have very nice weightpainting, and I’m after a workflow to get them into ue4 as perfect as possible. autorig pro can help, but requires quite a lot manual step to bring the existing weigths under the autorig’s rig. But once that’s done the next step is to use any existing ue4 animations on them. simple ones work rigth away… maybe some looking strange as the mannequin has a superhero proportion). What would be really nice is to either do a good retarget in blender… maybe use autorig’s remap tools to connect with Mr Mannequin and adjust the animations or use Mr mannequin at some point to bring back my Daz character with the animation retargeted in ue4 and adjust from there)
Weight painting would fix that! As a simple example If you increased the clavicles influence where it’s modelled on the mesh and reduced it everywhere else it could be closer to how a human actually moves It’s actually the way the weight painting is deforming the mesh that makes it seem unnatural
The mannequin is very superhuman, though a lot of his points of rotation are very realistic considering his mesh… unfortunately his hands are terrible to work with lol.
That workflow you’re after should be possible with Mr Mannequins Tools update 1.2. - Remap with Auto-rig, export to UE4, bring back to Blender to use with Mr Mannequins Tools new custom mesh/armature compatibility that will be coming soon.
Not quite yet, but it will be possible in the future, it’s one of my highest priorities for the add-on although it is going to be one of the most complex things to do
Thank for sharing this great addon and i also bought auto rig pro but so far i didn’t have the time to test my character animation pipeline with it so i cannot compare with your tool yet.
What i am looking after is the easiest way to bring animated character from mocap and to modify the animation in blender and then send it back to UE4.
I will soon start testing the pipeline so is there something your addon could be better at then auto rig pro?
I think what’s going to separate Mr Mannequins Tools from the rest is likely going to be the modular rigging options such as the switchable IK vs FK and head tracking that can be added or removed from a rig. I’m hoping i can create a very smooth workflow for custom characters as well and i plan to create dynamic walk/run cycle animation generators next year too (i hate making walk cycles so that’s mostly for me but i’m sure loads of people would find it very handy!)
That sound great and it would really make a fantastic tool for any Blender to UE4.
On my side what i will mainly require is to bring a mocap animation as example a walk cycle and to adjust arms to hold custom prop like weapons etc and then send it back to UE4.
This is key. At the moment, ARP has an EXTREMELY smooth workflow for custom biped mesh to UE4 fully retargeted to the Mannequin with very little work. Also, the ARP dev stated that he designed the rig primarily for film, whereas obviously MM is built for games dev workflow.
Adding the FPS template was a great move, but yes, once you open up the workflow to custom TPS/FPS mesh swapouts this will be a serious toolset.

 Some really nice features on the rig, particularly the rotation limiters on the shoulder/hip.

 the result would be pretty much the same.
