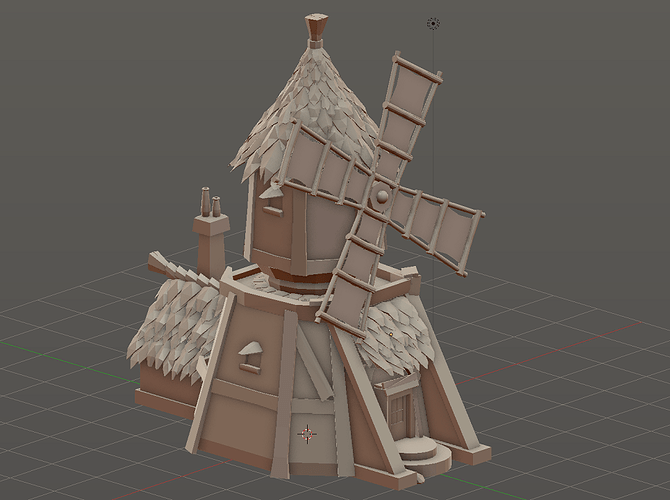
After somehow learning how to model, I decided to go further and do some texturing. I modeled a windmill (based on my old drawing) and my aim is now to shadelessly render the final image with hand-painted textures. Something like here: https://www.artstation.com/artwork/XdRgl .
However, I came upon a problem I can’t solve. I know only basics of texturing - how to make seams, how to unwrap simple objects, how to move UV islands and paint them in Photoshop. However, once I made all the seams and unwrapped everything, I got this:
The biggest issue are the roof tiles. Each has a top and a bottom layer, and here they’re all mixed together. I would like to somehow unwrap them in groups, so that, for instance, the front tile pack (above the entrance) has proper tiles next to each other; or the cone-shaped roof is unwrapped as if it was a whole cone.
I hope that you know what I mean, it’s hard for me to explain.
What methotds should I use? Perhaps you know any usefull tutorials for this kind of UV managing? Thanks in advance!
I forgot to add that I already spent over an hour trying to move to the same location UV islands of top layers of the front roof. Yeah, only the top of one roof and so much time. I’m convinced it isn’t the right method. ;p
I am not very expert at blender, but looking at your UV file or it is enormous or you have a very tiny UV islands. In your place I would use one UV layout for every group of objects (i.e. one for the roof, one for the mill, one for the walls ecc…). But if it is a model lowpoly you should semplify things to make it fit only one or two UV layouts. And somewhere there should be one option to saw one island to another to make things a little bit tidier…but I do not where it is yet or if it exist even
Is painting directly onto the model inside Blender something that you cannot do? That would be ideal.
Separating things into different UV Layouts like @Mattakkione suggests is a good idea. If you decide to do this AND paint onto the model inside Blender, you would need to set it up properly. Each texture would need assigned to the correct corresponding UV Layout. Also, I would use a different material for each UV Layout and image texture. That way you can assign a different color to each material so that they are more easily differentiated from one another while you are trying to UV unwrap. You don’t want to accidentally have a UV in two different layouts. Also, in case it’s not obvious, use Blender Internal with “Shadeless” checked on the materials.
@AustinC - Yes, you can paint directly onto the model.
That might be a partial solution.
In fact, AustoinC suggests the exact same thing I do. You have very identifiably different parts to your windmill that can be separated into their own objects. Once that’s done, you can more easily manage the textures on the more complicated parts, like those shingles. You should apply your base textures from file and then paint the finer details onto the object directly in texture paint mode.
You’ve done a really nice job on the windmill, btw.
For something as simple as this, there is no reason to have multiple maps/objects. this can all be mapped onto one UV map. nearly 75% of your UV is roof tiles packed in a very inefficient way. I’d doing some major retopo with uv layout in mind and doing the shingles with normal map
What’s the ultimate purpose of the model? Is it going to be used in animations or games, or is it only for still-shots? That makes a big difference in how to model/texture something. A bumpmap might be a better idea for the shingles if it’s for animations/games.


 or if it exist even