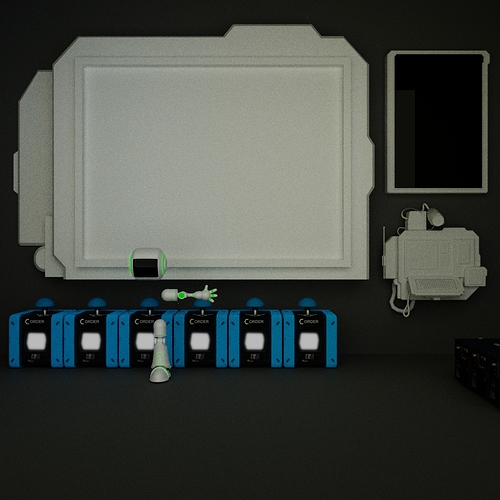
this will be my first animation ![]()
1- i will complete this robot parts
2- there will be a chat going on the big screen
3- the white squares will light when the button over the cube is clicked with different colors
the animation is simple the robot will move from button to another and keeps clicking them till the end
→ any ideas about how to make this scene looks much better in lights ?
→ how to import a video and place it to the big screen ?
→ any additional parts missed in modeling ?
→ since this will be animation for facebook page howmany samples should i render the animation ?
→ your opinion ?
thank you ![]()
Depending on the mood you’re going for, you could for much darker lighting…
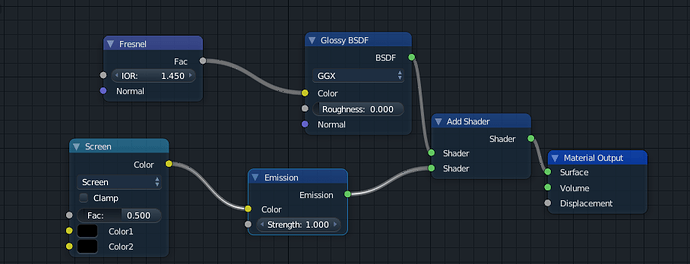
The robot already has some areas lit… the screen will emit light (I myself would use:
Fresnel into glossy colour
Glossy has 0 roughness
screen mage into emit colour
Emit and glossy into add shader
add shader into output
this will make the screen emit light AND reflect the robot slightly.
If you do that and have a whole load more objects emiting light on the screens and panels, that may be all the light you need! If it’s still a bit dark, try adding a coloured spot coming in from the side.
In fact this is the exactly mood I wanted to do but failed 
I will try it
Thank you 
is this nodes right ?
in fact it reflects the robot well but there will be lights out of it so will not need the robot to be reflected ![]()
i want to know more about the lights i will try color spots
@Mohammed_Terry If you are wanting to separate what is shown per object or material on an object you can use the node light path and set which you are wanting to be shown with what type of material/lights/camera. I am not at my computer right now but once I get back on it I will post a video that exposing the use of that node in better detail than I can describe. Also Blender Guru is doing a lighting series on YouTube, think he only has the first part posted and think it is going to be a 3 part series. Another user to check out lighting tips on is Glen Alexandrov from Creative Shrimp, he always has some awesome quality lighting to his renders. He has a tutorial on YouTube as well for all the different ways to light your models or scenes.
As for Facebook quality settings, well… Facebook does its own thing with compressions so the higher you can go within reason for what it is would be better.
Here is the video that explains the light path node and what exactly it does.
And here is some of the Gleb Alexandrov ways to light your scene videos.
Yep - that’s exactly what I meant - Except the screen node should be the image/video texture for whatever’s on your screen. Sorry if that was unclear.
that’s what I use for glass with a light behind it - so basically most lights.
You could always add - say - .05 roughness on the glass to make it less reflective. Or you can put a finger-print / smudge texture onto roughness for added realism (taking care of scale, of course)
As a real-world photographer I more or less worked like this – referring liberally to Ansel Adams’ Zone System although it’s for film not video:
-
Start by establishing the illumination of the darkest areas, so that they are not opaque black. This would be Ansel’s “Zone 3.”
-
Next, establish your base illumination for “most of the objects in the scene.” This is probably “Zone 5” but could be 4.
-
Finally, establish highlights, starting with the thing you want the viewer’s eye to rest on first. (Then, envision a circular path through the scene from one brighter-lit thing to the next, winding up back where it started.) These are “Zone 6 or 7.”
-
Take care that nothing in the scene is “blown-out white.” In Blender you can use the histogram tool to verify the overall layout of the illumination. It should be mostly bell-shaped with only small “peaks” (if any) at either end.
Color temperature is also a crucial consideration, because real-world light sources are never “white.”


