So, what does really do?
"What it does", if the first post is TL;DR:
Adds animation layer support in Blender
"What it does", as in what it "technically does":
When you pose an object/bone, and insert a keyframe,
it will search through the NLA tracks, then alter the new keyframe.
It performs some math, and replaces the keyframe’s value, to a value that will make the object/bone VISUALLY the same as what you set it to, when you go through the animation.
In other words, inserting a keyframe sets the keyframes to the final value, and this sets keyframes to the “offset” value, which is was you want, for additive animation layers.
1 Like
Is a bit confusing for people who lives in caves, like me. So it can modify existing animations on top of them? like linking a null and modify the keyframe without really modifying it?
1 Like
Yes.
You can tweak an animation, using additive layers, without either overwriting(erasing) or directly modifying the keyframes of those previous animation actions.
2 Likes
This is beautiful. A simple solution to a very needed feature for ALL animation work. This is one of the key features that had me off Blender for years. THANK YOU for filling in this gap.
2 Likes
Thank you very nice addon
Okay, I spent over a month re-writing this, multiple times. I think I'm mostly done now.
-
There was an error while using motion paths with how/when blender updates, causing them to not key correctly.
Currently it fixes those keyframes correctly now but it may leave the pose in the incorrect visual change (just try to move the bone/object to update it correctly);
It works but it’s best to just not try to animate with motion paths and layers.Also, if you animate with multiple objects, now you can animate them with layers for each, even if they aren’t selected (for example: animating empties using proportional editing).
-
Note: the toggle button is currently placed in the Info Header, because I want to always be able to toggle it, so that’s where I personally keep it. I will try to add an option to relocate it in the preferences window.
- This version also includes a new version of the “Reset Layer Keyframe” button.
Now, you can press Alt + G / R / S and it’ll run. There’s a slider next to the toggle button, for a range of 3 different values.
You can blend between them if you want, as well as extend past the boundaries (100%) to overshoot the pose.
- This version also includes a new version of the “Reset Layer Keyframe” button.
Additive_NLA_Layers.zip (15.3 KB) << edit: additive layer is bugged on 2.79 stable
There are still some small things to do before I say it's really ready, so I prefer to think of this as a version 2.0 beta, plus there's some new tools to add
There’s still a lot of debug and development code still laying around. It should be harmless but it leaves a possibility that a text message will be sent to the console, about a situation that the code isn’t set to fix but considers the possibility.
I’m planning to charge for certain/most tools, since the point of this free addon is the layered animation, and the other things are just a bonus.
-
($) Made a layer baker that keeps keyframes but I gave up on it, a bit, and left it at only merging layers of the same blend type. So, for example, it can’t convert Replace to Add, and creates a separate strip for each type. It bakes scaled/repeating strips, so that’s something I guess.
- Some more NLA controls, as well as a function to multiply values in a strip. For example, you could invert/double the offset of an additive layer, without having to duplicate the strip.
-
Also made a 2-part slow motion script [SlowMo] inspired by a feature from the Action Loader Addon
- (free)
Using a slider, you can dynamically slow down animation playback. This is useful for spotting issues in your animation.
Blender doesn’t have a decent way of doing this correctly builtin, because if you just change the frame-rate, the animation gets blocky and doesn’t show you the transition between frames.
The problem is this uses builtin the time-remapping option, which doesn’t allow you to insert keyframes correctly. - ($)
This version actually changes the range of all animation data, allowing you to globally slowdown everything and be able to insert keyframes. You can apply the slowmo, or reset back to original timing, whenever you want. - I describe these as working for slow motion but they can also speed up animation, I just wouldn’t recommend it.
- I plan to post the current version of both of these, along with video demonstration but if you want to try it now, you can purchase on gumroad for an older but working version.
- (free)
-
Now that I got my script to work modularly, I can actually include the versions of things that I personally use, instead of clipping them for public usage. So, I can consider adding other tools I made, like.
- Rig Layers panel, based on Rigify’s generated panel. Currently I use data from the Rigify and Bone Layer Management addons, but I’m now fairly certain that I’m competent enough to create my own data for this purpose, as well as import it from Rigify for people looking to use it with that.
- buttons for quick motion paths generation
- a usage for keyframe types, beyond just visibility
- ability to quickly jump between keyframes (and just to start/mid/end of nla strips). There’s one addon I’m aware of that already adds the mid-keyframe jump but it’s slow, so I made my own.
If you run into issues, please let me know.
-
However, there’s one issue with the Alt +G/R/S reset that I’m very well aware of and can do nothing about:
When your layers contain extremely small decimal values (like .000012068), when they’re added together and applied to the current keyframe, the value is either inserted or read incorrecty.
The math should be something like (.000012068 + -.000012068 == 0)
but the result is more like (.000012068 + -.000012068 == .000000513)The resulting difference is VERY minute but it’s a difference none the less, and your poses will show as something like 0.0001 instead of the 0.0 you would expect.
If you know how to solve this, please feel free to tell me.
The lines you would be looking at to try to fix it yourself would be around #1163-1175 (get) and #1229-1241 (set)
2 Likes
I’ll try it.
Looks really nice! now i need to start learning animation 
I don’t know if no one felt a need to report it or just no one noticed it but while the current version is enabled, there was a performance drop during animation, with it enabled because I forgot to disable it when you’re just playing the animation.
I found out that the builtin Bake Action operator is actually a python script found at ‘..\Blender\2.79\scripts\startup\bl_operators\anim.py’.
So, I looked through it, mimicked a bulk of it’s code, then added some additional features to it, including additive layers. Oddly enough, I was already mimicking most of how it does it’s things, before I ever saw it.
Additive_NLA_Layers.zip (22.0 KB) << edit: additive layer is bugged on 2.79 stable
Additional features in Bake (Extra) are:
(side feature: when you open the bake menu, it will default to Preview time range before final Render time range)
(Disable) Insert needed: by default, the bake action inserts a keyframe for every frame in the selected range, then goes back and remove extra keys not needed for the curve’s shape.
This item opens the option to keep them.
Available Keyframes: Bake in the selected time range, but ONLY bake using the keyframes currently available in the action.
(Note: inserts keyframes for all transform indexes, so X+Y+Z, not just one because one curve was selected)
Selected Keyframes: ONLY bake using “selected” keyframes in the active action.
(Note: same as available, also available is ignored when this is enabled)
Selected NLA Strips: This is meant for baking the strips into a different blend type, for example Replace > Add.
(Note: Does not remove strips, and standard NLA bugs apply, so it’s up to you to mange the resulting strips.)
This baker started with [Selected Keyframes], and the idea is based on how SFM’s motion editor works (because I can’t get something JUST like that, working and fast).
The idea for it is you quickly create constraints on a bone, pose with that, then select the range you want to bake, and update your action.
Also, a warning:
Currently the additive checker uses a modal operator for certain tasks (including the reset transform action)
Blender’s auto-save feature is disabled while a modal operator is running, so it’s now disabled by default.
edit: I found a way to get the data I needed from the modal operator. I’m busy actually trying to animate and stuff, and since extracting the modal’s tasks probably isn’t a quick fix, doing so will be a low priority.
edit: fixed a bug, additive didn’t work on 2.79 stable
working version: Additive_NLA_Layers.zip (26.7 KB)
bugged version
Additive_NLA_Layers.zip (26.1 KB)
Okay, I updated the baker, with some additions to the above:
- Bake in negative frames (for some reason, the default baker limited frames to positive numbers)
- Support for nla strip.repeat
- Re-added select IK chain (only bakes, does not select bones)
- Bake keyframes from constraints,
- Bake keyframes from nla strips (essentially merge strips together, plus being able to change blend type)
- Bake at markers (insert keyframes at set intervals, without having to insert keys on the bones beforehand)
- Bake outside of the manually specified time range (for options under extras)
- There’s also a hidden property you can toggle to have the frame range default to the selected NLA strips.
- Fix: Get keyframe’s correct frame location.
- I’ve had trouble for months converting keyframes to a strip’s offset; finally found a solution I believe would always work
- Also applied this to the additive keyer. I didn’t notice this bugging there, before but if it did, it should be fixed.
Note:
- There “may be” some issues with the extra bake options, but they DO generally work.
- Also, the extra options does not support f-curve modifiers.
- If you only want the baker, you can simply grab it from the folder.
@Bone-Studio I believe I have this functioning correctly enough to function as a strip merger.
The basic method for merging strips would be to enable [Available Keyframes] and [Selected NLA Strips].
edit: if you want to convert a strip to a different blend type (for example Replace to Add)
-
You need to have a lower track with animation to “update” the difference between with / without.
If you don’t, the baker will only insert blank keyframes for the additive layer. -
This is an issue with how the NLA works, and I’ve no intention to create an automated workaround.
-
I’m sure I could work in an automated fix for this but that would just be a lot of extra work when you could easily just insert a keyframe and push it down as a track.
A successful bake will immediately double the offsets of your animation. If you hide the selected strips, the animation should pop back to mostly how it was before.
(“mostly”, because of differences with curves+keyframes related to multiple strips)
1 Like
Additive_NLA_Layers.zip (31.6 KB)
List of changes:
Additive Layer
Note: while this is disabled by default, you CAN simply enable it then save user preferences to have it enabled by default instead.
Until I merge the modal functions, to allow blender’s autosave, I added a temporary backup alternative:
While the additive checker is enabled, it will create a duplicate save file for the current .blend file with the added text: “.addsave”.
I moved the button back to the NLA with text, and added text to the slider on the right of it.
What is the slider?
In the videos above, from the previous version, there was an X button. What that button did is let you reset the pose to the result of the previous layers.
What this slider does is let you do the same, using the default reset transforms buttons (Alt + G / R / S)
Basically you have 3 values to choose from.
-100 = Previous layers, like the X button
0 = Regular reset, where the transforms are set to 0
100 = Keep the current pose.
The point of 100% is actually to use a value between 1-99, not actually 100.
What this would do is slowly ease the current pose into the default position.
At some point, I may split this slider in two, to allow blending in to the lower layers.
You can also extend the number beyond 100 (i.e. 175) to overshoot the current pose.
Essentially it’s the Push pose operator that works with additive layers and objects.
I was using the reset transforms + key fixer, on subframes.
Since Blender doesn’t insert keyframes on subframes, I disabled subframe checker, now it always default to the nearest frame.
Bake (extra)
Added NLA separator for constraints. At first I had them use the constraint’s entire animation.
Also got the baker to work with additive layers all the time.
If you bake while using an additive blend mode, the animation will just bake current animation as an additively, including the current action, so you can keep doubling the current animation if you wanted.
A bug came to my attention about the baker (extra options). It’s not an issue with the baker but just the result. So, here’s a reclarification:
Warning:
- The baker is not a strip merger. It can only mimic one.
- If you use any of the keyframe limitation items ( all extra except Add IK Chains), you run the risk of baking an action that doesn’t retain transforms on some frames.
- These items are experimental and my ability to foolproof them is very limited because no one else is reporting use issue scenarios.
- These items are experimental and my ability to foolproof them is very limited because no one else is reporting use issue scenarios.
Notes about additive layers with Blender NLA (Blender issues, not mine):
additive layers bug
If your object does not have an NLA strip and you use an additive Blend mode:
While the the action is active, the animation will play correctly but when you put it in the NLA, it will break.
When no strips are in the NLA editor, Blender is set to always treat the animation like the Replace blend mode. So, my options were either break the current animation (like setting scale to 0), or make the animation read correctly but when you push it, it doubles the animation.
Simply add a strip to the nla and mute it or whatever, all the matters is there’s a strip.
The current stable Blender version (2.79b) does not push action to NLA strip and maintain it’s blend mode.
When you push to track, the strip will be set to Replace blend mode. You have to manually set it back to the correct blend mode.
This bug is fixed in the Daily builds; https://builder.blender.org/download/
It also doesn’t maintain [Hold] extrapolation, only [Nothing] or [Hold Forward]. There are no plans to fix this.
When moving strips around, they also may auto-switch from hold to hold forward.
tip:
- If you enable show subframes in the timeline >> view menu, when you click+drag in the animation/timeline windows, you can view the transition between frames more smoothly.
This can make it easier to help you spot issues in the animation.
You could also see this effect animated (plus insert subframes), using the SlowMo feature of the addon, found at Gumroad.
The Gumroad version also includes a feature to automatically snap the 3D cursor to the active bone
2 Likes
A developer made a patch to Blender 2.80 and now it officially has Additive NLA Animation layers; https://developer.blender.org/rBde662e7cd3b3ca45c4220e3830c32e2b3496c9fe
which thankfully makes the bulk of my addon redundant.
I already made some updates so the script functions constantly but as the highlight feature is no longer needed, unless a developer backports the 2.8 implementation, this can be relegated as 2.7x legacy animation layers.
I will update some features from this addon in 2.8 (on gumroad) but the layering system itself will be completely snipped (and not really be animation layers anymore), so consider this NLA Additive Animation Layers Final Version
Features
In the User Preferences, you can manually select where to place these buttons, or click the checkbox next to it to disable the item.
Animation Layers:
- This feature by default is always running, as it’s intended.
When you insert a keyframe, using any Blend type, it will automatically fix the keyframe, to properly work like an animation layer (for the Blend type; you have to manually set the Blend type). When/Where/How you use this is up to you.
A red plus/minus (+/-) button can be found in the header, to enable/disable this autofixer (for testing/debugging purposes) - Next to this button is a slider used when you Reset Transforms (Alt+G/R/S). Hover over the slider for an explanation
- Tweening:
- Blender’s built-in tweens don’t work with additive layers, so I had to try to manually recreate it. My system appears to work mostly like it but I can’t figure a conversion for an exact match.
- In the process, I also created tweening for Object mode.
- I didn’t get around to adding axis locks for tweens like in the default version. If you need them, you can turn turn off the additive layer button to get the default version with axis locks in Pose mode.
Bake Extra:
- This can be found next to the default Bake button and essentially works like the default Animation Baker, with additional features such as Baking to additive layers (without treating them like they’re REPLACE Blend type)
Usage is a bit tricky, so it’s best to play with the settings and determine when/where you may want to use them.
Bone Cursor:
- This can be found in the header as a 3D cursor icon (when a rig/bone are selected).
When manipulating bones, this will automatically snap the 3D cursor to the active bone. This makes it more convenient to the 3D cursor as the pivot point. - The slider next to this allows you to reposition where the cursor defaults to on the bone, so for example you can default the pivot to the bone’s tail, which would be useful for rotating a foot on it’s toes without using a foot-roll rig
- Another button is to the right of the slider. When you click and manually set the 3D cursor’s location, it won’t snap to the bone anymore. What the button does is allow you to manually offset the cursor but still have it follow the selected bone.
SlowMo:
- This feature’s purpose is to allow you to play your animation smoothly in slowmotion. This would help you see problems with the motion more clearly.
There are two modes for this: - Preview / Time Remap
- This slider can be found in the header and in the Properties >> Render window.
It uses the Time Remapping values in Blender to automatically adjust playback speed with smooth frames.
The Time Remaping feature is a bit janky, so it’s only good for viewing the animation (preview, never edit) but it’s quick to set and loses no data (unless you were using time remap for something already)
- This slider can be found in the header and in the Properties >> Render window.
- Global SlowMo
- This slider can only be found in the Properties >> Render window
When you change the value then click apply, all animation time range data will be scaled to match your adjusted value.
You can insert keys like normal in the mode, then just reset the time speed and click apply to go back to normal. - WARNING: Read the hover information to avoid data loss
- This slider can only be found in the Properties >> Render window
Hotkeys:
- The additive layers and tweening actions use custom operators intended to run over default Blender operators and run those default operators when the custom version is not needed.
- Clear Transforms:
- Alt + G = Clear Location
- Alt + R = Clear Rotation
- Alt + S = Clear Scale
- Alt + Q = Clear Loc+Rot+Scale
- Tween:
- Shift + E = Breakdowner
- Ctrl + E = Push Pose
- Alt + E = Relax Pose
if you don’t understand something: ask and I’ll try to explain.
4 Likes
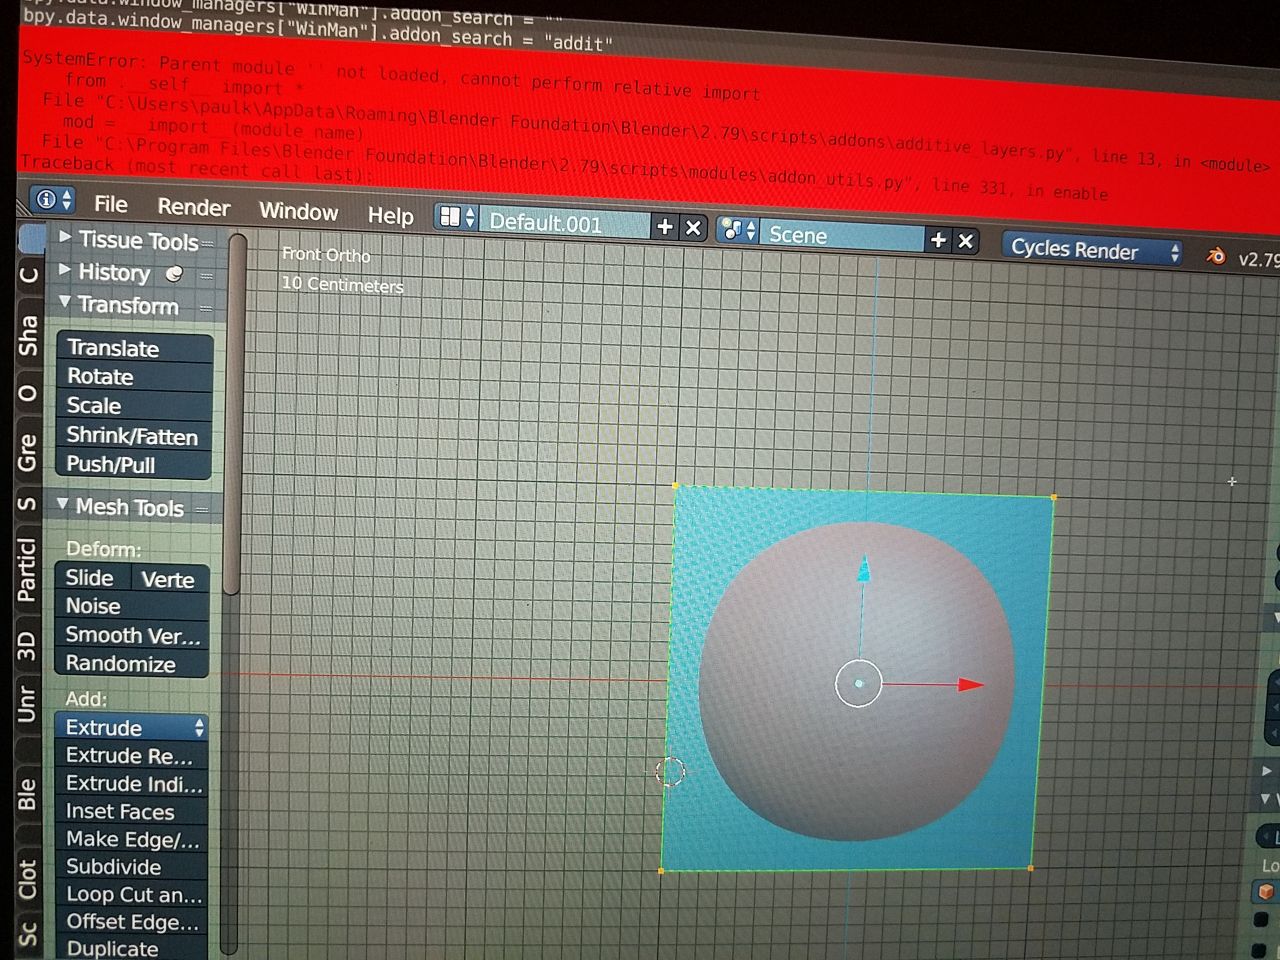
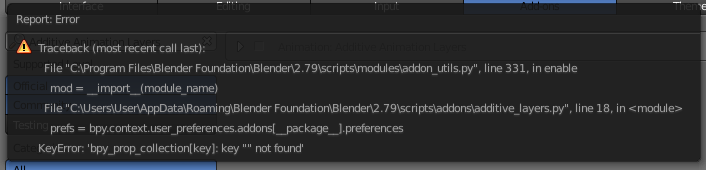
Hello, I just purchased the addon and it sounds great and I cant wait to try it out. I added it to my addons list but when I click checkmark in a new blend file, I just get an error message that I’ll include here. Could you please help? I do have quite a few addons activated in my Blender setup so maybe something is conflicting?
Yes.
When an addon is distributed inside a .zip/folder, and it includes a file called __init__.py, this means that unless the individual files were specifically designed to work separately, you MUST include the entire folder.
I sort of designed the files to be separate but I added some “convenience” codes in and didn’t want to go through a bunch of effort to make them hard-separatable again. I do however include options in the preferences to disable functions.
However, if you MUST delete files for whatever reason, the only mandatory ones are __init__.py and __self__.py
Hello.
You did a great job, man!
But I have an issue activating it inside 2.79
What could be wrong? Am I doing something incorrectly?
Yes, read the post above yours ![]()
Hi everyone, does anyone know if there is a strip merger for additive animation? Thats what I really need- i.e. something that bakes a base strip and an additive one together to give you a new action with the resulting single animation looking exactly the same as the two combined did prior to the bake
EDIT: I seem to get baked animation as a single track if I export to fbx and import again (just on a test cube anyways) but its a bit of a ballache to have to do this. Cant the same result be achieved in the editor?
Just bake animation into new action.
The baker started as a strip merger.
I made a strip merger but due to certain situations for use, and how difficult it would be to “edit” it, I restarted the merger from scratch.
situations such as...
If you merge an Additive layer with a Replace layer but there’s another layer in between them, what’s supposed to take priority above what?
Additive layers can’t transfer to a Replace layer without first wiping anything below them, and vice-versa.
Initially I was just trying to see how the builtin baker works, and then wound up duplicating it’s process.
A cross-blend type (to one strip) merger isn’t feasible or at least I can’t think of any ways for it to actually work all the time.
However a different tool “idea” just occurred to me, being like a box merger: where you select a range, then all the available data get merged in that range (from all layers) and strips outside of the range get cropped out.
Since I'm here
I ported a bulk of my code to 2.8 (released and unposted).
After porting the baker, I tried an idea and mostly got it working.
You know how when you start a bake, the screen just freezes and you wait until it’s done?
What’s happening in the background is first Blender plays ever frame in the animation’s frame-range (less frames if using certain “extra” options), to read the visual poses, then it inserts a keyframe for everything and send them to the target frame.
What I did was convert this to a modal operation, so that you can see the animation playing (or stop at a certain frame or cancel), and also see the keyframes being inserted.
The downside is the method doesn’t work in 2.7, and requires you to do something (like move your mouse) for the process to end.
I found how I could fix this (in 2.8; I don’t know if it can be also fixed for 2.7) but I have numerous other things to do than set it up.