I made a butterfly. its wings are flat planes in the shape of its wings. one left one right.
when I put the image on without UV and moved the wings the image on the wings did not work right.
so I thought I would try UV which almost never works for me.
see pic. why did it change the wing shape of a FLAT PLANE?
and how do I get the image on the wing?
thanks all

so I have this image I wish to put on a wing shaped plane.
so I set it to show what the rendered image will look like so I can move the image to fit.
but press F12 and uhoh blender is in chaos again.
A: what happened.
B: why does the image on the wing move when I move the screen!!! ?
I hope I can move the butterfly and let its wings flap without blender messing up again.
I suggest blender be renamed frustration unlimited.
thanks all
Attachments

Check if you have applied your Object mode rotation/scaling (CTRL+A -> rotation&scale with your model selected in Object Mode) , unapplied transformation in Object Mode can screw up many tools from edit mode, then try to unwrap again.
If it does not help and with that giant ngon , you should maybe try U -> Project From View instead of U -> Unwrap to avoid that distorted thing.
I see you have the texture coordinate (in the Mapping tab) set to “Object”, change it to “UV” as looking at your other thread, you have an unwrapped model.
Hi
I use Greaae pencil to make the wing.
First picture is a plane with the butterfly in top view.
Grease pencil is easy to use…Just press d and left click in viewport…And it’s ready to use…I made My drawing bigger so You can see the line…Press Esc or click outside the viewport to turn GP off.
In T - panel find the convert tap and convert the GP to bezier curve.
Next picture is in edit mode.

In T - panel - tools tap click remove doubles…It open a new tool below…Merge distance…use it to remove verties…Grease pencil default make a very dense mesh…That’s the reason to use Merge distance.
The wing selected press F to fill the space…Now give the wing a material with Your texture on.
In edit mode and Uv/Image Editor

Top view…Open Uv/Image Editor…With Your butterfly.
In Edit…Wing selected press U and Project from view…It will unwrap the wing as You see it.
You can see The Wing in Uv/Image editor…But the size is wrong…No big deal…You can use same command as in edit- object mode.
G to move S to size You can use X-Y…When it fit You have texture on the wing…Remember to save it…)
Hope this make sense…
Tai
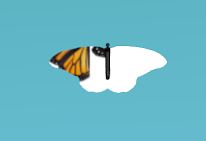
I’m lazy and scrooge at giving spare vertices enough to use planes on Cycles ;). They are close to absolute minimum of verts to define surface; three would be enough but we do have quad as a default…and on top of that a) we have Import Images as Planes addon, b) in the drawing, the upper wings cover lower pair so that some image editing is needed anyways.
So, have some gimp session and, well, do the same as was suggested by @Taipan - lasso some outlines and do some in-painting to edit lower pair of wings. Each wing goes to it’s own image then and has a transparent background.
Next, Import Images as Planes ( if Cycles was chosen before material is created automatically), put them back where they belong to and either add some bones and animate or use particle system…200 butterflys * 4 wings each… if e.g. there are 20 extra verts on one wing…200*80 is a lot of savings.
Have fun: http://www.pasteall.org/blend/36349
I subdivided a plane and used the knife to cut round it. and put on the image.
seems to work
thanks
Attachments
BUTTERFLYWING.blend (848 KB)