You will have to zoom out a bit at least once to leave space around, and then it will stay like this for your new cameras.
To zoom out, make sure to disable Lock Camera to View, and then zoom out Ctrl+middlemouse or with your mouse wheel.
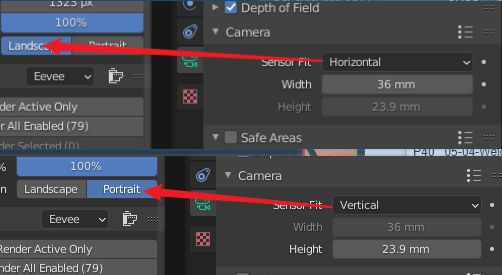
hi, i have a question in using photographer, i want to make photo to match real world completely, if select to vetical of sensor fit in portrait mode, and select to horizontal of sensor fit in landscape mode?because there are different angle of view and different image in different mode.
Keep the Sensor Fit to Auto, I don’t know exactly why but Auto is neither of Horizontal and Vertical when using a portrait render, and Auto is the only one that is correct.
Hi Fabien,
I own both version 3.x and 4.x of your great add-on. Now I am a little confused on what to use where because I do keep the following Blender versions on my machine: 2.79b (for legacy files with Blender Render materials usually); 2.83LTS (for an animation project I am collaborating to); 293LTS for new projects and 3.x for playing around with the new functionalities. So, sorry for the stupid question, but what version of your add-on should I use with each Blender version, or what would you recommend? Thank you.
Both Photographer 3 and 4 support Blender 2.83, 2.93 and 3.0, I would recommend using version 4.
As for 2.79, I don’t think any of them would work, you would have to use Photographer 2.
Thank you for the reply and clarification. I don’t need Photographer on 2.79b but I have version 2 in case. Ok, I will use version 4.x with the other Blender versions.
Thanks so much for building this. I was wondering if there was a way to be able to effectively meter a selected face.
I see that through the rgb_to_luminance you are able to run the 18% grey auto exposure but I would love to be able to understand how many stops under or over my base aperture a given face is.
Also I’m curious to understand what the EV constant is as I can see how different faces register with the Auto_Exposure picker for instance between 8.05 and 10.33 on a simple light study. Not sure if there is a direct relation to false colors?
The EV value represents the scene referred brightness of your image / picked pixel, before exposure.
It doesn’t really have any direct relation to False Color, which is scene-referred but after applying the Exposure.
An example in real life would be to divide the strength of your lights in your scene by 2, and open your camera lens aperture by one stop. You would get visually the same picture as before (with a lit less depth of field). Identical False Color, but the EV value would be different.
Now I do find that there is a lot of green in Blender’s False Color so it’s a bit hard to be accurate.
The EV picker will essentially set the picked value close to 50%, so that area will appear greyish in the False Color. I was hoping that could be used to compare 2 different picked EV but I need to investigate, there is something I can’t wrap my head around. False Color would tell you there is a 5 stop difference between two grey swatches but the exposure difference to get both properly exposed is much lower.
Whenever that realtime comp comes you can do custom false color
atm even though I could do new one, I really dont understand that ocio text file to add anything in it, and on top of that its weird af lut format what requires weird lut transforming
Thanks for sharing those links, really clarify the false color system as well as the exposure slider in the color management panel. I now see the EV picker and slider is shifting that slider which has a +/- 10 range.
With the behavior of the Color Management Exposure slider, could be possible to stay in manual mode and indicate how much the exposure value(in stops) WOULD change if it were going to make the adjustment using the EV slider?
Not sure I understand. You want it to tell you how much stop difference there is between your current Shutter speed and the new Shutter speed you would be picking for instance?
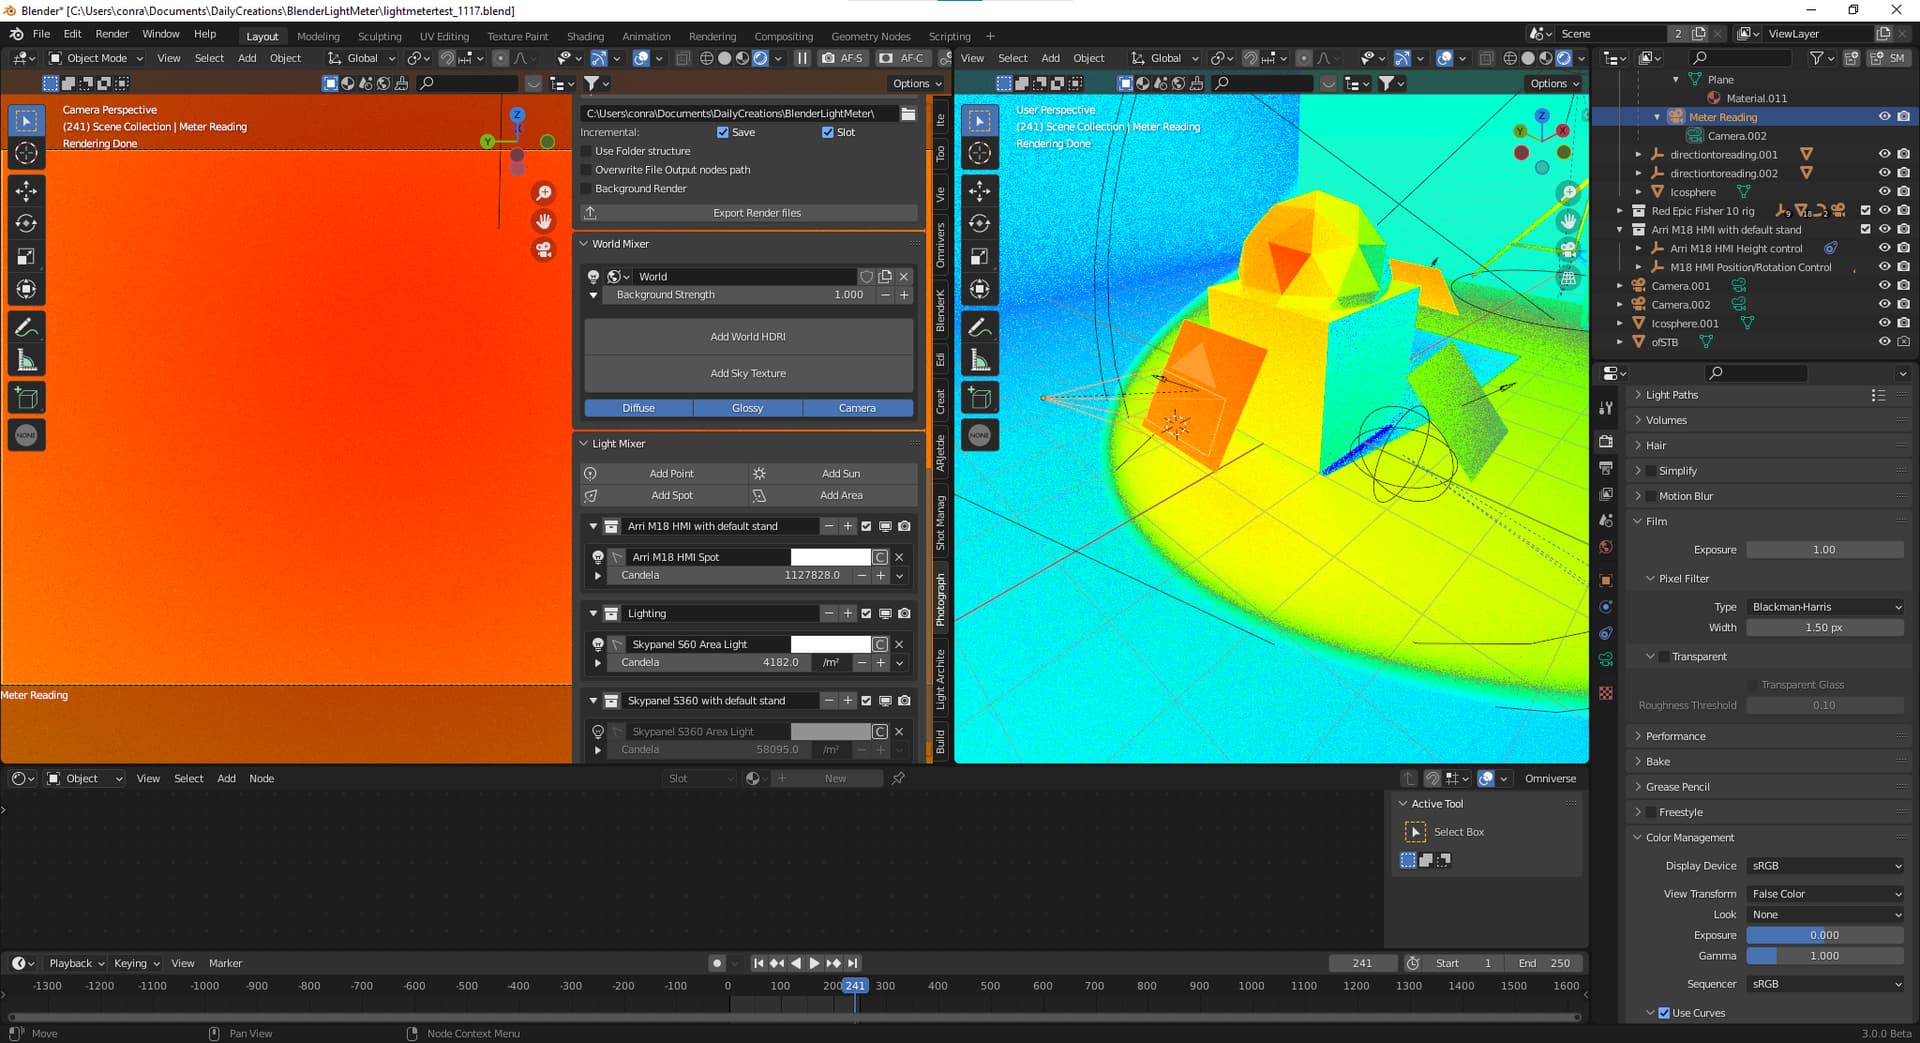
For reference I’m not a color scientist, colorist or even professional camera person but I am trying to figure out a more streamlined way to light subjects in real life that I can bring into blender. I’m imagining a virtual light meter which would allow you to set a ISO, f-Stop and Shutter and then measure the amount of light at a given place inside of a blender scene.
For instance in this scene I have ISO 1250, Shutter Angle 45 degrees, and f.4 ,
I’ve created a plane with an attached camera called meter reading. With an 18% grey card infront of it, it looks like this.
The scene is being lit on the key side by an Arri M18 that I got from the Light Architect addon and adjusted to be outputting the candelas that Arri lists in their specs (thank you so much for the light mixer!) I was able to take the fixture down 7 clicks (3.5 stops) to get to green.
This “reading” puts that light about +3.5 based on my manual camera settings… from my understanding. Therefore in theory I could light a subject in real life that meters +3.5 with a same or similar fixture in order to
The same kind of change in the meter camera’s reading could be accomplished by adjusting the Exposure slider in the Color Management panel.
On the fill side I created another Meter Reading Camera/Plane pair and used the light mixer to identify that fixture as 5 1/2 stops under (11clicks)
I also included a camera render.
Wondering if there is a way to calculate this process given the attributes you are already working with.
Also, seems the even when I zero out the Exposure slider in the Color Management Panel it resets to 1.476, is that effectively zero? or is this a bug?
Hope this helps to clarify. Happy to discus further!
I’ll have a look tomorrow, but just wanted to say that you should not touch the Exposure slider in the Colour Management panel, this is controlled and overridden by Photographer settings.
Use the Exposure compensation in Photographer instead.
The 1.476 is probably Photographer reapplying the Manual Exposure settings you have set in Photographer.
Now I understand what you are trying to do, here is what I think is the fastest way to measure how strong your light is compared to a mid-grey exposure:
Note the current EV value
Use the EV picker to target your 18% gray card and not the EV value that is returned.
Right-Click to cancel the EV picking, and subtract your 2 EV values to find the delta between the two.
It is not possible to know if your light is always gonna have that brightness at a certain camera EV, because the distance from the subject is not known. For this you would need Lux unit, which I will add in the future with a light rig.
I have a feature request in my list to be able to pick the position on the latlong HDR image and it will adjust your sun rotation accordingly, would that work for you?
I’m not a fan of picking the brightest point of the image. The reason is pretty simple: if you want to use a sun light, it means that you should have painted out the brightest point of your HDRI already, or you will get 2 sunlights in your scene.