0.9.25 color adjustment (filter), faster boolean - see below, also boolean is faster by first determining if point is in bounding box of mesh, so it is faster only in some cases… 0.9.24 project colors - see below, just an addition to project filter to optionally change colors from various sources on target mesh 0.9.23 fixes - ehm, i forgot what these were, some minor stuff, like drawing normals as lines was not affected by global alpha setting, etc… edit: one more - position shader rotates colors in cube grid of length 1.0
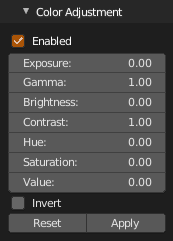
Adjust exposure, gamma, brightness, contrast, hue, saturation, value or invert colors. Click Enable to enable color adjustment shader, adjust values as needed, click Apply to apply colors to points. Click Reset to set all to default value. Shader can be disabled without changes anytime unchecking Enable. When color adjustment shader is enabled, all other shaders are disabled.
Enabled - Enable color adjustment shader, other shaders will be overrided until disabled
update: 0.9.27 render supersampling and draw smooth circles
render has two new options
Supersampling - Render larger image and then resize back to anti-alias, 1 - disabled, 2 - render 200%, 3 - render 300%, etc.
Smooth Circles - Currently works only for basic shader with/without illumination and generally is much slower than Supersampling, use only when Supersampling fails
Render smoothing/anti-aliasing notes:
Use Supersampling for most of the time with lowest value (to be exact, 2 works great) that look still good. If you run into problems due to very large supersampled image sizes Blender or hardware cannot handle, you can try to disable Supersampling and use Smooth Circles to draw smooth points directly in target resolution, but you are limited to basic shader and points before drawing have to be depth sorted manually which can be very slow with large point counts.
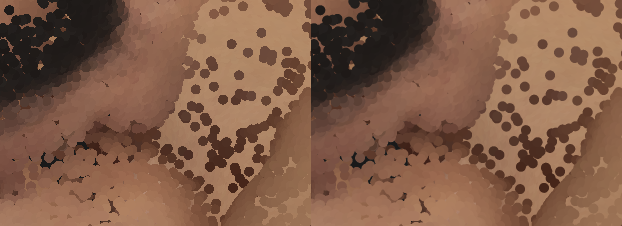
left without supersampling, right with supersampling 3
PTS files with color consist of X,Y,Z,I,R,G,B for each. If you would like to skip Meshlab at this point. Using a text editior such as gVim, to open LARGE PTS files quickly, and then add the following header
lines.
ply
format ascii 1.0
element vertex “PLEASE CUT THE FIRST LINE OF THE PTS FILE AND PASTE IT HERE, THIS IS THE VERTEX COUNT RECORDED IN THE PTS FILES”
property float x
property float y
property float z
property uchar intensity
property uchar red
property uchar green
property uchar blue
end_header
Then simply save the file as a .ply …import and now you have all the colors
from your registered pointcloud.
Hi carbon2,
Amazing add-on. You should be very proud!
I create/use large dense point cloud scenes that I hope to be able to render/animate in Cycles/Eevee which will contain other models/objects. Blender keeps crashing after attempting to Convert. Do you have any suggestions of which settings to use in your add-ob to avoid the crash.
Sorry for the late reply. The scene I am working on now has 32.7m points. That was after I subsampled it down… from 500m+
I have tried all the instances and they all crash. (i7 processor with 32g ram)
Its crazy that the viewport renders the point cloud really nicely, and when you create and add primitives or other objects, they place perfectly in the scene, but thats where the magic stops (for me)
i guess you went out of memory, 33m is too much. in cubes it is mesh with 33 * 10^6 * 8 = 264m vertices, try with 5m for start, and try converting to particles, you can change instanced mesh afterwards and emitter will be most basic mesh while keeping point orientation
update: 0.9.28 clipping planes from object bounding box, faster all numpy export, many minor fixes
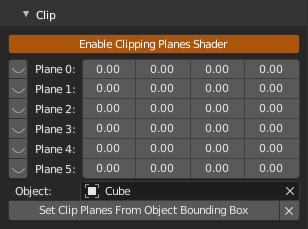
Clip
Shader with 6 clipping planes. Planes can be enabled/disabled independently with eye icon, first 3 values are plane normal (x, y, z), last value is plane distance from origin. These can be set from different object bounding box, choose object from scene in Object and hit Set Clip Planes From Object Bounding Box, object can then be hidden/deleted, set values will stay until operator is executed again. X reset all the settings to their defaults.
Still becoming more and more grateful for this addon. So many great ways to visualize the data. It’s so lovely, it’s motivating me to go back and review some old pointcloud tests.
Request:
Currently I can key/animate the Alpha attribute, but not the Display value. Rather, it keys, but it does not update the viewport till the value is manually tweaked.
If the Display attribute was animatable, I’d be using it… for sure. It does a good job of illustrating the density of a point cloud.
Also, having the size value going to zero would be handy, but can I can fake that by animating the visibility.
On Oct 24th I am giving a talk at the Blender Conference, and will be using this tool as part of my demonstration (with proper credit, of course). Hoping to have this talk preparation wrapped up sooner, but will be able to tweak it later… closer to the conference date.
Juss saying.
Thanks again for this beautiful tool. I’m excited to be able to share it!!
i am depending on update callback in this property and as it seems, this is not called at all during animation. searching revealed it is know problem. i’ll have a look if i can do it without callback, so maybe… i’ll let you know
that’s intentional. but you can modify it to go to zero. in current version it is line 12102, change
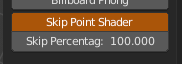
i was able to implement it, but have to test it more and rewrite all shaders, but you can use i now if you want, install fresh from repository, start blender, space (or whatever) to search for Debug Menu and set Debug Value to 1 or something non zero. then PCV will have two more panels, on Development panel, there is button called Skip Point Shader, click to enable and then Skip Percentage property works the same as Display but it is animatable, and with high point count even faster to recalculate… but it is available only for the most basic shader now…
It works! Was happen to see I could exit the debug mode and the animation stays. Can even save and exist and the hidden attribute stays keyed. (trying to minimise setup time during talk).
One last question…
I’m sure this is safe, but want to confirm with you…
Do know of a reason this might bug out over the previous version? I have control over my variables (hardware & software), and this will be the last piece I change… but have to make sure I’m not introducing anything too sketchy. So far, I’m avoiding crashes (which I’m unable to believe, really).
edit
Also, thank you!! For jumping on this and for the tech walkthrough. A good introduction to some of the processes available when coding for Blender. Neat stuff.
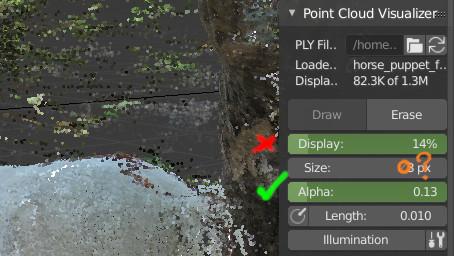
I have two models in scene and am animating the Skip Percentage attribute, which is 0-1 one one model… and 0-100 on the other one.
For example:
I’m blending one model out, while blending the other model in to the scene. Screenshot shows the scale difference as I blend one off and the other on (red using blending from 1 to 0, green is blending from 0 to 100).
i hope so, it was quick idea implementation, it’s nothing hacky, i think. it indexes all verts and moves them outside view by index, so it’s there, but it is not rasterized and drawn, so they effectively disappear, while data is not modified and performance is good, but it is all embedded in previous system which i plan to rewrite completely in future… so, it seems to work, i tried with some pretty high point counts and all good… but, be careful, test it in advance, i am not 100% confident with it…
eh, don’t understand, also screenshot seems to be missing…