Project Tuuli

Most recent update


Tuuli is a victim of my long-running project for creating better humans. This is something I've been working on on and off—more off than on—for the last year. The ultimate goal is creating a base mesh I can freely adapt to my projects.

Buckle up because this will be a long thread! This is the sort of project that takes many months to complete.

I’ll open it with some test shader renders. I’m sorry about the noise, I used a really high amount of vellus hair to check its shader (not good!) and my computer isn’t that powerful. Many mistakes were made. :joy:

Here’s an Eevee viewport render. Eventually I’ll have to get around building a decent hair shader for it. It looks particularly bad for her hair shade, to the point I darkened it to hide the issues because I’m a huge hack.


Thread Index

  1. Initial Mistakes / Hair Workflow
  2. Meniscus Trick / SSS Trick
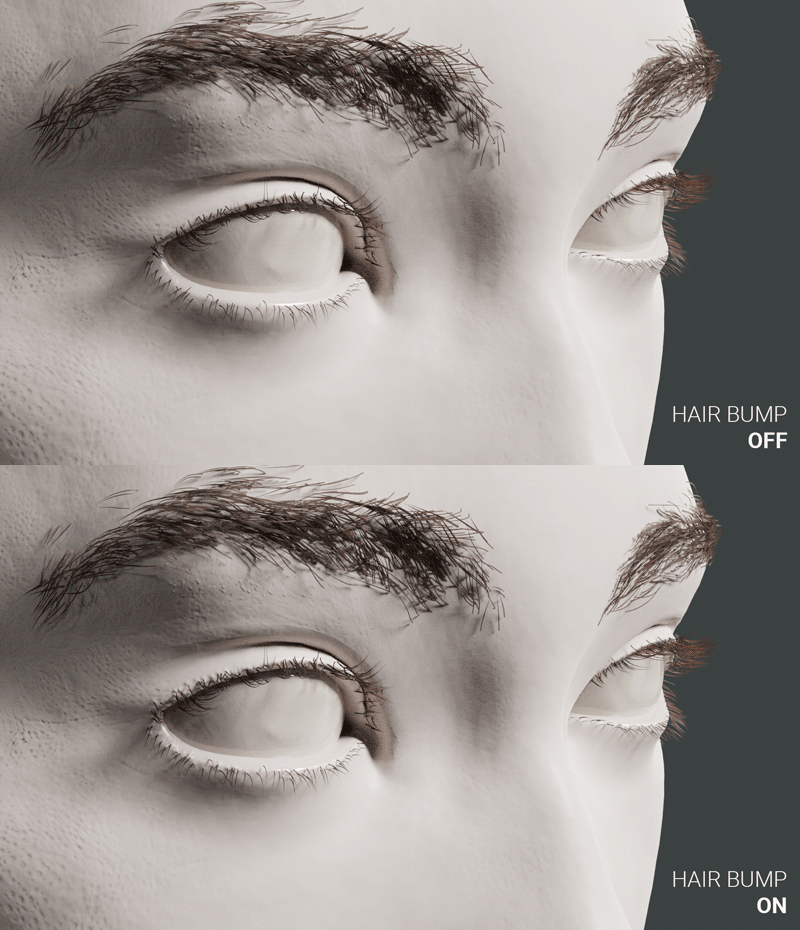
  3. Hair Follicles Bump Map
  4. Transfer combed hair between objects to fix broken systems / Replacing Hair Settings through Python / Auto-rename Hair Modifiers
  5. Shaping the Mouth
Thumbnail
5 Likes

Initial Mistakes

I didn’t get around doing serious anatomy work yet, but I wanted a good face to use as a starting point to test a couple of things. In the beginning I used multires to store sculpts of individual characteristics like cheek structure. Big mistake. You can’t really port it to different characters, revert parts of it to the base mesh or freely mix and match features.

Eventually I switched to Shape Keys. It solved most issues, but it can’t fully foolproof the process against errors caused by what’s between the chair and the keyboard. I kept accidentally introducing asymmetrical changes to the model to the point I wrote an addon to quickly fix those, and… uh… I forgot to turn off a Smooth Corrective modifier.

I kept trying to do sharper plane transitions but they just wouldn’t take! Such a puzzling mystery, until I decided review the modifiers.

Oops.

First tip: Maybe turn off all smoothing modifiers before starting?

I any case I have some edge loop reconfiguration to do in the future. Topology and characterization aren’t my focus right now, but just so you know what I’m aiming at with Tuuli and couldn’t because I don’t have the right topology and did the smoothing mistake thing.

Hair Workflow

You’ll notice there are some hairline changes too. My second mistake was to forget about some annoying hair particles limitations.

With a not great computer, I always use multiple hair layers to fill in the hair. I do the bare minimum of 2 layers, but I like to work with 4.

  1. The first layer uses thicker hair. It establishes the overall shape and direction, and tries to cover as much scalp as possible.
  2. The second layer is made of thinner, closer to real-life hair. It’s here to shape the hairline and give the hairstyle a better texture.
  3. The third layer is compromised of stray hairs for added realism. This layer uses no children particles.
  4. The fourth layer is baby hair—the new growth of hair seen in the hairline. It’s thinner and more annoying to style, so I used very little for this version of Tuuli.

My error was forgetting you can’t easily change the hair particle settings once combing the hair. I thought myself very clever when I duplicated the first layer to create the second while taking advantage of the combing I already did through interpolation, forgetting this would force me to use the same particle parameters of the original ones, including thickness. :roll_eyes:

In the end I settled with an average thickness that made the outer layer thicker than I’d like and the first thinner, requiring more children to fill in the hair. I’ll likely write an addon later just to duplicate systems with unlinked settings so I don’t ever have to deal with this again.

In my workflow I also paint the scalp after styling the hair to hide gaps in the hair mass. I use two layers, one desaturated and lighter than the skin color to emulate real-life scalp, then a second one to actually hide the holes. I had to tone down the desaturated layer in this version due the mentioned hair woes.

4 Likes

Still in the spirit of showing a bit of what I’ve done so far before proceeding to the good part…There’s something you need to know about me: I’m the queen of the dirty hacks!

If I had to name two things that can bother the living fuck out of me in a render it’s waxy skin and abrupt eyeball to eyelid transitions. They’re the sort of jarring hiccup that keeps drawing my eyes, what’s not nice when you’re trying to get work done. But in a WIP subject to constant changes addressing those only to remake them again and again to keep up with the changes is not worth the trouble. So just like the hair layers trick, I’ve been resorting to quick hack solutions which work just well enough these things stop hijacking my focus.

Meniscus Trick

Meniscus is the name of the tear layer sitting between your eyeballs and eyelids. The sharp material transition caused by the absence of it—which is often paired with a snow white sclera—is a dead giveaway something is a 3D render.

So I came up with a quick way to generate a new meniscus mesh when doing drastic changes to the eye: Knife Intersect > Skin Modifier. I wrote a script for that and now doing this is a one-click task.

It looks pretty bad at close range because the geometry is off and it has barely any alpha, however it’s enough from a distance I’m no longer creeped out by overly-dry 3D stares.

I think I might be able to use this same strategy to shape the initial meniscus edge loop when I get around creating the real mesh.

SSS Trick

Accidental waxy skin is a prevalent mistake in renders, so much I prefer to rather look at something with too little SSS than too much SSS by now. I suspect most people having issues with this are not using maps or don’t quite understand how makeup works. Yep. Makeup.

Makeup is way more than heavy eyeshadow and red lipstick, and most CG women are representations of what you look like with makeup on. Eyelids that would clearly have gone through at least foundation, concealer and setting powder applications yet are highly translucent are very uncanny-valley because makeup layers have the effect of making skin more opaque. This makes it easier to get away with less SSS than excessive SSS in those areas. You’d also see reduced opacity in the face in general due the same layers of makeup. Even cream makeup, which tends to have a lighter coverage, causes increased opacity.

You don’t need to become an expert in makeup to train your eye to recognize these changes, just go ahead and google “clean face makeup tutorial”, watch a couple of makeup tutorials and take note of how the layers affect the appearance of the skin, paying particular attention to details such as the SSS difference between ears and face before and after the makeup is done. You don’t need even to turn the audio on, just look at it with a critical eye.

I feel these SSS variations are the key to a good skin shader, being so important you don’t need to get them exactly right to make it already start working, you just need to have some variation going on.

With this in mind I tried a way to swiftly generate a fake map that would break the SSS uniformity: Pointiness. Then I painted a rough mask to attenuate it on areas I don’t want all lit up, taking care with eyelids in particular since the pointiness makes them too translucent.

I did a really aggressive masking this first round due the added bonus of it leading to faster renders, because the next thing I’ll tackle is a universal base skintone node setup, followed by a decent eye shader.

This wraps up what I’ve done so far. The skin albedo was painted on Blender, the displacement and normal maps are a test done on Substance Painter. They use displacement/normal maps created from real scans from faces, but unfortunately the page where they were available for download seems to have been taken down. I’ll share the url if I ever manage to find it again.

4 Likes

I had a sudden idea for a way to create a tiny detail which can add a lot of realism to the skin and I couldn’t wait to try it out, so here I am playing with Blender at one in morning.

Hair Follicles Bump Map

Hair doesn’t just spring out of the skin, it comes out of follicles, right? Sometimes they’ll look like indents, other they’ll present like tiny bumps. That’s pretty noticeable in eyelids.

I was wondering how I could generate a map for it based on actual hair particles, and it dawned on me it’d be the perfect opportunity to try out the Vertex Weight Proximity modifier. Worked like a charm!

hairbump_demo

First I converted the eyelashes particle systems to meshes and merged them. One thing I’ll likely be doing later is duplicating these systems and deleting all keys but the root beforehand so the modifier doesn’t accidentally pick up the shaft of the hair.

I duplicated her body mesh, deleted everything but the eyelids then subdivided the hell out of it. Since the modifier uses vertex groups you’ll need a dense mesh for this. I set up the receiving vertex group, added the modifier and pointed it to the eyelashes mesh, tweaked the settings to get a tiny radius then previewed with a displacement modifier.

I applied the modifiers when satisfied. From there you can turn the Vertex Weight into Vertex Colors using this script and either use it straight away or bake it.

Now you know how to create goosebumps from hair particles! I’m sure will be an invaluable addition to your skillset. :joy:

5 Likes

You obviously have a lot of experience in Blender. One critique though, her face looks fuzzy to me, like peach fuzz over her whole face. I know you talked about makeup and SSS, not wanting to go overboard on that, but this fuzziness is throwing me. I think the skin should have a bit more specular highlights too, using a texture map. Maybe the bumpiness is too much. Could you modify this so that distance from the camera is a factor? Faces are extremely difficult. Small details can make or break the realism.

3 Likes

Great job on the eyebrows and eyelashes!

2 Likes

Holy cow, I really love her look! You’re doing quite unconventional things to achieve realism, and I enjoy it! It’d be great to have small short videos on those specific things you’ve done. I can’t wait to see more updates to her, even if it takes months.

1 Like

@TheAsianGuy_LOL Thank you, I’m glad you like it!

I’ve repeatedly flirted with the idea of doing short videos showing obscure tricks, but clear, concise tutorials take way more time to produce than it looks like. I feel such time would be better invested learning and creating things. Maybe in the future? For now I hope my mistakes and little snippets are helpful enough. :slight_smile:

@bstaub Thanks! They’re transferred from a previous version, so they’re partially sliding off her face. I actually revamped the eyelashes between post #3 and #4 to do the hair bump test and I’ll do another pass later, but didn’t touch the eyebrows yet.

The eyebrows use the basic thicker + thinner particle hair combo, and a slightly different shader setup with mixed diffuse to make them more matte.

One change 2.8 brought to my workflow is using Annotations to plan eyebrows and hairlines.

Saves a lot of time!

@Spaceboy64 Thanks for the thoughtful feedback, you’re spot on!

It’s weird to be called “experienced”. I’m not sure if I have earned this right yet, just wait to see the glaring omissions in my 3d knowledge. :sweat_smile:

About the skin shader, rest assured I’m rebuilding it from scratch. This is a test pass to figure the best way to apply skin scans, etc. There’s not really a roughness map for it now, it’s derived from the height map.

You’re absolutely right about the vellus hair, I did use a higher than average amount trying to understand what’s wrong with its shader. It gets either too opaque, too noisy or velvet-ish due the offset. While the velvet-like version is the best so far (it’s the one in the render), it’s still bad.

This is evident on the chin:

I’d love some tips if you have any!

My intended skin roadmap is:

  1. Finish node setup of base skin tone picker.
  2. Sculpt wrinkles for baking (I hated the painted-on wrinkles!).
  3. Interlude for topology changes, leading to UV changes. May switch from single UV to UDIMs too.
  4. Paint new maps. New albedo with independent flush maps etc; new height map; new normal… new everything! Plus missing maps like actual roughness and SSS.


In the meanwhile, a tiny update in preparation for the shaders overhaul.

She has caruncles now! I just snapped them to the faces of the surrounding geometry at the moment, but sooner or later I’ll have to figure whether I should merge them to the body mesh (sharing edges) or keep them detached, like eyeballs.

My first instinct is to merge every edge loop I can, building solid meshes, but I don’t think it’ll be a good idea here. Caruncles are a fold of tissue connected only to the inner corner of the eye, being independent from upper and lower eyelids. I feel that trying to make it part of the body mesh would make animating hell. What do you think?

  • Connect caruncles to body
  • Keep detached
  • Other

0 voters

Also, new eyeballs. The previous setup had a cornea mesh over an sclera+iris eyeball, forcing me to go out of the way to keep the cornea from casting shadows on the sclera. I’ll be trying a cornea (lens, actually) + sclera mesh and separate irises this time—and reverting to the classic setup for game engine exports shouldn’t too hard.

This was the perfect opportunity to reshape the lens as well. I was too afraid of deviating from a sphere the first time! I’ll sculpt some irises this weekend if life doesn’t get in the way.

2 Likes

I would keep the caruncles separate for the control and not having to with mesh issues.

And it’s ok for the videos. I learn better by seeing it done than just words. But I can still experiment with what I can. As the intended skin map, are you going to do animation or face rig? It’d be awesome to see how those wrinkles and creases can be applied for expressions.

@TheAsianGuy_LOL Yeah, it looks like shared edges would make animating it hell. It’s easier to figure something about skin <> caruncle texture transition if it comes to it.

I’m going to rig the face. I want to work with tension maps or something similar too, but I have yet to try it. And despite having rigged a fair number of limbs, jaws/eyes and weird inanimate objects this will be my first expression rig. Wish me luck!


Since texturing requires being able to open and close eyes I’m fiddling with them, getting a bit carried away in the process. New test: Corneal… bulge dynamics? No idea what’s this supposed to be called.

(Ignore the caruncle clipping, it needs correction after the cornea reshape)

Found two ways to do the bulge, however both use deformation-type modifiers so they’re terribly slow. I need to think this over if I ever want to make this compatible with game engines.

Oh, and a funny (if not common) accident. I’m sure there must be some Junji Ito story out there about hair coming out of your mouth!

By now I’m almost 100% sure I’ll move hair and eyebrows to separate meshes to make them interchangeable between characters while avoiding this.

3 Likes

Ok! Good luck with the caruncle and face rig! :smile:

For the eye movement, have you seen Chris Jones’s non-linear shape keys for his face rig? It might be useful. He has a simple Blender file demo on the 588th post: https://blenderartists.org/t/human-progress/1143224/623

And lol, the hair glitch. :joy:

1 Like

@TheAsianGuy_LOL Wow, this is perfect! I just concluded I’d have to juggle a bunch of shape keys to do this—and at least blinking too because rigging alone isn’t convincing without a ridiculous amount of bones—and this method is exactly what I needed to coordinate them.

I’m a bit short on time right now but I can’t wait to try this. Thanks for pointing me into the right direction!

1 Like

Oh wow, I see what you mean. Same problem I was having. Very bizarre. What was the thing that caused this?

I took off her eyeballs.

…okay, that came out wrong. *ahem*

Anyway, I might have done a destructive symmmetrize at some point too since her hair fell off on the X axis. It’s so easy to break particle systems I no longer avoid it. Just keep a backup version with a working one to retransfer it and you’ll be fine.

In the spirit of keeping issues from piling up too high I did the retransfer already—and took screenshots to show the process. In this case I moved the hair to a separate mesh, but it can be done to identical meshes without issues.

Also in this post a bonus python snippet to swap the settings of an already combed system + a script to automatically rename the particle modifiers to the system’s name.

Transfer combed hair between objects to fix broken systems

Requirements: A source mesh with a working particle system and geometry similar to the target mesh.

  1. Systems with “Use Modifier Stack” may look wrong, so adjust the modifier order and settings so the particle looks right on the source mesh.

    If your meshes have Shape Keys, select the Basis key and activate the Shape Key Lock. Make sure target and source overlap well.

  2. Disconnect Hair of every system you’ll transfer. It’s important to do this in Object Mode, never in Hair or Edit modes.

    Tip: To discover whether this trick will work for this particular hair system you can reconnect the hair before disconnecting again. If the hair system breaks, then it’ll fail. Double check your moodifiers and shape keys, but your best hope is using addons to convert them to curves and reconvert to particle systems targeting the new mesh.

  3. Select the target object, making sure the source is the active one. Either Copy Active to Selected Objects or Copy All to Selected Objects. Copying all will erase other existing systems from target.

  4. Connect Hair on the target object. If things look wrong, double-check if modifiers are in the correct order. The hair will possibly puff up and slide a bit out of place, but it usually doesn’t slide too far, being quick to fix in Hair Edit mode.

Random Tips: You can make incompatible geometry—eg meshes that don’t have the same scalp shape—temporarily compatible just for the transfer by using modifiers like Shrinkwrap and Surface Deform. :wink:

Avoid Use Modifier Stack like plague. It’s evil!

Replacing Hair Settings through Python

You may remember from post #2 that I did something stupid with particle systems and ended stuck with one with the wrong hair shape. Given I’m already fixing hair issues, I fixed this one too.

It’s pretty easy!

  1. Create a particle system with the correct settings.

  2. With the object containing the system activated, use the following snippet in the Python Console to switch the settings of the other system, replacing PSYSTEM_NAME with the target system and SETTINGS_NAME with the new settings name.

bpy.context.active_object.particle_systems['PSYSTEM_NAME'].settings = bpy.data.particles['SETTINGS_NAME']

Caveat: Only settings like children, material, hair shape will be modified. The original hair number, length and similar properties which can be changed through combing won’t suffer any alteration. I consider this a plus!

Auto-rename Hair Modifiers

“ParticleSettings.(numbers)” isn’t very descriptive and I don’t like messy modifiers, so here’s a python script to rename them:

# Script to auto-rename particle system modifiers

import bpy

obj = bpy.context.active_object
particle_mods = (psys for psys in obj.modifiers if psys.type == 'PARTICLE_SYSTEM')

for mod in particle_mods:
    mod.name = mod.particle_system.name
3 Likes

I’ve made some progress on Tuuli since the last update, but great part of it entails researching, improving the pipeline, and laying the groundwork in general to ensure the effort invested pays off. Plus I have to admit I’m not looking forward to rendering what I’ve done on the skin because will take ages given it’s not baked down in proper maps yet, haha.

So here’s something I posted on another thread that may be useful for artists working on humans: A pouting lips sculpt!


One mistake that crops up a lot on modeling are lips which are consistently anatomically incorrect—and I recognize the irony of posting about it when Tuuli’s lips got flattened in the first retopo pass, but… :joy:

I suspect this happens because artists without a strong anatomy foundation see lips as something pasted on the face instead of integral part of the structure of the mouth. The fuller the lips more glaring are the issues caused by this way of rationalizing their shape.

![lips__ini|690x371]

Lips transitioning straight to the chin and lacking any volume underneath to support them, mouths with botox-worthy sharp borders all over them, and upper lips which don’t sit right over lower lips are tells the artist has an incorrect understanding of lips, seeing them as something attached to the face.

All of these issues can be avoided if you try to see lips as the inner lining of the mouth being pulled outward. Yeah, icky, but hear me out:

It’s easy to construct a natural-looking mouth when modelling it to look like if it was pulled from the inside. All the correct features happen by default, without any extra effort from your part.

This is not a multires sculpting guide, mind you, because it creates crappy loops; this is a “framework to see the world” guide. :wink:

But that’s not all. Under every lip there’s teeth, so unless you’re going for a toothless look you need to take their existence into consideration. It’s teeth what creates a slightly mound on the region of the face lips sit on. They push the mouth forward. Vertically tall lips which should look full but have a pretty flat Y depth on a face that doesn’t curve enough to accommodate the volume created by teeth are unnatural.

I hope this helps and remember, kids: Lips are your mouth inside out. Here are some extra views of the disembodied creepy mouth.

3 Likes

Ah nice! And it seems the new brushes in 2/83 and even 2.9 would make this even easier to make too.

Also, it seems that if one is able to sculpt an entire head from flat sheets like the above, it’ll also make realistic eye areas and ears too.

1 Like

I’m late for the sculpting party! While people are raving about the latest improvements I’m still exploring the post-2.79 features. :smile:

I really like the elastic deform brush but couldn’t figure yet how properly control what’s grabbed. It kinda just ignored the auto masking and kept pulling the opposite lip when I was working on that demo, and manual masking didn’t go very well, creating seams. Changing the deformation type helps to attenuate it, but I couldn’t make the issue go completely away.

Oh, and I love the multi-plane scrape. This is the scrape brush I’ve been dreaming about!

My experience overall was really positive. Sculpting on Blender used to be impossible here. The performance difference is amazing! I still didn’t manage to do really dense work on big meshes like pores work on a full body, but some tests showed it might work if I do it by body parts.

1 Like

Hey guys, it’s been a while, hasn’t it? I’ve had been drowning in work in recent weeks (what’s great!), only being able to sneak out to work more on this project between commissions. I got quite number of small tasks done actually, but only got around to rendering things I need to show to other people.

New skin shader progress

The new shader uses procedural maps for the albedo blended through hand-painted masks. No roughness map yet, sorry. I’ve got some considerations on the viability of this method in a production environment at the end of the post.

(Albedo only)

Hair

I’m done tweaking the hair after the transfer to the skullcap. Hair styling is fun enough might have gone a bit overboard here! I hope to only revisit it once I get around doing more hairstyles for a portfolio piece or after fixing her topology—whatever comes first—, as the hair might slide a bit out of place anyway. The intersections and shitty baby hair combing are here to stay for the time being!

Key takeaways

  • Image textures > Procedural textures for performance

    I went through some nasty crashes before baking down the procedurals for masking, and her skin doesn’t even have all the color layers it’s supposed to have yet. For rendering nothing beats baking everything into a single albedo map.

    Regarding procedurals for texturing: I like the result, the infinte combinations and how it took way less fiddling with brushes to achieve good base textures. I can see myself fully incorporating this into my regular workflow.

  • Multires > Displacement

    This includes bump only displacement. It’s not only better looking, displacement was pretty noisy and slow for some reason. The performance difference between a lvl 5 multires and a 4k displacement png map was absurd!

  • Sculpting in Blender is great! Sculpting in Blender is awful!

    I like the tools. I kinda like the interface. I wish it could handle more polys. But the real deal-breaker are the lack of layers and a way to erase the sculpt back to the base, plus the occasional horrifying undo-provoked glitch. Sculpting works well for nailing down bigger shapes or adding details to small, isolated models, but unfortunately I can’t see myself using it in production yet.

    I tried really hard to find creative workarounds, but really, devoting more time trying to overcome limitations instead of actually working is just unsustainable in the long run.

2 Likes

Hey! Any update on this? There’s some interesting updates in 3.3 that might grab your attention :slight_smile: