I’ve got a camera move exported from Syntheyes that matches some footage I’ve shot for a short film.
The problem is, I’ve sped up PART of that footage in After Effects, looks great, but how to get the solved camera in Blender to match up with that footage? I have a curve from After Effects that I’ve applied to the x coordinate of a plane (just somewhere to put it…) so for any given frame in Blender, the plane’s x-coordinate tells what frame that displays AFTER the time remapping (so for example, the new camera’s position at frame 44 must be that of the old camera’s position at frame 49.48157)
I’m not new to programming, but I have never written any code for Blender before and I find it perplexing as to how anybody gets into this. Maybe I’m just not looking in the right places, but I can’t for the life of me find ANY sort of up-to-date reference for what can be used in expressions.
Anyways, what I need is an expression that sets the position of a camera “new camera” to the position of the camera “old camera” at a frame/time x where x is equal to the plane’s x-coordinate at the current time.
In After Effects, one would simply say something like thisComp.layer(“ImALayer”).transform.position.valueAtTime(time)[0]; I can’t find any such function in Blender (nor did I expect to, but I didn’t think I’d have THIS hard of a time adjusting).
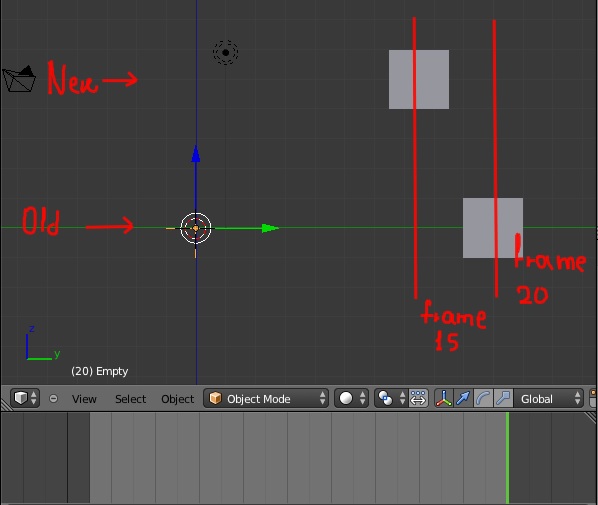
In example let’s say that in 20 frames cube travels 10 units.
If I want to remap the time so the cube can travel 10 units in 15 frames then I will have to find an analogy. 15/20 = 0,75
So that means than if I multiply the position of cube with this analogy then at frame 15 I will have reached the exact required position.
Analogy of 44 divided by 49,48157 is 0,8892199661409288, so the position of new object is old value multiplied by the analogy. I am not sure if this goes well but the experiment I did went good.
Oh but the time remapping isn’t to be just some constant factor applied to it. The clip starts at regular speed, then speeds up slightly for about a half second, then slows down again to regular speed. It doesn’t instantly speed up or slow down either.
The source frame is represented by the plane’s x-coordinate, and when graphed, this does not result in a straight line, thus it’s more complex than simply multiplying the current frame by some factor.
Also, I’m well aware of the math behind it. The problem is PURELY how to write this in Python in Blender.
Yeah it’s a bit more complex than that. Well here’s my ideas in order of easiest / most naive to more complex / more realistic.
Can you just render it as is and change the time mapping in After Effects?
The camera position needs to be obtained from the position of camera1 at a future frame, which means you would need a function that uses that uses that ipo information, I don’t know if such a function exists, probably does though. If you were going the other way (slowing down) then the postion would already have been obtained and you could keep track of it and use that position in real time at the current frame to reposition camera2.
Basically you have the script keep track of the camera1 position for every frame, and you run the animation. You have the equivalent of an array camera1pos[frame] as a global variable. The second time you run the animation you use that data to position camera2, using your x value from the plane. Problem is of course that you’ll need to interpolate the values as they won’t be integers, which won’t be that hard.
I’m honestly a bit out of my league here, but I have written similar driver scripts. It would be easy if there was a method getPos(float frame) and getRotation(float frame) maybe a real coder here knows. Also tell me why #1 won’t work, as you would have tried it.
I suggest that you do a new video tracking based on the processed video because it’s time consuming. I guess that within three hours your new video tracking will be ready to do in respect to the production pipeline of course.
Exactly! That’s what I’ve been trying to figure out is how to get the value at a certain time through the IPO curve. I know there’s an evaluate(time) function for fCurves, but I can’t figure out how to get to the fcurve through the actions, through the camera object. This is extremely frustrating…
Look, I appreciate that you’re trying to help, but you NEVER EVER EVER NEVER track processed video if you want accurate results. This shot was extremely time consuming to track in the first place because of low-lighting, motion blur, lens distortion, and few features to track. That, coupled with the resampling of the image for the stabilization that I’ve applied to it (repainted the edges by hand, took FOREVER!) means the image quality is degraded even further… not talking about compression, just the slight blurring that results from resampling.
But a better reason to not do it again is the fact that when you time remap something, you’re not REALLY slowing down the footage, you’re just distorting what you have to make it LOOK like it’s been slowed down… I mean yea, it obviously plays back over a longer duration, but where do those extra frames come from? They come from warping the image so it interpolates from one frame to the next. While it may look fine to us, it won’t “look” fine to the computer anymore. Yea, it’ll probably solve, but probably won’t be a decent match.
But I shouldn’t have to! The data is RIGHT THERE, I just need to compress the time! Also, it doesn’t help at ALL that the ONLY feedback I get is “invalid python expression”. Whoa! No kidding?
Oh dude you are kidding me, I just figured it out too. Well the hell with it I’m posting my solution too, as it has been rewritten as a function somebody might want. It’s roundabout, hacky and most copied from Atom, (credit given in the script, and again thanks Atom) but here it is:
1)Create an empty and keyframe some x rotation on 1st and last frame.
2) Create a dummy driver for it’s y rotation, which will fire every frame
3) Create a var in the driver for the x location of the plane containing frame data and pass that into a script
4) Pass that x location (frame) into a function I rewrote from Atom called getPositionAtFrame(objectname,frame,infotype) where infotype is “loc”,“rot"or"scale”)
5) Copy the loc, rot and scale to camera2.