JA12 Thanks for pointing that out about the wing. I wasn’t happy with it as well. So I re did it from a different file that I had saved. I appreciate your comment it did give me time to think about that wing. Thank you
Photox Thank you I noticed that with the third bone/finger I didn’t extrude it so I added another loop and I was able to get it to work.
http://www.pasteall.org/blend/30554 I hope I am ready for the sculpting now. Please answer about the multires and that one blend swap brush for the scales. Thanks so very much. I am learning a lot from this.
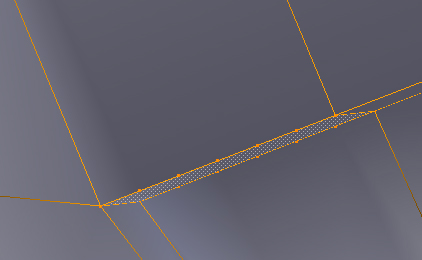
You can’t sculpt yet. Once you begin multires sculpting you cannot change the underlying geometry of the base mesh. Cannot be done. I mean you can, blender will let you, but the results be very frustrating. You have cleaned up the topology a lot, but you are kind sweeping all the dust into the corner on the wings. You still have these n-gons with 14 verts.
Take a good long look at JA12’s previous post.
Here is possible way to fix the n-gon issue. I have cleaned up the outside, and left the back deleted, they are virtually identical topologies. I’m not saying this is good clean topology, It’s just a cleaned up version of what was there.
You still have 2 ngons under mouth. Select->faces by sides, ‘not equal to 4’ Hint: delete the faces, and add a loop cut(s) below them.
Cross the sculpting bridge when you get to it. You wanted a dragon, so you’re stuck making a dragon basemesh. You know you could have modeled a wine glass. :eyebrowlift: It’s always better to take on a project that stretches your skills. Keep banging on this until until all quads, and the shading looks smooth.
Photox
Not sure if correct but is it close enough to be able to go on with this. The two n-gon under mouth is that inside the mouth or on outside cause I don’t see it…
It’s close, but you still have n-gons. Open your tools panel (hit t) from the menu at the bottom choose, select ‘faces by sides’ and change the number of 4, and the dropdown to ‘not equal to’ and it will show you all non quads. There should be none.
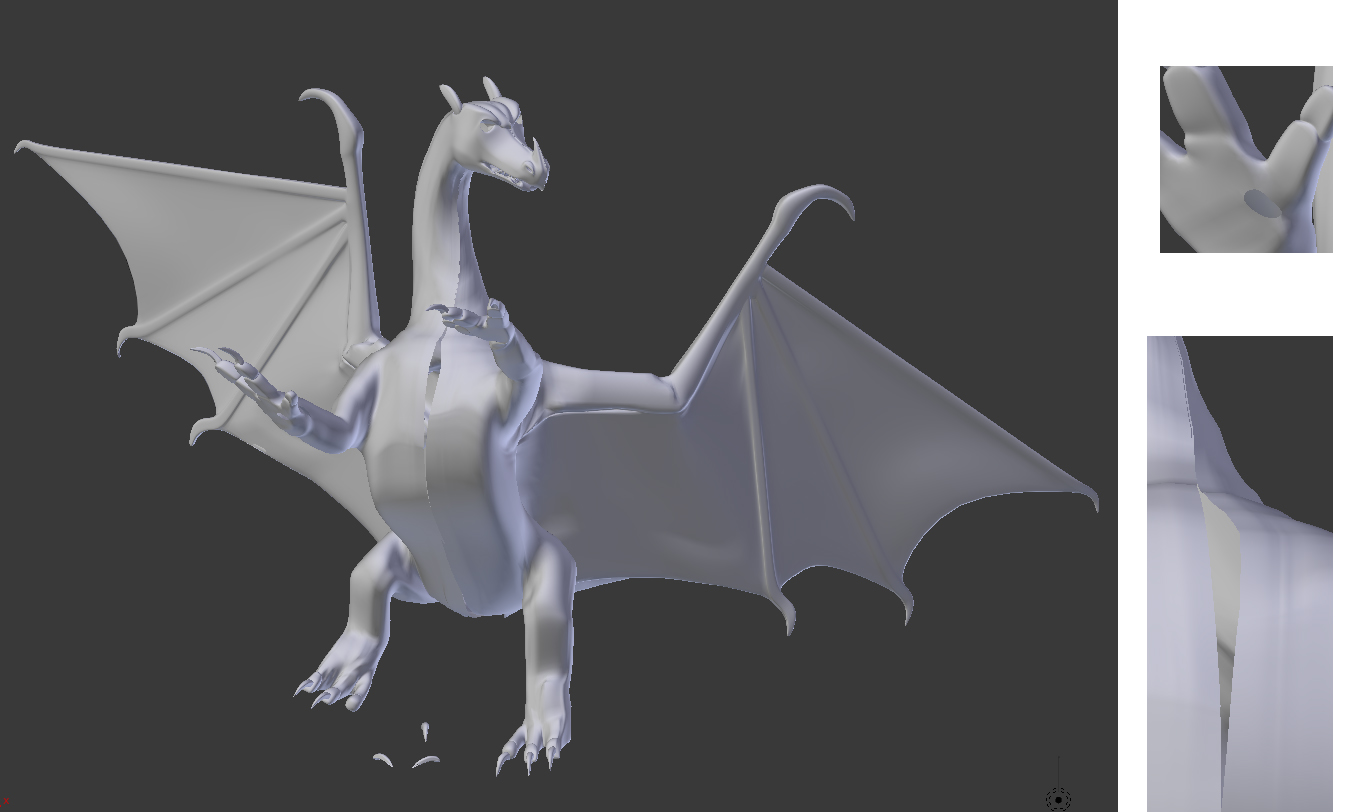
Nope. I applied the mirror and threw on a simple rig to see where she stands, and it’s halfway there. You still have faces missing under the front feet. The mirror is not clipping properly at the seems. You need to select the center (x=0) loops and move them until that snap, clipped at x=0. Otherwise the belly will tear open like my screenshot. Also your solution to fixing the ngons was to add several super tight loop cuts which run down the tail, you did fix one problem but have created another.
The good news is that overall the rig deformations are decent, but there’s still quite a bit more to do. I sense you are getting impatient. Why don’t you spell out your ultimate goal. You could take a fork in the road and work on some renders with procedural shaders like glass or plastic, it can be a fun way to get out of the nitty gritty of vert pushing and work on the art of the piece. The shaders can often to be reused later in the project, or in other projects. Cycles in certainly capable of producing renders nearly identical to the glass one I did earlier.
Photox I went ahead and selected the center vertices on the neck and I made the selection holding down the ctrl key and moved towards the center and it just bunched it up. So I wonder if I am doing it correctly. I followed these instructions http://wiki.blender.org/index.php/Doc:2.4/Tutorials/Modeling/Meshes/Snap_to_Mesh
Also your solution to fixing the ngons was to add several super tight loop cuts which run down the tail, you did fix one problem but have created another.
What do you mean by this?
I thought about what you said about experiementing with the art of the piece and that sounds like a great idea. So I will try it with the glass like what you had done and other different shaders. I will look for some tutorials on that. That will help me to relax a bit and work on something different with this dragon.
My goal is to make it fly, walk, & blow fire. I want it in a game that I plan to do. I know I have alot to do and I am not going to give up on this project yet.
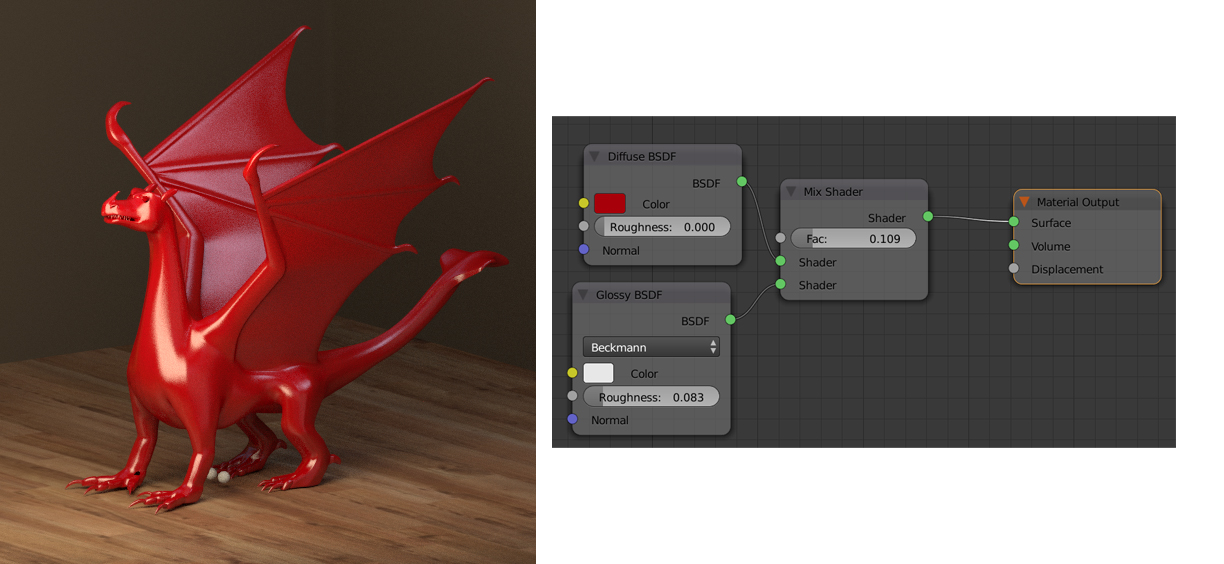
Take a little break from modeling and do some materials. Seeing your model come to like in a render can be a lot of fun. Cycles is the name of the renderer that is built in to blender and is used (primarily) for realistic rendering. Here’s a little test scene of a cheap wooden floor (cgtextures) and there is an environmental lighting image (a low res jpeg, not an hdri) fromsibl
The hdri preview image gives you reflections in your glossy materials when you don’t have a large scene around it. You access it in the world panel.
The node editor is where you create these materials. I have it open in the top right window in the blend. You can make any panel turn into fullscreen by hovering your mouse within it and htiting shift-space. Hit shift-space to get back out to regular layout.
It’s super basic designed for experimentation. Change the material on the dragon to the glass shader if you like. The mix shader node is at the heart of many shader and is used to combine two different shaders. In your case it’s a dark red diffuse, mixed in with 10% glossy, with a roughness of ~.08 (0 roughness is a perfect mirror) This is the most basic glossy mix possible, often times you will use fresnal as the mix factor.
Just open it up and do a viewport render: (it will improve over time as more samples are processed)
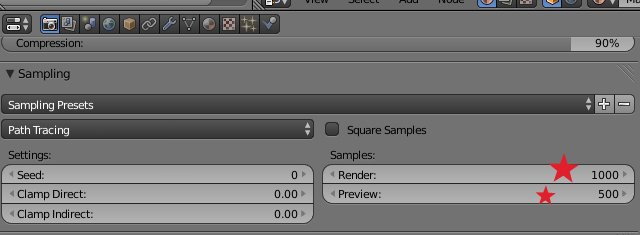
You can probably turn the samples way down to spee dthings up. I have them at 500 for viewport and 1000 for full renders. These materials are pretty quick to converge, so you can experiment and turn them down to 100, 200ish. And of course if you have a GPU video card, turn that on.
I just read this thread and your post with the triangles than can be merged into a quad just blew my mind as I have spent a week to redo an imported mesh that was triangulated… Thank you for that tip… we never know Blender enough… select two triangles and hit f is a life saving…
It’s pretty typical to figure out “a way” to do something, and then later on you realize how crazy you were to do it that way. I am constantly reading posts and realizing how ridiculous my older methods were.
You may also want to take a look at the remesh modifier
@yvesbodson2 Yes it is the best way to learn about the different ways that Blender does things. @Photox I tried the remesh modifier and it was interesting to do.
Well I have been working on trying to figure out Cycles which I didn’t do well in. I am still trying to understand that and will be working on that but for now I will do blender render.
So I wen to do the dragon in blender render. It isn’t great. I have learned more about blender but I still have
a lot to learn yet. Will it ever stop, I doubt it. I will still experiment.
I am trying to get him into an environment for dragons but I have to create that and still learning to do it in blender.
I have tried to figure out the lighting in this I have a 3 point lighting in this render which didn’t turn out that great. When I moved the light the dragon disappeared. So I had to start over with the image.
I will still work on the lighting and would like any improvements that I could use. I am going to start to rig him and I might try some sculpting. Just to see what happens. CC would be welcome
Thanks for looking
Good effort. You pretty much need to make several of these half completions before you get to the point where you can do it. Each time you pick up some new skills and hone some old ones.
 select two triangles and hit f is a life saving…