Hey,
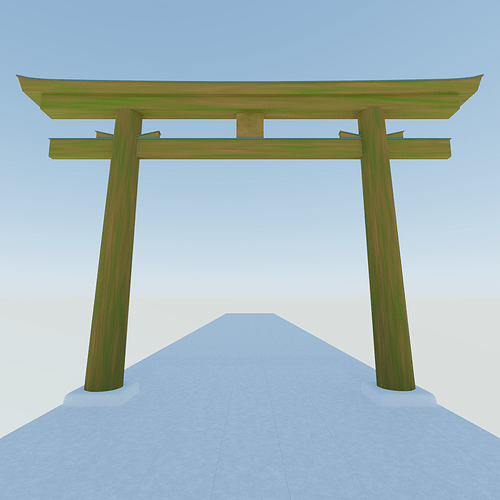
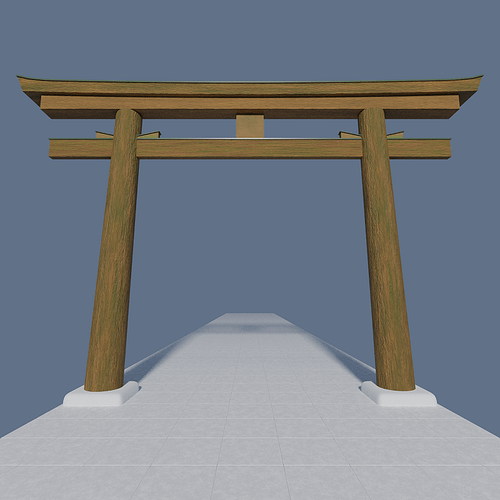
I made a japanese Torii with a wood texture that I created.
I‘m ok with the structure of the wood but when I render it it does absolutely not look realistic. I set the specular to 0 because its a very rough wood and put a light bump on it. Somebody got an idea what I could do to get a more realistic look?
Well, before anything else, while that doesn’t look remotely realistic, it looks really good if your goal isn’t realism. I really like the stark lines, the perspective, the angle. the color variation. Your render tells an actual story in the greenness of the wood. Telling stories like that is about a thousand times more important than getting any particular rendering detail right.
Now, if you want it to be realistic, hide or delete the snow, because that’s not realistic either, and change the world/background image, because that’s not realistic either. Anything unrealistic will throw you off of realism.
Okay, on to wood realism. One, a low specular value does not equal rough. A low roughness value equals rough. Principled BSDF specular. between a piece of rough wood and a piece of smooth (but unvarnished) wood, should be similar. Two, your bump is not apparent in the picture, and it needs to be for rough wood. Don’t know if this is because your texture isn’t appropriate, if your settings are inappropriate, or what. Three, lighting. This looks like an Eevee render with a flat-ish world and, maybe, a single sun lamp, if that. That isn’t really sufficient to give realistic lighting. Realistic lighting here would be a sun lamp + bounced sun and sky from the snow (very reflective!), and in Eevee, that bounce has to be simulated with lights.
May you try a Subsurface Scattering Shader (SSS-Shader) and the IOR Values for Wood . And try to use a piece of a seamless wood-photograph instead of drawing something. Materials reflect often. Try some very low reflection values.
Happy Blending
can you show nodes set up you use!
and do you have a real photo of the wood in question!
in cycles or EEVEE ?
happy bl
Turning down specular is okay, turning off is advised only in special circumstances (like shadow gaps in floorboards with lacking geometry). If is is rough, turn up roughness instead.
Try lighting with a HDRI instead of a sky texture. The sky texture is extremely flat and doesn’t bring out the shapes or bump response very well. I use sky texture a lot myself as it cleans up faster, but I’m only doing interior scenes where the HDRI variations doesn’t really bring much to the table (imo, I know others disagree). When you do use it, I recommend using a proper ground.
If using bump, temporarily use adaptive subdivision with microdisplacement instead. Whatever goes into displacement scale is what you should use for bump distance at full bump effect.
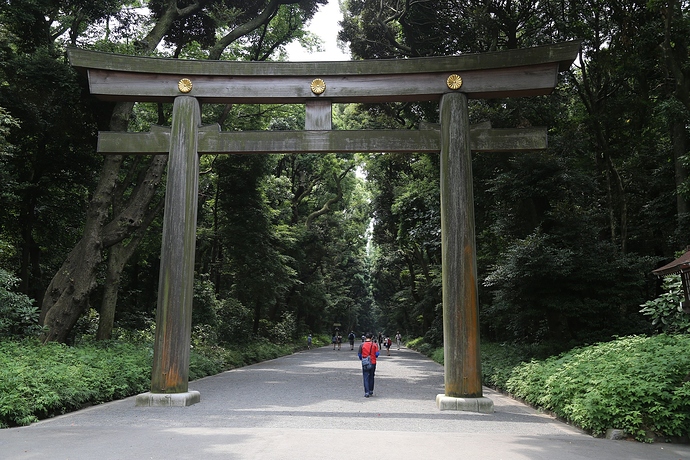
It’s hard to know how to achieve more realism, you didn’t provide a link to how a realistic one looks like.
Thank you. I didn‘t expect such helpful answers.
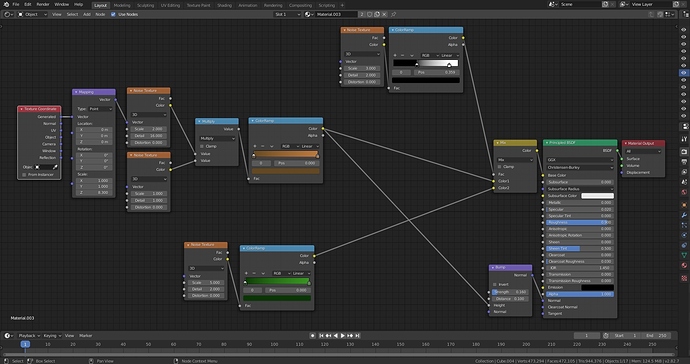
So here‘s my node setup from one of the woods. It‘s a mixed noise texture for the wood and a noise texture for the green color. If I increase the bump to strength 0.5 or 0.6 it starts to look strange. Maybe I will make it 0.3 - 0.4 and I will add some specularity. I do also need lights and a realistic background. Now it’s basically a sky texture and all the light comes from there.
have you thought of using a UV image instead
that might be more realist then a proc texture ?
what name is this type of tree called ?
happy cl
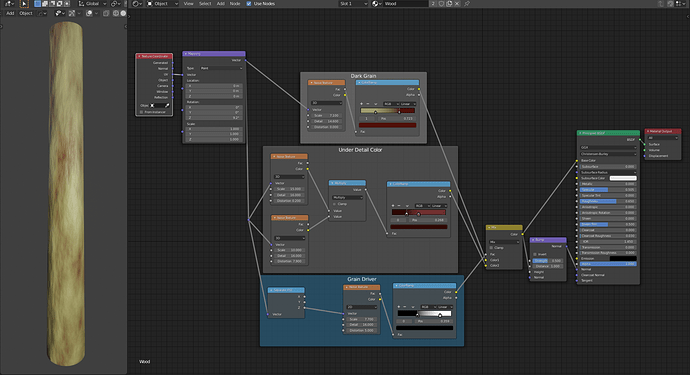
To get it as your example you would need to add a grunge map of some sort either generated or image alpha…I just went with your node tree and tweaked it a bit for a more realistic look…
and the Blend File using built-in HDRI’s wood-example.blend (633.1 KB) I emphasized the grain as well as the bump…and it is UV unwrapped so the very back has a seam.
I believe that trying to wood purely procedurally isn’t a good idea. There are some procedural techniques you can use, but they can’t approach carefully made textures. There are a wide variety of CC0 textures you could be looking at, or, you could take your own photographs and adapt them into your own textures. Right now, your procedural techniques are not remotely approaching the detail apparent in your reference, and IMO, they never will.
Working on your mesh would help some. It looks like you just have various objects kind of sticking through each other, but in the real version, the crossbeam actually passes through holes in the pillars. Modelling this and working on joins elsewhere will improve the realism.
Notice the different patterns of weathering on your reference picture. Two of the pieces look to be of a different age or different wood than the other pieces. Notice the reddish discoloration seeping up from near the ground (did there used to be an iron framework around these pieces?) I’d be willing to bet that as you walked around the real life reference, you’d see color variation depending on if you were looking at the north side of the structure or the south side, because there’s different weathering and different flora (mosses and such.)
There’s too much to realism for it to be created all procedurally. How does your computer know what’s north and what’s south? What’s sheltered from the wind and what isn’t? Using hand-painted masks to do some of this-- a “wind map”, a “moss map”-- can be really valuable (although it’s fine to use them in conjunction with some procedural effects, like to multiply a hand-painted mask with a noise texture.)
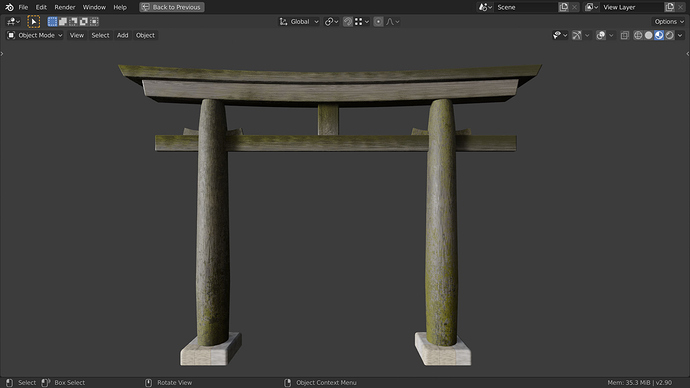
A little update - but quite not finished. I will stay with proc textures and maybe do one with a real wood texture when I‘m finished. I would like to draw a moss or wind map but don‘t know how.
Hi Ren1, your wood texture is getting better, I think it is definatly worth trying to make procedual textures. There are different ways to do the mould both procedualy and «drawing» a mask.
To draw a mask (map) first you should unwrap your model, and then you can use texture paint to draw a black and white image of where the moss grows (you could also use a colour vrs alpha image). Black has a value of zero and white a value of one. Once you have that image you can use it as a factor to mix the moss texture with the wood texture. I recommend you look at tutorials for masking textures. This method is easier to control but everything has a drawback, in this case the resolution of your texture will depend on the image.
Alternately you can do this procedualy using for example a musgrave texture as a mask, there are many ways to map this texture to your object, you do not necessarily have to unwrap the object. I also suggest you look into tutorials for texture mapping metods. I can not go into all of them as it would make my answer too long! Also the tutorials will give you better technical information than I can. Basically almost everything is possible, Blender does know where the North is! (or more exactly you can decide).
Once you have a made a mask you can also use it to control roughness and bump etc.
I see from the top of the beam you have put some specular back in to the texture, you should play with the light source to get some nice reflections now it only shows on the edge of the beam.
Keep going you will learn valuable information from this.
I often read posts on textures and try to make them myself, I am trying to learn as texturing has always been a weak point of mine.
I did not start from scratch as I already have made wood textures and mouldy drips, I just combined two textures I have in my stock.
I did use different variations of the texture for different parts, the vertical poles have mould coming down from the top and creeping up from the bottom, the sheltered beam has less mould and it grows from bottom to top, the other beams the mould drips down from the rain
Here is what I came out with, 100% procedual with blender nodes.
I am trying to inspire you not to intimidate!
I’m afraid that the node setup is an absolute mess and would not be a good example for you, I just wanted you to know its not impossible.
