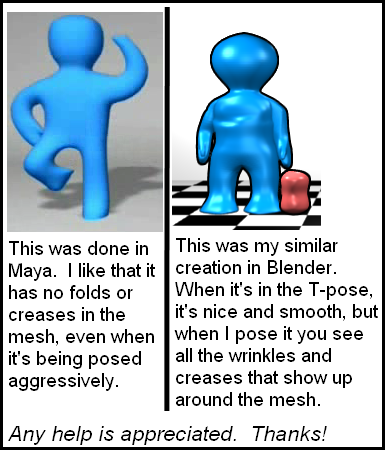
Hello, I’m doing a little animation with a simple caricature - pretty basic stuff, but I’m just a novice with 3D animation. A former co-worker of mine once did a simpler version of this animation in Maya. However, when I tried to re-create the main character in Blender, I couldn’t give it that smooth, gelatinous look. Instead, every time it was posed away from its T-shape, there are all these wrinkles and creases.
So, does anybody know of techniques I could use to make posed meshes look as wrinkle-free and smooth as the one in the picture on the left?
you have to post a wire-picture of the mesh and setup of the armature
or, if it is small the whole (compressed - check at blender-save-options) blend-file.
Such wrinkles are sometimes wanted, … if the character wears clothes …and not a tight “swim-suit”.
What does the topology of your model look like ie the the edge flow, could be a weight paint issue hard to say without relevant pics or a blend to check out
I see test-dr resopnded as I was writing this so excuse the double up.
I think you have the armature after the subsurf. try putting your armature modifier in the modifiers panel before the subdivision surface.
also the less edge loops you have the smoother it will be.
another note is that a less specular mesh doesn’t show up so many artifacts.
If all else fails you may need some more work on your weight painting
The armature is listed before the subsurf, so that isn’t the issue. (I actually just went and reversed them to see what that looked like, and I couldn’t really see any difference.)
The model is not weight-painted. It’s just a monochromatic blue. So that can’t be the issue.
I’m sure that some people do want wrinkles and creases. But obviously, they’re unwanted right here.
I reduced the specularity, as suggested by Metalix, and this definitely made it look improved. But still not as universally smooth as the previous one.
I’ve uploaded a .BLEND file for anybody who wants to take a look at it.
Really, from what I can tell, there are a few issues here:
The biggest issue is your weight painting. It looks like you did manual vertex assignment. That makes the transition of control from one bone to the next pretty harsh. If you use automatic weights (or bone heat, since you’re using 2.49b), you should get much nicer results.
You should use Quaternion deformation on your mesh. It maintains volume on deformation a lot better.
Reduce the specularity on your mesh material.
You have a lot more geometry in your mesh than is necessary. The shortcomings in your topology become much more apparent when the mesh is deformed by an armature. Is this the exact same model and topology used in the Maya example?
Your parenting is inverted. It’s not that huge of a deal, but typically the mesh should be the child of the armature; not the other way around
I’ve made some tweaks to your .blend file (though I didn’t mess with the topology of the mesh at all). You can see the result here: http://www.pasteall.org/blend/6548
With some smart adjustments to your character’s topology, you should be much closer to the result you’re looking for.
Also, I’ve moved this thread to the Animation and Rigging forum where it’s a bit better fit.
Thanks for the replies and the work. This is a totally new model from the one used in the Maya example, and that might explain a lot of it. I’m obviously just a novice with CG modeling, and so that explains any flaws in the geometry. (I’d have assumed, though, that more geometry would be better rather than worse, because that’s what subsurf does automatically. I know that some of the geometry - especially at the thumbs and the groin - is kind of screwy and imperfect, but that’s not necessarily where the problems are, anyway.)
I definitely see what you and the others meant by turning off the specularity shading. That makes it look 50% better, right there.
I did turn on quaternion deform in the Armature’s options and I trust that this’ll help. (Honestly, I don’t really know what that is, but I’ll research it.)
There was no weight painting done on the model at all. I just ascribed a blue shade to the mesh in the Materials. So I don’t totally understand how that could be a problem.
If anybody has any pointers about how the mesh could be made better (ideally, any quick techniques), that might help matters a lot, too.
Ah… we’re in a bit of terminology misunderstanding here. Weight painting has nothing to do with materials. It’s a means by which vertices can be assigned to a vertex group associated with a bone in your mesh. From the looks of things, you did this manually using the vertex groups panel (brave man! ;)). Weight painting (enabled by selecting your mesh and pressing Ctrl+Tab) gives you a somewhat more natural means of controlling how vertices are associated with bones. You have most definitely assigned weights to your vertices; you just may not have done that with weight painting.
Did you look at the adjustments I made in the .blend file I linked to?
Yeah, I definitely looked at your model and I think it looks markedly better after your changes.
I would LIKE to be able to make all those changes myself so that I learn. However, if I can’t do that, then I’ll just try to import your figure into my model.
So, with this weight painting, you used some automated method of assigning the Armature to the vertices? Can you tell me what steps I should make to make the changes?
(By the way, I can’t believe that you wrote the Blenders for Dummies book! I learned the Blender interface just by following all the steps laid out in there, one after another after another. I think it’s a genuinely excellent tutorial. Later, for some of the more complicated, task-specific things, tutorials on YouTube and stuff kind of supplanted the book. But for getting a good handle on Blender, I don’t think I could’ve possibly done better than reading your book. I had zero CG experience before that, and now I have, I think, a good working knowledge.)
To automatically assign weights, the steps are pretty straight forward. It works best when you don’t have any keyframes on your rig, but you can always push back to rest position and things should work fine so long as the mesh and the armature are in the same place. Assuming this is true, the steps are pretty easy (these steps are assuming Blender 2.4, but they’re nearly identical in 2.5):
Select the Mesh
Shift+Select the Armature
Ctrl+P->Armature->Create from Bone Heat
And you should be good to go.
As for your mesh topology, at this point, you may be better off remodeling the character or using the retopolgy tools to create a new mesh with cleaner topology. If you’d like, I could take a few minutes and cobble something together based on your original mesh so you have an idea of what direction to go. Just let me know.
(Also, thank you! I’m glad you found my book useful. :))
You made several main mistakes a lot of people do!
Too make clear what is going wrong check these things:
with your softball-like-wanted mesh in 3D-View enable the
tool-shelf! (first switch back to EDIT-SCENE-Setup not this animation style)
(the tool-shelf (enabled) then appears in the left side of the 3d-view-screen)
In the tool-shelf there is a button “Smooth” (under shading) press it
and look at your mesh. You will soon notice there are a lot of darker looking parts like the poor boy got some bad skin-cancer.
After you have noticed those shadow-coloured regions,
tab into edit-mode for the blue boy and select all (press A… maybe twice)
vertices and on the tool-shelf
press the button “Recalculate normals”.
Tab out of edit mode and check again.
Besides this, like mentioned in an earlier posting, there are some overlappings?
in the rigging, thats why the mesh is acting a bit (like jelly) pudding when moving the bones.
and … hokus-pokus … the bad skin-cancer is gone.
ps. forgot, its always the same, for a mesh with a subsurf-modifier setting “smooth” is nearly always necessary and mesh-faces with wrong normals (happens when doing some editing and dont take care about inner/outer side) will create “bad looking” … and for animation "bad bending, cause normal is flipped.
Damn. It looks like I’m gonna have to pretty much re-do the entire thing. I just tried reversing the parenting so that I could do the Bone Heat like you instructed, and, doing that, it just screwed up everything because it’d previously been designed the other way around.
Well, I can do this, though. So, yes, please do re-do the topography of the mesh. I’ll then re-do the armature by following the steps you just took. I believe that I’m then going to have to also re-do the animations, but that’s okay. It shouldn’t take TOO long and it’s kind of fun, too.
So can you use the mesh that you previously downloaded? (Also, any details of the changes you made are appreciated, so that I can learn.)
One other note, for others reading this thread: one small change that also seemed to help was re-calculating all the face normals outside. (Ctrl + N) Some of them were apparently backwards.
Funnily, I had just noticed the problem with the Normals, too! (Mentioned in my last post.)
Rather than doing anything with a Tool Shelf, I instead just did the Ctrl + N to recalculate the Normals outside. This should have had the same effect, right?
The topology isn’t perfect, but it should get you a slightly better idea of what direction to head. I left your original mesh on layer 1 for comparision.
no, not at all. I said to set SMOOTH is necessary for objects with subsurf. There is a big difference between the same object in FLAT or SMOOTH with an subsurf modifier.
Next, (not in this case) sometimes the re-calculation of normals fails, then you have to check manually the normal-directions (those can be enabled in 3d-view options to check the normals visual).
If I go File -> Append or Link -> the file, then I’m just importing the Mesh and Armature, but not the animation. Can you tell me how to import the Mesh, Armature, and also the animation?
I did go to Smooth, although in a different way than you’re describing.
(I have Blender 2.49.) In Edit Mode, I then hit W and then went to “Set Smooth” before I applied the Subsurf. (And, as noted before, I later recalculated the Normals outside with Ctrl + N.) I believe that this is the same effect as you were describing, but through a different process.
That looks a hundred times better! How did you do that? The mesh looks totally different - there are hardly any vertices on it. (And I see that you built it from scratch, too!)
In case any fellow novices were wondering about this, I imported the motion as well as the objects by, separately, importing the “Pose” from the list as well as the specific objects (the Armature and Mesh).