Ok, I’ve generally been a modeller of hard objects, things which don’t deform. Now I need to model the seatblelts in a vehicle. I’m doing the modelling of the geometry in another program and importing to blender via obj*. Could I please have some advice for once I get the obj files into blender, how do I make the seatbelt objects deform in the way that human figure models do. I know a little about rigging and skinning of meshes, how would this be done in this context? Would I have to somehow make a chain of little armatures whch the belt mesh could be parented to? Could this be done so one only needs to move the end armature to make the belt bend. Crucially with this being a belt as opposed to a rope or cable it has a flat cross section and although it will bend in that way it shouldn’t twist to much, will this be difficult to do?
Tutorials, including those about rope/chain/cable, would be helpful, preferably text and image step by step tutorials rather than video ones.
*this means that upon import the geometry will be triangle geometry not quads. Any problem there?
Sorry to ask again but does anyone have any further tips on this. I can tell that the methods I will need are similar to the methods used in the two models below, but I can’t work out how they were made, that is how their rigging was made, their geometry is fantastic but how it was made isn’t of relevance to this question.
The things I need to rig, the seatbelts, I have already modelled as geometry in their “closed position”, so I’ve got their shape and bendedness already made, what I need is to some how parent their curved geometry onto some sort of curve object or chain of armatures and get the geometry to flex when the armatures/curve are moved. And I’ll need to make sure that the skinning is done in the right sort of way that the belts bend like flexible material objects rather than just bending sharply at the edges between one triangle/quad and another. I could then for example pull them into their straight or loose hanging positions.
Thanks
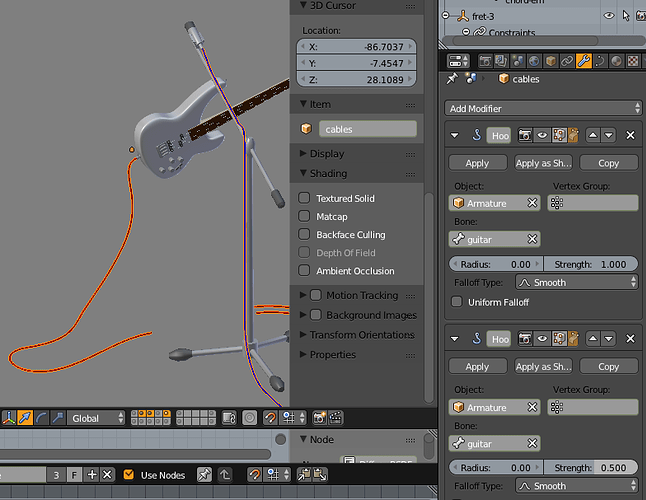
Curve Objects are the way to go. I have a text/image tutorial on my website - clockmender.uk - just look in the Blender Tutorials menu option and find the Cord Systems set - there are four pages. Then to animate them the way you describe, you need to put Hook Modifiers at the vertex points and then you change the modifiers influence to affect the amount of “bend” caused by moving one vertex of the curve. I used this approach for a guitar lead that needs to follow the movements of the guitar in an animation in a realistic fashion. The manual is great for this, but I had to experiment quite a lot to get what I wanted. BTW you really should model with Quads in Blender - there are tools to convert Tris to Quads.
“Blender Tutorials menu option” Sorry, where is that? Is this a website you are talking about, a section of this forum or something else? Oh sorry, it’s your website you’re talking about, my apologies for not realising.
Those tuts tell you how to model the objects, you need to add hook modifiers to the curve in order to animate it, as I said before. That’s not in the tutorial yet - part of my very long Todo list! :eek:
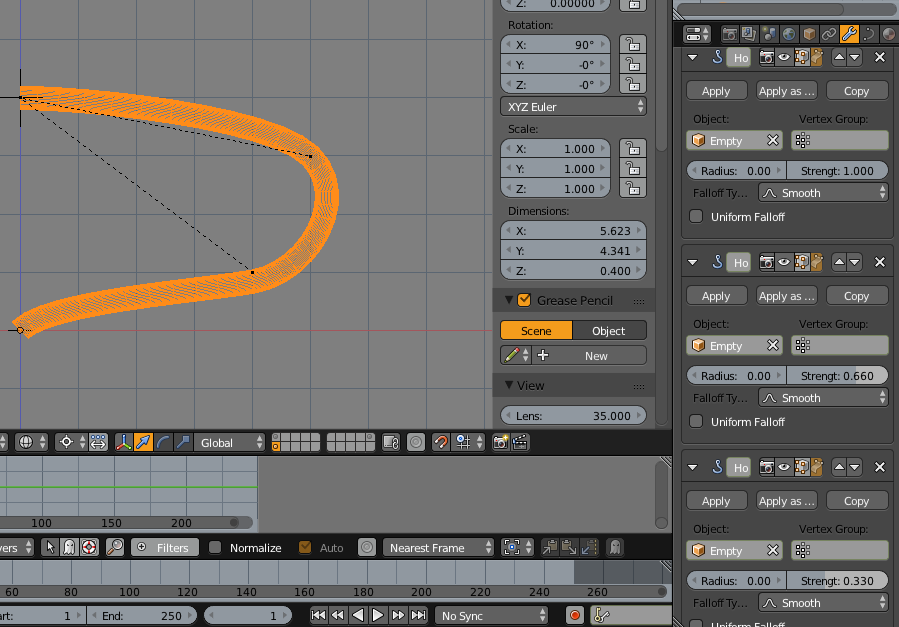
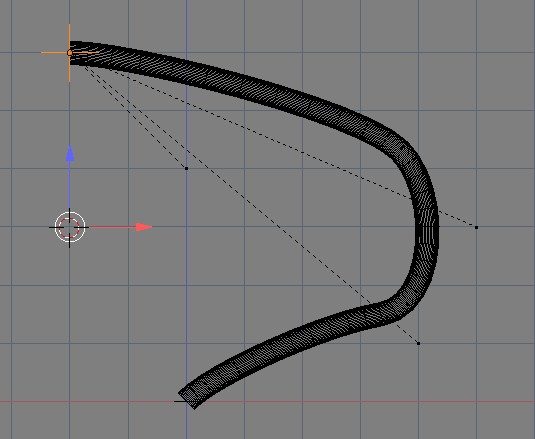
You can see a curve and an empty at the top of the curve - the curve has a “Bevel” object as in my rope tuts. It also has three Hook Modifiers. Each hook modifier is assigned to a vertex (the black dotted lines show where) The procedure is:
Construct the curve for your object, add as many Hook Modifiers as you need to animate the curve. I then added a Bevel Object, which must also be a curve, I used a Bezier circle, to get the overall shape. For a belt profile I would use a rectangular “plane” object and then convert it to a curve using ALT+C => “Curve from Mesh”.
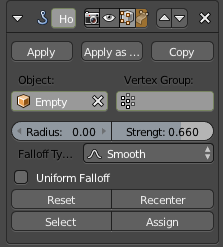
Add an empty, or bone or other object as the operator, I placed this on the end vertex of the curve.
In EDIT mode assign this Target object to each Hook modifier.
This is what the hook mod looks like in EDIT mode:
For EACH Hook Modifier - select the vertex you want it to work on and click the Assign button on the modifier.
Set the “Strength” value, I set 1 for the end Hook Mod, then 0.66 for the next then 0.33 for the next. This way the movement is less the further the affected vertex is away from the Target Object.
Move the Target object - see below:
Note the dotted black lines showing where the Hooks are in the rest position. I have just moved the Target empty up and to the left a little.
If you are making a retractable seat belt, like Inertia ones in cars, you will need to use the principles in my tuts to extend the belt out of the belt reel or hole in the car’s inner panels. That’s why I pointed you towards those tuts - particularly the rope tricks and snakes bits. These tell you how to extend the profile of the belt along a curve track. Animating the “movement” of the curve has to be done with Hook modifiers as I have outlined above.
Hopefully this will get you sorted, just ask again if you are still stuck.
Cheers, Clock.
PS. You can of course have many Target objects working on different parts of the curve, try a simple setup and then make it more complex. The Target object can also be used to extend the profile along the curve as well as reshaping the curve, that’s really the final stage for you to get to.
Sorry, for clarification, this isn’t a retractable seat belt I’, modelling, it’s more like a 6 point harness ( https://upload.wikimedia.org/wikipedia/commons/a/a3/Bucket_seat_with_Schroth_six-point_harness_in_a_2010_Porsche_997_GT3_RS_3.8.jpg )where each strand attaches to an attachment point. Effectively each strand of it should be flexible so I can animate it being released or closed by the person in the seat. Thanks for your tutorial in your post about how to use the hook modifiers, but just to check, will this work for an already modelled piece of geometry, or would I have to make the belts again using the sort of techniques you describe in the tuts on your website where the ropes are made initially following the curve? At present my belts are simple mesh objects (imported from obj because I did the modelling in another program) fully shaped to be in their positions as would be expected when someone is in the seat. Will I need to replace them with belts made by taking the cross section shape and putting it along the path of the belt, or can hook modifiers work on any piece of mesh geometry?
It will be quicker to remake them in Blender, they must be curve objects for this system to work, I don’t know of any other way to do this. Perhaps others will know better. You could try converting them to curve objects - use a backup of your blend file in case it all goes wrong - by selecting them and then keying ALT+C => “Curve from mesh”. You should then be able to add the hook modifiers, but you will not get a curve with a bevel object, so I am unsure as to whether this approach will yield the result you want.
I don’t have time today to check this, maybe I can look at it another day, if you can post the blend file, or one with just a belt in it, here or in pasteall.org/blends for me to investigate.
Ok, I’ve remade the belt straps in a straight configuration rather than bent round to fit as they will when holding a character in my seat. I’ve added in a simple chain of bones (one bone then subdivide and tweak postions where needed) armature in a line for each belt, parented the belt to the bones “with automatic weights”. Then did some fiddling around with weight paint to make sure the weights are ok. I then turned on the “auto IK” tick box in the ight hand panel within the 3d viewer when in pose mode for the armature, it works pretty well, I can poston the end of the belt where I want it, but I don’t have much control of the exact way the rest of the belt between mount point and free end is twisted. Is there any way I can set it up so I can move a point in the middle of the belt (I think the word for this is a “pole” bone) to change how the belt is bent between one and the other, while leaving it’s ends in place?
Thanks
Don’t use Auto-IK, make a permanent IK chain of the required bone length then you can use Pole Targets to shape the bend characteristics of the chain. As I said before I would do this with curves and hooks…
Depends on how complicated the scene is (i.e. how many collisions with other objects) and how dense the cloth mesh is. But for just seat belts it shouldn’t be a problem.


