Rigging Tricks

Vertex weight proximity modifier sets a vertex group’s weights according to distance from an object, with the usual falloff presets Blender has all across. It’s the simple-minded brother of Houdini’s VOPs… I’ve been using it to control displacement or warp strength, the only downside is that it affects disconnected surfaces as well. We don’t have a “grow/shrink vertex group” modifier unfortunately.

I’ve been lobbying for that “UV to world space coordinates” thing for some time, I guess maybe I should take the time to learn C and write it myself. :grin:

@bandages your technique to limit rotation is such a clever idea, thanks for sharing. I’ll try to think of stuff to share as well if I find it’s worth it. Your other technique to “touch the floor” solves an actual problem I had several months ago rigging dampeners. I eventually found a workaround - but this is a smart contraption you made ! Yeah I would dig rigging nodes as well, collapsing them in groups for re-use.

seeing that proportional editing has an option for connected only I’d think that option could be added anywhere were falloff is used. (I don’t know much about the Blender core though, it might not be the case)

Seeing how well vert groups and shape keys are maintained when changing topology it really makes me think about the possibilities. Can’t wait for a node based system for certain things.

The problem may be that way more people are using Blender for modeling than anything else, and most don’t see the value in it. Lets hope some coder is getting intrigued by it at some point.

Until then I wanted to try using the uvshape script to flatten to uv space, and use that as a driver of the target mesh. Should work, it’s not the same though -

That would be great but proportional editing creates a gradient from a start selection, which restricts it to a certain surface already - vertex weight proximity doesn’t have that, it starts from scratch and affects every vertex in the vicinity. Ideally there should be a way to affect just one vertex and then (through another modifier or the same one), expand the ‘selection’ along the surface just like proportional editing does.

I think you’re partly right, it comes down to what people use the most. I have high hopes for ‘animation 2020’ and developers like Germano or Alexander who have already done wonders relating to rigs and precision modeling.

(dynamically) transferring shapekeys from one mesh to another would be great as well. This would alleviate the “proxy mesh” workaround.

Thanks. I’ve written tuts, but I’ve always been on the academic, ivory tower side of things-- “intersection of plane and sphere” as opposed to “different kind of floor!”-- and it turns most users off. I write some tuts when I feel like it, but I wrote more when I was starting (and some of it is kind of embarrassing, because of course I got some things wrong), because I think it’s easiest to write about what I just learned. And now, what I’m learning just isn’t very interesting to the majority of peeps I see, who are more in the stage of, “How do I export my Cycles mat to Unity? Why does this boolean edge look so bad?”

So there’s like one or two people who are interested in what I know. And they know they can write me if they have issues. In the meantime, every answer here, on Reddit, on StackExchange is kind of a little tutorial. (And I hate videos anyways, I’m so grateful every time I find some text that describes something I need to know, something I can read in thirty seconds, or maybe spend thirty seconds on just one difficult sentence, instead of sitting or scrubbing through 15 minutes of “Please hit the thumbs up button!”)

Eevee might help. When people don’t need a week to render a music video for their favorite artist, they’re more likely to start animating.

But I’m not sure that’s the entire problem. Animation, after all, is just modelling over time; animation tools like UV deforms are also modelling tools.

What I’ve noticed in my experience on that Blender suggestion site (forget its name) is that the largest group of people are focused on small things to streamline exporting to Unity and Unreal. I think that’s a huge part of the Blender base.

People are not trying to make Gollum, because making Gollum requires a hell of a lot of talent and experience, enough that if you had it, you’d be working the business and use Maya. It’s kind of a chicken-and-egg problem. Nobody’s using Blender to make Gollum, so nobody much cares about Blender providing the tools you’d need to make Gollum.

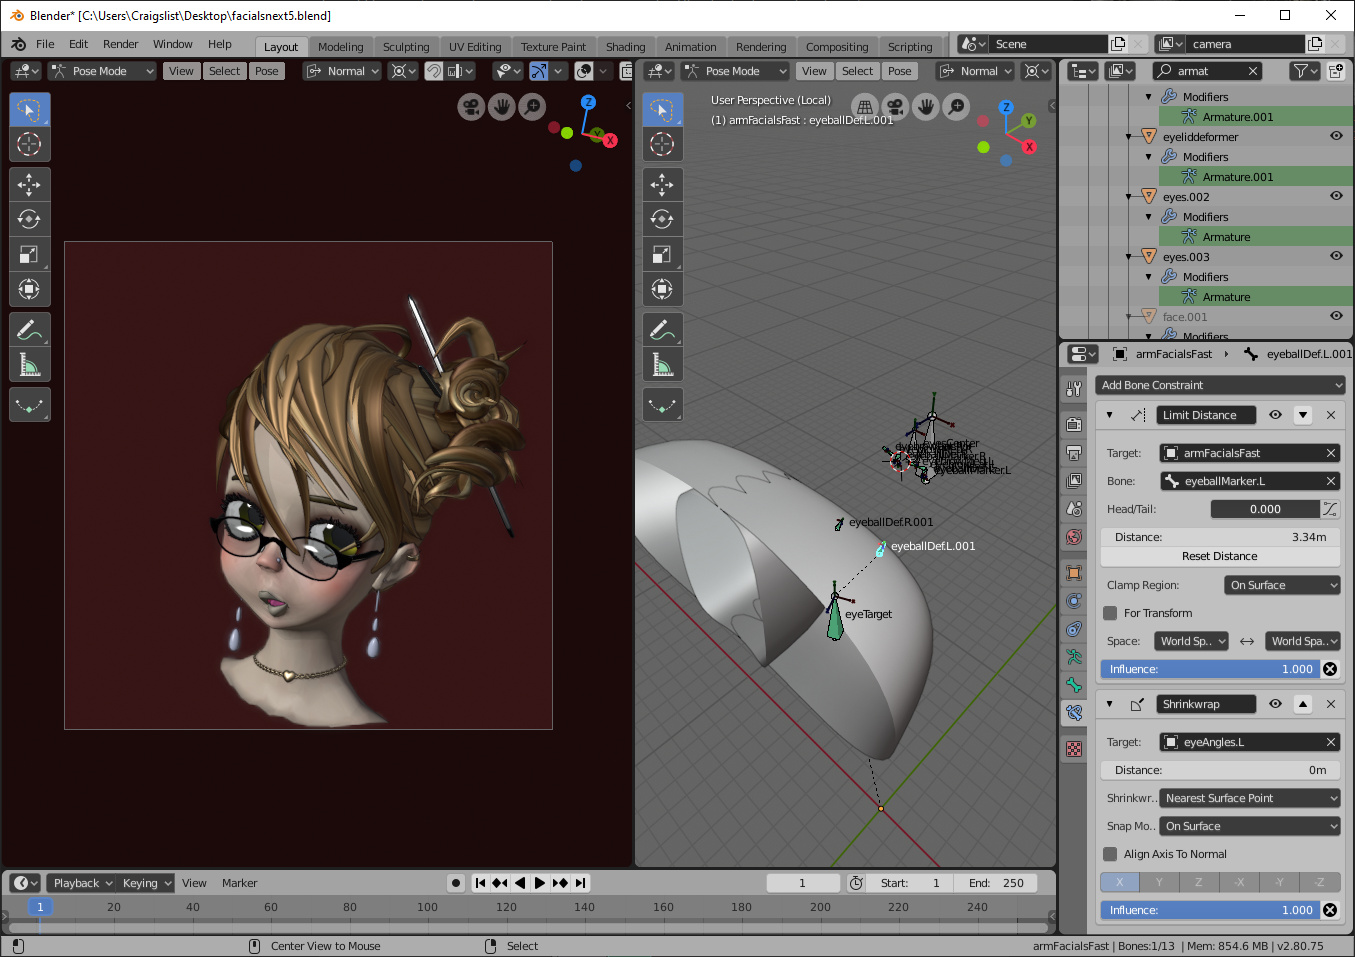
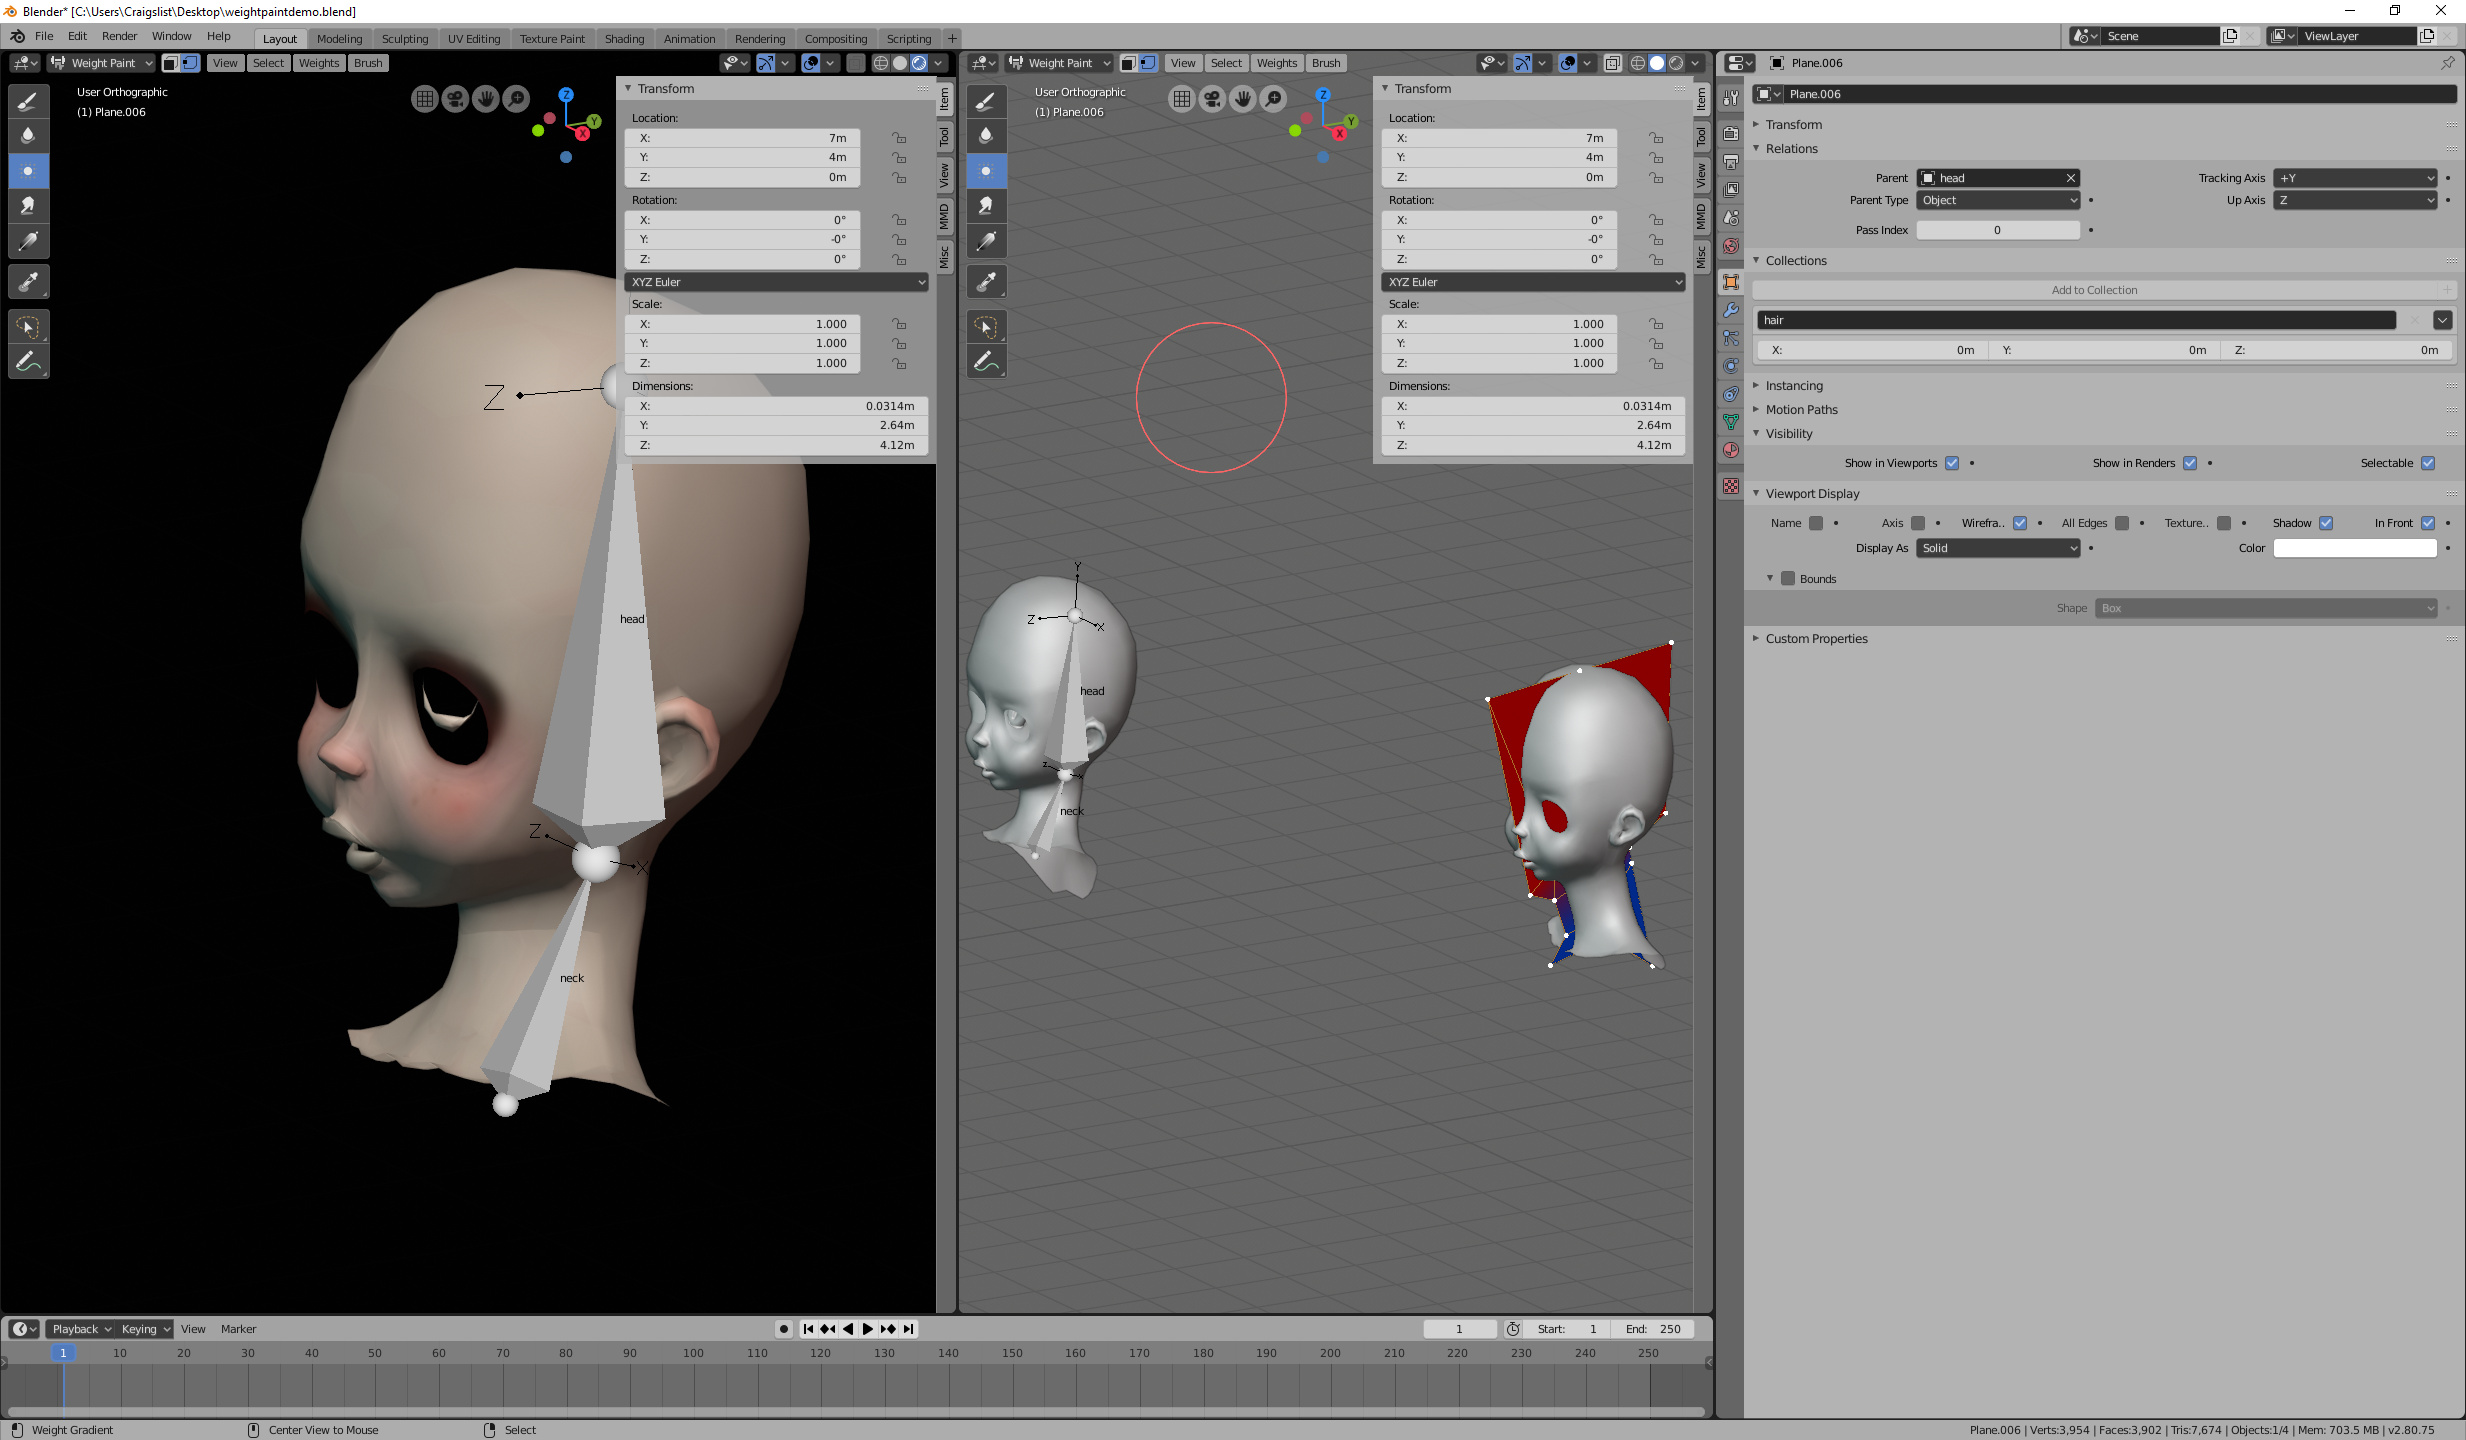
I think the ideal rigging nodes setup would have skinning nodes as well-- non-destructive access to weight paint tools, with parameters set from inputs like transforms and ray lengths and vectors, and of course, options to bake to fast, precalculated groups.

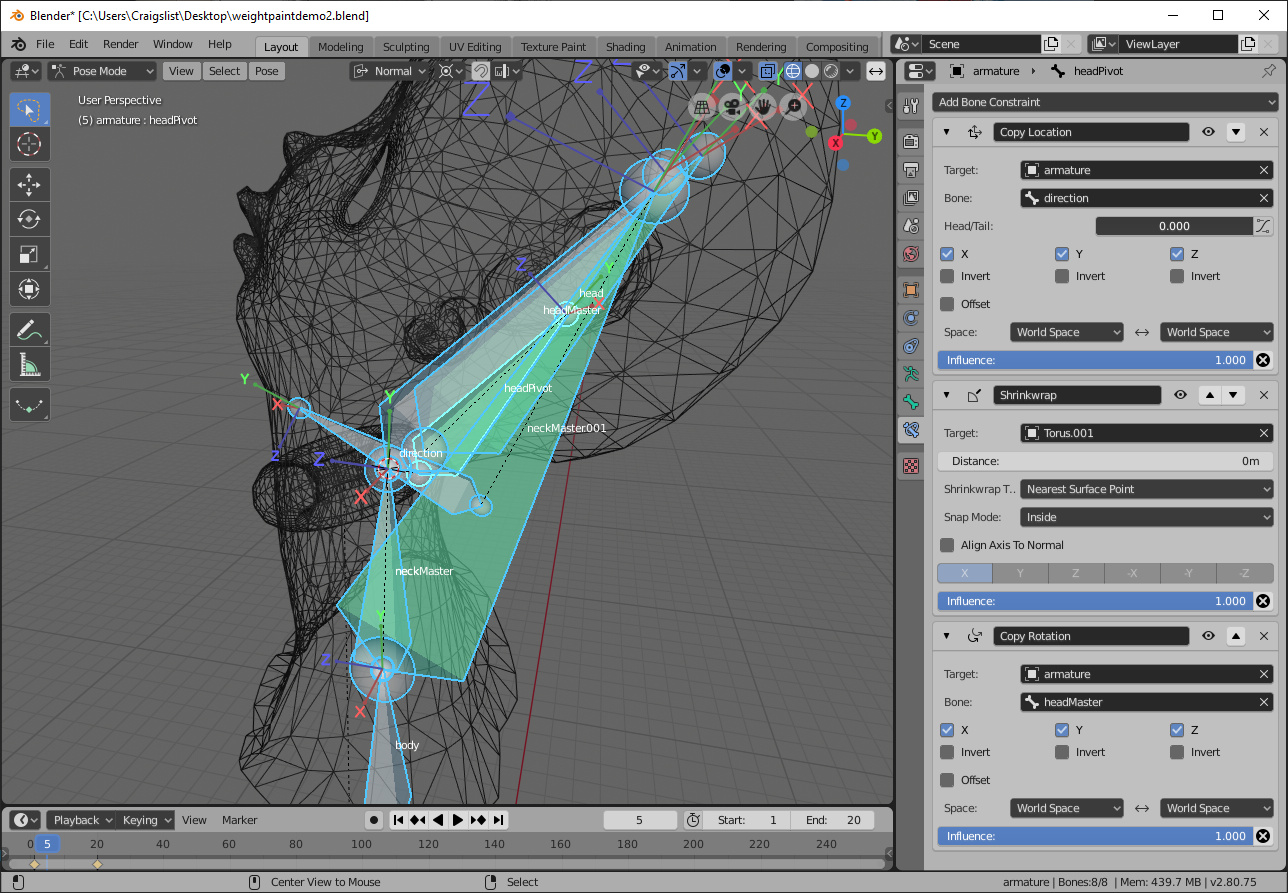
The main issue with all the proxies is just that it all contributes to the complexity ceiling. There are some things I make that are cool, but that are just too complicated to contemplate actually implementing. And all the complexity in a scene kind of adds up. (That’s part of what makes node structures good: you can modularize them arbitrarily in order to control that complexity.)

That’s essentially a UI issue. In my opinion, the bulk of it could be solved by modifier “references”, which create an invisible proxy at an arbitrary point in the modifier stack to be used as a reference by other modifiers or even future modifiers on the same object.

There really ought to be a structure for “handles” as well-- something that, selected and transformed in object or pose, is only pretending to be selected and transformed, but which is actually selecting and transforming something else-- something upon which the apparent selection depends. This takes care of a huge fraction of dependency issues. (Something like a no-falloff hook, located at origin, being controlled by a vertex parented empty. For example.)

I think for most people it’s just the matter of seeing nice practical examples. I completely get what you mean though, after a while I found myself more interested in seeing just a graph of a function or a minimalist description of a setup instead of listening to 20 minutes of which I’d only need 30 seconds of to solve my issue. It wasn’t always like that though, I’d never have even stared getting interested in the whole subject if it wasn’t for a really old cgtoolkit rigging tutorial which as I remember it had high production value. That’s why I’d find it interesting to see more complicated things put in a production context, dissecting and re-creating (possibly improving) a mindbender rig for example. (I know it’s time consuming but it’d appeal to a much wider audience) Don’t get me wrong, I find what I see here more to the point and I’d prefer it to watching an hour long tutorial.

That’s how I got into using Blender. Had a client asking for 4-6*60 frame 1080p character turntables every day, with some expectations regarding the presentation quality - no way I could’ve done it with Arnold, even with 1-2 minute frames.

Rightclickselect I think gives a very distorted impression in regards of the wishes of a hobbyist community vs the requirements of actual production companies. That’s the main issue I think, most professionals are seeing a lack of functionality or a slightly convoluted way of achieving what they want and they disregard Blender for another year or all together, not bothering to give any feedback or voice their opinions.

That’s true - you have a handful of professionals using Blender but pipelines can be very rigid for certain departments. I have quite a few colleagues asking about Blender though recently, I really hope the trend will pick up. A lot of production houses didn’t use houdini 5-6 years ago and now it became pretty much standard.

That’s were my lack of Blender knowledge would need some work - the way I imagined it is that the proximity getting converted into a selection at one point, which could be expanded with a connected checkbox in the vertex weight edit modifier for example. Need to do more reading on the subject, I feel like I’m missing a lot of possibilities.

The way we do it usually with different topologies is to either match the source mesh to the target mesh and apply it as a corrective shape key, surface deform it and export all shape keys, or better yet, use the equivalent of hook deformers to match the forms, that way you wouldn’t mess up your deltas. I saw an addon for transfering shape keys across meshes, still have to take a look how that one works. Batch import and export in Blender is less than user friendly at the moment, especially when it comes to shape keys.

You may be referring to @lucky 's addon…? it uses surfacedeform if I remember correctly.
However what I meant was to transfer using the same methods (nearest vertex, nearest face interpolated, etc.) that the data transfer operator/modifier has. Not sure why this isn’t possible at the moment.

That’s exactly how I think it should work…

Agreed, and to be honest it’s hard to draw the line where that context would end and the - say, modeling context would start - you might want your alien octopus rig to be able to extrude a tentacle at some point, so unless the bridge between those contexts is sleek enough… anyway that’s a ux problem like you say.

Aren’t you essentially describing a node tree ? if your object has a simple deform and a couple of other modifiers on it, but you want to use it for some simulation as it is before the other two modifiers - well just pipe the simple deform node to the sim node and leave subsequent nodes alone to do their thing.

This one I don’t understand. Do you have a practical example in mind ? Does this concept exist in other software ?

It’s this one, seems like surfacedeform as well -

I agree though, again something where UV based vert transfer would come in handy (combined with a proxy-mesh hook transform rig to keep deltas in-tact)

For nearly the worst-case-scenario modifier node system, it’s the same thing. Probably easier to implement than the nodes.

For the best-case modifier node system, with vector maths and inputs to make those meaningful, a modifier node system would be better. But, then the nodes are even more work for devs to implement.

I thought the hook-handles was a good practical example. But there’s no shortage. Think about a handle-controlled spline IK spine that includes the neck. Where does your clavicle connect? To control both the spine and the clavicle, you need two control systems to avoid dependency issues (armature->curve->armature.) But what if there was an upper body bone that only pretended to be selectable, and instead selected a curve hook in a different object or armature? This upper body bone could be dependent on the curve hook, but since selecting and transforming it would only select and transform the curve hook, not the upper body bone dependent on that curve hook, there would be no dependency problem-- you could control both the hook and the armature, including the clavicle and UB bones, from the exact same armature, because it re-interpreted your selections and transforms.

Sorry, I don’t know other software. I really don’t know. It’s an idea intended as a solution to Blender problems. I do tend to like Blender (2.79) UI. I keep hitting ‘x’ on my desktop to delete files, and it doesn’t do anything, because Bill Gates hates humanity I guess.

There might be a better solution to dependency issues like this. The obvious one, in the example I just gave, is to separate out armatures into bones for dependencies, but I think the hook example I gave earlier, based on dan2’s problem, shows how the handle structure is more general purpose. (You need a lot of examples to show general purpose.) There’s still nothing wrong with separating out bones if you add “handles”, but it stops being as important. A lot of the time that people have dependency problems, they don’t have a real dependency problem, they just want the UI to trick them like that. And that’s not as unreasonable as it sounds-- rigging is, in a lot of ways, about UI design. Maybe even in every way, depending on how philosophical you want to get. (IDear animator, I wanted to leave you ultimate freedom, so I made you a move bone for every vertex. Have fun! See you next year!)

Really, what you want is for your controls to be at some particular location, because they’re easier to understand there; you want g x x in local/normal to move in some particular axis, because it happens to be a particularly nice axis in which to move that thing. Those things don’t create “real” dependency issues, the sort of things that can’t be resolved without logical contradiction, but they create issues for Blender.

Alright I see. Well the dependency problems are supposedly gone now, so hopefully we won’t need that kind of workaround. I see how ‘modifier references’ would help but it seems like shy steps in the direction of a node system, bringing only a few of its advantages.

Have you guys read this post by Aligorith (Joshua Leung) ?
https://aligorith.blogspot.com/2018/04/future-of-animation-tools-some-wip.html#more

? Are you talking about bone-object-bone dependency problems? That’s great news. I’d heard that it wasn’t something Blender devs were interested in.

I hadn’t, thanks for sharing. Very interesting. Some interesting ideas in there.

Particularly, starting to move away from the animation-as-series-of-stills idea. Right now, for that, you either have physics or you have slow parents-- no room between, although there’s a lot of space to be explored between them. Adding some kind of pseudo-physical inertia would solve a whole lot of interpolation problems.

AFAIK the new dependency graph should solve all those dependency problems. Have you tried recent builds of blender 2.8 ?
Yes, Aligorith has great ideas, I hope he comes back to development soon - I haven’t seen contributions from him in a while. I particularly like the concept of multiframe editing applied to 3D animation… :o

Another person who has great perspective on animation, and who shares my opinion that animation should be simpler, more straightforward, more intuitive : Raf Anzovin (https://www.justtodosomethingbad.com/) his blog posts are fascinating. You’ll have to go back several posts to see him explain the concept of “ephemeral rig” - which is kind of a proxy rig, in a sense, on steroids.

1 Like

So now I need to make the decision between waiting till someone implements this in blender-land and makes a nice illustrated step by step guide for dummies like myself, or spend my evenings for the next couple of months trying (and possibly failing) to recreate this concept. Decisions, decisions :smiley:

It is amazing by the way, the approach makes so much sense.

I’m not sure how he managed to do it, since -as far as I understand- he somehow bypasses Maya’s depsgraph and builds his own. Not only that but if I understand correctly an ‘ephemeral’ rig is generated every time he selects a part of the character (can’t say ‘controller’ anymore!) and the underlying deforming system alone gets the keyframes. It’s really unknown territory for me - but I consider this kind of ambitious ‘rethinking’ something to aim for in future Blender versions. In any case, it’s not meant to be used with a graph editor (if you read that blog post, that’s the takeaway)…

– in fact, thinking about it just a tad more - Blender allows for autokeying custom sets of properties (keying sets) so it’s not at all impossible to have a control rig and a deform rig and have only the deform rig get the keyframes - the challenge is elsewhere : if the controllers themselves are not animated, then they must be placed where the deform rig components are, whenever the user clicks on an area of the character - if we keep the concept of ‘permanent’ controllers (so to say), as we have currently in any animation software, we introduce a dependency loop : the controllers follow the deform bones which in turn follow the controllers etc. => from where arises the need for the ephemeral rig…

I am also guilty of derailing this thread, and maybe we should ask to split it into ‘discussion’ and ‘tips and tricks’. Apologies @bandages. To make up for that, let me prepare a little something. :smile:

I really don’t mind topicality-- chatting with people about rigging is an enjoyable pursuit, and everything here has to do with rigging tricks anyways :slight_smile:

The ephemeral rig is definitely interesting (and, if I understand correctly, technically doable in Blender, although it would be a UI nightmare), but it seems to me that the problem is one of animator interaction with the rig.

The animator doesn’t just pose a bone. The animator sets various modes and establishes a custom hierarchy every keyframe (keyframes which seem to exist, at least with my understanding-- what’s missing is just interpolation between them.) It’s not something they necessarily want to have to do.

So think about it like this: you make an armature and set Blender up so that every time you change frames, it duplicates that armature, creates a copy of the modifier, mutes all armature modifiers but the one newly created. Use hidden layer “marker” bones to damped/locked track/stretch to locations specified by the previous frame’s armature to inherit your pose. That part will require a bit of scripting to persist correctly through hierarchy changes.

Now, how do you change mode? How do you change the direction of the hierarchy? Blender has strong tools to do so-- that’s what armature edit mode is.

When I think about it that way, I’m like, “I don’t want to make a whole new armature every frame…” True, there are some common edits, like reversing a chain, that Blender could make easier. But even so, there’s the question not just of, “How do I pose this model,” but of, “How do I tell this model how I want to pose it?”

It should be said that any UI epiphanies regarding that would apply just as well to the creation of non-ephemeral rigs as they would to ephemeral rigs. Have some cool technique that lets you set hierarchies from a dragged line? Might as well add it to the base armature edit tools too.

It’s already perfectly possible to make a different rig for every cut. That’s never seemed like a bad idea to me, although the professionals I’ve read haven’t recommended it. This is less proxy-on-steroids and more different-rig-for-every-cut on steroids.

It’s been a while. Last time I looked, bugs + UI turned me off. I’ve only been looking at the occasional 2.8 file to troubleshoot other people’s stuff. I’ll have to look again soon.

I was talking to some people who wrote maya plugins to create their own dependency graphs but since it wasn’t rig related I’m having a hard time translating the whole concept. Also, I have a somewhat solid understanding of how the DG/serial/paralel evaluation works but none what so ever of how things work in Blender (as of yet, anyhow)

The whole approach seems logical and he seems to be able to use it efficiently in production, the lack of interpolation would be definitely something to get used to though.

I was thinking of the same thing, would be interesting to see if that’d have big performance impacts and when/how data could be purged after the given interaction.

I finally got around to using 2.8. The dependency fixes are simply amazing.

This simplifies so many things: physics, spline IK, etc. But what I’m really interested is further exploration of mesh-based angle limits.

Once you get rid of the dependency problems that 2.79 had, mesh-based angle limits become super easy to set up and control. You end up with easy to create structures that aren’t just traditional angle limits on steroids, but also rotate-to floor constraints, clipping prevention structures, interpolation/remapping controls, perfect rocker bones (no need to define an arbitrary number of bones to percolate your rocker through).

The problem that remained was interpolation problems due to mesh resolution. If you track a bone shrinkwrapped to the surface of a low-resolution sphere, you can get jumpy interpolation as it travels over edges and faces. So I did a quick test to see what 2.8 shrinkwrap performance was like. Basically, it was impossible for me, after create a ton of bones, after creating a 6 million vert shrinkwrap target, to see any performance impact to the shrinkwrap. What this means is that it’s easy to just slap a subdivide on any shrinkwrap targets to take care of those interpolation problems.

Super exciting for me, this always struck me as a great tool if I could work around the dependency issues.

I’m working on a character with huge, anime eyes and they didn’t quite look right while tracking the camera. When they were looking laterally, they seemed to be looking too far laterally, but when they were looking across the nose, they were mostly okay. So I’m using two asymmetrical, linked meshes to both define angle limits and interpolation for the eyes:

Some of the constraints are a little confusing here, because I wanted to both shrinkwrap my trackers to a mesh and allow for the eyes to cross when the tracked object gets close.

The eyetarget parent bone copies location from the object we want to track, then copies world space rotation from the head, then locked tracks (locked Y) the head bone. The individual eyetarget bones first shrink to a particular sphere around the eye via a limit distance constraint, then shrinkwrap to the surface of non-rendering meshes that are parented to the head bone. Finally, the deforming eye bones damped track these eye targets.

The perimeter of the mesh defines the hard limits, but the depth of the mesh defines the interpolation. Where the mesh is furthest from the eye target, the eye target doesn’t want to shrink there-- it wants to shrink someplace closer. So by curving this mesh I can tune how the eye tracks in two dimensions, and do so continuously, without all the dangers of breaking angles up into Eulers.

I tried this with some different techniques-- project and target project-- but they had interpolation problems, skipping parts of the mesh. Shrinking to surface is working.

Shrinkwrap constraints don’t update in edit mode. So to tune the mesh, I gave it a temporary armature, then wrote the armature modifier.

1 Like

I wanted to show something else off. It’s a different way of weight painting.I think it has a lot of promise:

I’m not creating weights the normal way. Instead, I’m copying weights via nearest face interpolated from a plane with (mostly) full weights. (And then copying by topology to a model with an armature modifier for realtime visualization.)

Why? Because it lets me think about my weighting differently. Instead of using an airbrush, I’m defining a line where the neck should be fully weighted and a line where the head should be fully weighted. Then, after that, I made a few loop cuts so I could say where the 0.5 line is between them, and how the line is different on the side from on the front or back. Then I pose my model, and to tune the weights, I just move my weighting plane’s verts. (I can even move my verts in a shapekey if I want. I guess I could have crazily dynamic weights by doing this dynamically from shapekeys or, hell, modifiers, but I’ll just apply the weights when I’m done.)

There’s something worth noting about this, which is how it interacts with limited weight groups. Unity limits models to four groups, and Blender doesn’t have good tools to deal with that. (“Limit” is a terrible tool to fix problems related to this.) But if you start with a quad weighting mesh, with each vertex weighted to only a single group, you are guaranteed never to get more than four groups per vertex. You can even subdivide or loop cut after assigning, that’s fine, just don’t add more weights.

Can you do this in 3D? Yes, but it requires slightly different thinking. You want to start by defining a plane for each weight line. Then you bridge these planes-- but don’t get rid of the planes! You need that messed up topology for it to work. (In fact, every time you loop cut to create transitions, you need to face the cut.)

Anybody who’s reading this is probably familiar with rocker bones. The general technique that I’ve seen for these is to pass rotation through a series of children, each of which is floored to a plane. That’s great for getting, say, a cube to rock on a plane, but you have limited points of contact-- for each new point of contact, you need to insert a new bone, and it can get a little crazy.

Some character bones would actually do well with rocker bones. Our bones are physical objects, with width and volume, and our bodies resist compression, so this model of verts rotating around an origin is, of course, a simplification. But the traditional rocker bone doesn’t work very well for characters because the finite points-of-contact lead to poor interpolation when rotating through them.

I thought that I could make a universal rocker bone:

universalrocker

Some bones aren’t shown there. What I’m doing is controlling the overall rotation of my head with the headMaster bone, but I’m using a variable pivot point that’s shrinkwrap constrained (inside) a torus that’s parented to the neck.

I think the first question anybody might have would be, how do you make a variable pivot point. There is a pivot constraint, but I’ve heard it’s buggy, and I’ve never bothered using it.

Instead, you can create a variable pivot point by using an inverse copy location constraint, local->local, on your deforming bone, which is then parented to the variable pivot bone. Both bones need to be in the exact same orientation. So that anytime your variable pivot moves, your deforming bone exactly counteracts that movement, so stays in the same world space position. But anytime your variable pivot rotates, your deforming bone rotates about the current location of the variable pivot.

The next step is to tell the pivot point where to go. I get the direction of the bend of the head by stretching a bone from the base of the neck to the tail of the head (with a stretch to constraint). I stuck a bone in the middle for my variable pivot to copy location, just a nudge to get it in the right direction. Then I shrinkwrap it to a mesh that I have parented to the neck. However it moves, the head won’t move-- this is only for the way that it rotates. Finally, I copy rotation from my head control onto my variable pivot.

The mesh that the pivot shrinkwraps to is really what defines the behavior. If you want jerky behavior, just shrinkwrap it to something discontinuous! Since I shrinkwrap it something smooth and round, I get smooth interpolation. You can adjust the mesh in various axes. If you want to shrinkwrap to a line instead of a mesh, it’s possible: if you make a capless cylinder and then edge slide one loop all the way to the other, it will shrinkwrap to that line. (Doesn’t work with volumes though.)

Note that the way that I have this, it rotates in all axes about my adjusted pivot. It doesn’t have to-- it is possible to design this so that twist occurs around the base of the skull instead. Just don’t use copy/limit rotation constraints for this (see Why your rotational constraints don't work ). Use damped/locked tracks to markers instead.