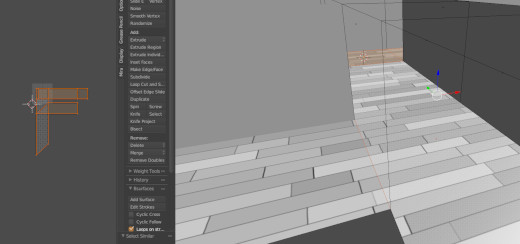
To make interiors texturing, I usually use the cube projection, it works pretty well and is fast, I love how I can unwrap separated meshes floors with cube projection and everything looks seamless as you can see in the image:
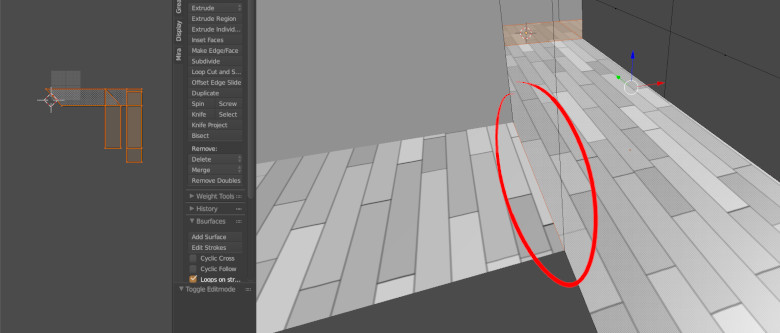
But sometimes, texture is not aligned as I would want, in this case, if I would rotate 90 degrees, could be easy, just go into edit mode, select all the faces and rotate them 90 degrees in the uv image editor. But now, I have another mesh that I should rotate the floor texture, if I do it, then the texture is not aligned and seamless:
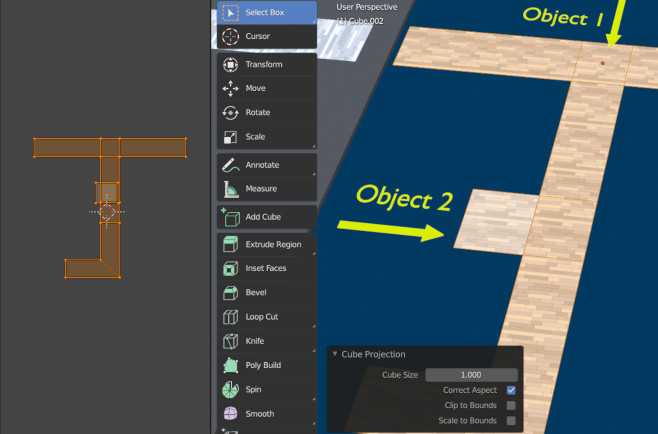
Yes, this works nice, but I have a problem with this method, every object I apply this material will have the exact same vector mapping, if I need “a 3rd object” with the same material but with a bigger vector mapping, I can’t modify it, If I do it, it will change on everything with the same material, so I should create another material with different sizes. This is not an option because I want to export this to Unity, so I need just one instance of a material and UV’s.
This sounds to me like whatever the solution should be, it has to be done by modifying the UV map. I’m not really familiar with Unity, but I assume UV coordinates are the only ones to be used there, no?
Okay, let me reiterate my understanding of the problem:
you have a tileable texture
after cube projection of your mesh, the UVs are discontinuous at some edges on the floor, but luckily they are aligned such that the texture is seamless
when you rotate the UV map, the texture is no longer aligned
If that is all correct, it means your texture image is not a square, right?
Does the texture need only to be applied seamlessly to the floor? Maybe instead of using texture space (generated coordinates), you could generate UVs such that these are continuous over the whole of the floor, getting rid of any alignment problems this way? For a plane (as the floor) this should always be possible. Mark the edges between the walls and the floor as seams and do a normal UV unwrap. Then you should have a continuous UV map.
Yes, correct, except for the “luckily”, cube projection always position uvs in a manner that seamless textures are always seamless, that’s why I love to use cube projection on simple objects with seamless textures, because, I can have multiple objects but if I apply the cube projection, I don’t need to struggle moving, rotating or mirroring the uvs to match other objects, and its fast, just press U > select Cube projection, and done, everything is aligned like it was magic.
I think, the theory of cube projection, is simply that it projects the texture from the all 6 sides in orthographic mode right? So, if I could rotate the texture space cube that appears on the 3dView when I press SHIFT + T, I think this would get rid of this problem, but there is no way to do it, I tried to see if there is a menu where texture space positions, scales and rotations could be modified with sliders, but I can’t find it anywhere.
What you say is correct, but it only works if I only had one object, I could apply a seam to all floor borders and do a unique simple unwrap, but the model have to be splitted in parts and sometimes, floor parts are inside the same object but faces are not joined for performance reasons in gaming.
Unfortunately I cannot see from your images how the faces in the UV editor map to the ones in the 3D view. I’m still confused as to why rotating the UV map makes a difference concerning seamlessness. Is the texture only seamless in the direction along the planks? Or is the UV map discontinuous at the marked spot?
Sure, the left models are using nodes, without manual uvs, the right models are unwrapped with cube projection, as you can see, there is no seams, but if you rotate 90 degrees both objects UV’s, it will break the seamless effect.
I think the only way to do it is to rotate the “object 2” texture space, but its not possible, at least, don’t know how to do it. SHIFT+T only lets you move or scale it, not rotate it.
By the way, I’m using 2.79a, I tried with 2.8 beta and results are worse, cube projection don’t even unwrap seamlessly, even using the new multiobject edit mode, I hope it will be a bug that will be fixed on final version.
Oh, dont mind about the uvs forms, when I use cube unwrap, I use it for seamless textures, I dont care if islands are over the others, I create a second uv map for the lightmaps completely different than seamless textures.
Ah, now I got what’s going on. Missed the fact that it is multiple objects.
Okay, so what you can do is to rotate the local coordinate system of the objects. This works for both generated texture space and also for uv cube projection:
set z-rotation of your object to +90 deg (in the transform tab)
in the object menu, select apply -> rotation
set z-rotation of your object to -90 deg
Afterwards your mesh should appear in the exact same location as before. Generated coordinates will be affected instantly, for UVs, you have to do the cube projection again.
But say, stupid question, how did you do the combined unwrap of multiple objects in 2.79? I didn’t know that was possible.
Thanks, it worked, now textures are rotated 90 degrees and seamless between objects.
About 2.79, its not multi edit, its just cube projection, I apply cube projection one by one.
What is worrying me, is that cube projection in 2.8 and with multiedit tool does not match the seamless texture.
And I hope blender add the feature of rotating the texture space of every object, by now, seems it can only be moved (SHIFT+T) or scaled (SHIFT+T and then S).