Is there a way I can set UV for a non-square texture map?
For instance, the texture is 512 x 2048. I want to set it 512 x 512 and just slide the UV tile vertically?
I understand that a straight forward way would just be to separate the texture to 4 textures, but there are quite a lot of them.
So I was thinking of just “sliding UV” tile.
This is the uvmap for your object?
My best solution is that you do the unwarping again, but change the dimension when you export?
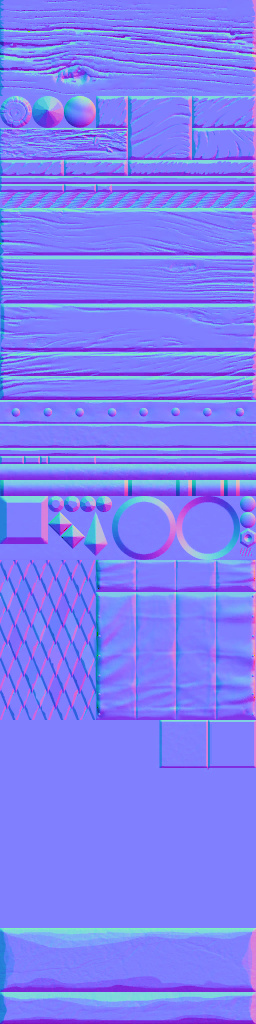
Another question: I this the ready texture image that you want to apply to your object?
Thanks for the response. No that is not the unwrap. The unwrap is a perfect square. The texture map is not. Yes, this is the texture image I want to apply to my image. Only a portion of it (i.e. 512x512 square)
@mohamed_omer
The texture above is 1x4 or 4x1. Hence the 512 x 2048.
I just want to use the 512 x 512 without using photoshop and cutting them into 4 pieces.
Just "sliding UV tile. Itf that make sense.
@moonboots
Yes, that’s what I meant. The texture is from a game engine. So they probably saving texture space by merging textures into 1 rather than several files.
If it’s not possible to unwrap and keep the original proportion I think it’s a to-do for Blender. Anyway what you can do is rescaling the UV with S and X or Y.
Blender already does this… If you unwrap the object, while having an image texture node in the node editor selected (as we do for baking), the unwrap will take the proportionality of the texture in that node.
So basically, as I warp my head around it, the image texture node can be a portion of object’s mesh that has a different image texture than the rest of the mesh. Even though the object it self is set to have an image texture of it’s own.
Am I right?
No.
The Unwrap operator just takes into account the image proportions from the selected ImageTextureNode, only when it’s unwrapping. If there’s none selected, it uses the default 1:1 proportion.
After the unwrap, the texture node can be deleted. Although the UVmap will remain the same.
You can assign different materials to different faces of an object (or only one material to the all the faces). To set the material you need to go into the Shader Editor and play with nodes. To use images in your material you need to use the Image Texture node and load an image (jpg for example).
To use an image Blender needs to know where it is supposed to be place on the face(s), that’s why you need to unwrap (create UV map) at least for the face(s) where you need the image to be displayed.
You can create as many UV maps as needed. For example if you have a character with shirt and pants, you can separately unwrap the shirt and the pants, create 2 materials, one for the shirt and one for the pants, and use each UV map for each material, with 2 images: shirt and pants textures. Or you can create one unique material with one UV map and one image texture where there will be both the shirt and the pants image texture…
create the material for the object you want and plug in the normal map in desired proportions to correct input
now, when you UV unwrap the object with “correct proportions” checked, it will be ok don’t mess with Display/Aspect Ratio properties as they are irrelevant, leave them at default x=1, y=1
Ok I think I understand, you need to make sure that, in your Image Texture node, you’ve loaded the image on which you want the correct proportion to happen, and, when you unwrap, that the Correct Aspect option is enabled.