So, I’m working on this shark. I realize I have a long way to go.
To do list:
Gills (Haven’t a clue, any suggestions?)
Give the eyes pupils that can follow a subject. (Any ideas?)
Skinning the shark to look more real. (never been particularly good at this)
Have to make clothes for the shark; jacket shirt tie. (Done this before, but what’s the easiest way?)
Rigging the shark so his head looks forward at a 90 degree angle and his mouth can lip sync to words. (Did this a long time ago, but can’t remember how.)
Need to make lighting look like a real office space. (Would HDRI be best and easiest way?)
Here’s the basic model that I just made, following a tutorial that I modified a bit to fit the caricature type shark I’m going for.
I’ve attached the blend file as well.
Thanks, any help, whether it be in the form of advice, links to tutorials, or direct manipulation of the blend file is welcome.
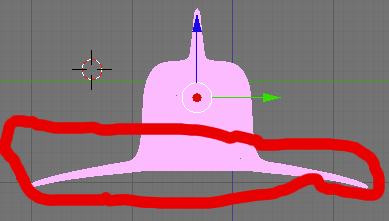
The head and the body should blend more and not be as separated
The tail should be a little bit shorter(the top part should only be slightly longer)
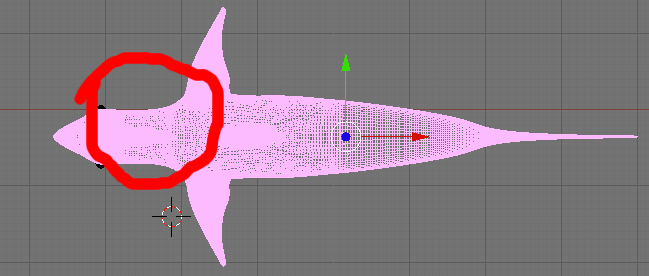
The fins need to be a quarter of the way up on the shark instead of below its body.
As far as the pupil issues go that can be fixed with rigging.
All of these are problems easily fixed with the sculpt tool. Other than that its doing pretty good.
I’m working on the eyes right now, but I was wondering which direction you wanted them to face. I think a sharks eyes face straight out to the side, but you could also have them face forward further.
First off, thanks! Looks like the Blender artists forums aren’t dead, and that’s a relief.
I’m not too worried about the lower body, because that will never be seen. The scene will only feature the upper body.
As far as the location of the fins, it’s supposed to be a great white and every representation I’ve seen of them shows them as nearly under-body protrusions. The shark character, Sharkey McShysteur, has to use these fins as arms. So, I think the placement is good.
Are there good pupil rigging and sculpting tool tutorials that are easy to follow?
Note: I really want to make this my first real attempt at using Blender 2.5 for some serious work, but the interface seems so foreign, so I’m using 2.49. I haven’t been able to find adequate tuts on the new interface yet. Is there a ref that shows the new methods side by side with the old to help people dive into 2.5?
Well this is just the character for an animation. When the character is finished it will arch it’s head toward it’s tail such that there will be a 90 degree bend, so he can be in a seated position at a desk, and look at customers who will be talking in front of him. His fins will act as arms. So, the eyes will have to track whoever he is talking to.
as for sculpting, you might wanna take a look at this videofor an introduction to the new 2.5 sculpt tools. I don’t know of any full fledged tutorials for 2.5 sculpting, but I do have a few tips for ya
-to set your model up for sculpting, be sure you’ve recalculated normals (ctrl N) and dont have any vertex doubles (W -> remove doubles). Add the multires modifier (get rid of subsurf) to your object and go into sculpt mode.
-it’s a good idea to sculpt at the lowest multires subdivision level at first, then work your way up. Instead of subdividing a whole bunch at first and sculpting with the highest subdivision level, try perfecting your current level before working with the next subdivision level. this helps prevent lumpyness by forcing you to use lower subdivision levels for larger changes, and higher subdivision levels for smaller changes
-focus on anatomy. Even if it is a charicature, a somewhat accurate muscular structure is a good thing to aim for
-I’d encourage you not to go up to a ridiculously high resolution just so you can sculpt in the skin irregularities (scales or whatever). While deail looks nice, this kind of stuff will usually distract from the more important anatomy sculpting. if you do plan on doing lots of little bumps or scales, a texture would really save on vert count and it makes it easier to adjust
I’ve created a rig for my shark, and I’m seeing some deformation issues. I want the shark body to build without pinching the mesh into unnatural positions.
What’s the easiest way to do this?
I’ve attached the rigged model in case anyone wants to see first hand what I’m seeing.
don’t think you need that much bones in the middle of the body
may be add a bone with some segmenst and it will do the job
same with the fin just add one bone but with some segments
it will be a lot easier to animate !
to see theses segments you need to use B bone display !
here is a sample file with some simpler rig with bones and segments
what do you think ?
to see segment go into pose mode and look at the bones in middle and for the fins
all with segments
so then the only thing left is to do the weight painting and define the vertex group i guess!
Figured out that if I wanted the Shark to be seated like a person, I should first modify the mesh to match that pose, and then build a rig to control it. Common sense, right?
Anyway, I’ve done that, and added some teeth. Problem is the armature doesn’t control the teeth at all, and it controls the eyes very poorly.
I’ve tried to fix using weight paint but if I go into weight paint mode, there’s nothing set, even though the armature is controlling the shark body reasonable well, and the eyes partially.
Does anyone have any insights? I’ve included my current version in case someone wants to look at what I’ve got so far.
go to your armature then edit t mode and look into the armature panel on the left and you’ll see that you have vertex group and bone enveloppe set at the same time
remove or unclik the enveloppe bone to keep only the vertex group
be back with more later on may be tomorrow sorry for the delay
so go into pose mode selet a bone then select the mesh and look in panel for list of vertex group
you cna then select or deselect to see the vretex assocaited with that bone
or after selecting the mesh to into paint mode and you’;; the vertex for this bone
I have been working on other stuff and forgot about this, but here’s the eyes. Basically, I UV mapped the image to the eyes and set the eyes to follow the empty. You will probably have to change the location of the UV image on your computer, though. If the eyes arent at the right angle, go into edit mode and rotate it along the z axis. The vertice at the front is the center of the pupil.


